MartinSivertsen
Hunter
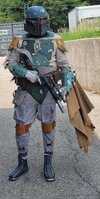
Thanks for the feedback!Coming along super nice! I definitely agree there's some brown in the misting but I wouldn't worry about the weathering misting until the very end, the helmet will continue to shift as you add the mandibles, cheeks and the rest of the damage. It really plays tricks on your eyes until it all comes together. I've only done one helmet (and not nearly as nice as yours so far!) but I was second guessing colors all the way to the end.
And what you don't like digging through ancient forum posts? That's half the fun!
I'm getting an ESB/RoTJ SE helmet (and armor) from Minutefett next week (it cleared customs in my country today!), so I'm both considering this paint job on the BM helmet a learning experience to prepare for the MF helmet, but I also want to do my best while I'm at it. It's a very tricky paint job to replicate, and I can't wait to get to the end to do some weathering and see how it comes together!
I love reading through old threads and digging up nuggets of knowledge! The fact that everything is neatly archived for posterity is just great. I've spent countless hours so far, and will no doubt spend many more.
 , but yeah, I used SP Armour Yellow as a base coat and then added a touch of SP Scarlet to the Armour Yellow for the back part of the kill stripes. I found out that I needed a lot less Scarlet than I thought. I first went 50/50 and that was way too red, so I added a lot of Armour Yellow and went a bit back and forth until I was happy with the gradient.