AustroFett's Right Bracer/Gauntlet Build (v2, 2018)

AustroFett

New Hunter
This is my first post, so to start: Hi to all of you!

2016: By using too little hardening agent on the resin/putty mix for my first right gauntlet mold, after a few months - along with the stench - ugly cracks and wrinkles began to appear:
cracks_S.jpg
wrinkle_S.jpg


Late 2017: Along with some other problems with the model, being a perfectionist led me to the conclusion that I had to do a new, perfect one!
  • I started with 1mm and 0.5mm polystyrene (PS) sheets (thanks to my local art supplies shop for their great selection and for being cheaper than Amazon!) and WizardOfFlight's gauntlet blueprints, printed out on adhesive full-page A4 labels.
  • Cutting was done with a generic X-Acto knive, gluing with cyanoacrylate (a.k.a. super glue) and n-Butyl acetate (Revell Contacta Professional, which works great with PS if you have the patience).
  • Then, I reinforced the structure with polyester resin, glass fibre fabric and putty on the inside.
  • The polystyrene surface was pretty even so only "little" work had to be done on the outside. Plastic putty, rattle can filler, sanding, some more filler, more sanding, primer, paint coat, sanding,... (rinse and repeat) until everything met my ludicrously high standards.
  • Drilling holes, cutting threads, hiding magnets, adding hinges.
Those few lines of text are actually many evenings and weekends at my dad's garage and basement. Lazy me took no pictures of the process though... This was the outcome, the upper half with plain silver and clearcoat paint, with no accessories yet:

PRE0_S.jpg

  • By using short bursts of chrome effect spray from a great distance I added some shiny speckles, which will become matte when sanded/polished.
  • Along with Revell Aqua Color "Rust", quite dry, applied with a little sponge or sanding fleece (at least that's what it's called in German - I used 3M Scotch Brite pads) this created a more realistic "dirty" iron/steel metallic effect. Even though little of that effect is visible in the end I think it really looks great and I might incorporate it in a Mandalorian Merc build in the (far) future.
PRE1_S.jpg
PRE2_S.jpg
PRE3_S.jpg


There's more to come soon!


PS: If you have any questions, feel free to ask. I'd be glad to help and give informations. However, with English not being my first language, translating tools and building processes can be quite complicated (especially if you don't even know the proper German word for e.g. "that nut/screw cutting thingy")...

EDITS: Still figuring out how to make thumbnails links to Postimage, worked fine in the preview, but on the final post, URL and IMG tags were replaced by ATTACHs...
 
Last edited:
- Thanks, Geekdad!

Part 2: Painting/Lower half

After silver and clearcoat (and metal effect mentioned before), I used:
  • Masking fluid (Winsor&Newton), applied with a small brush or toothpick to mask the spots that should stay silver.
  • Revell Aqua Color "Gunship Grey" for grey base, applied with airbrush. Once dried, rubbing off masking fluid. Outcome:
20171230_150804.jpg

  • Yet again, use masking fluid on all spots that should stay silver or grey.
  • I mixed my own custom Boba Fett green, consinsting of (all Revell Aqua Color):
    • Sea Green (bluish green, shake well as blue and green parts tend to seperate)
    • Gunship grey (to reduce color saturation)
    • Yellow (to reduce the blue tone and lighten up color)
    • White (I should have done that to make the color lighter, however, mixing and matching colors is incredibly hard. Colors may look completely differently, depending on whether they are wet, dry, viewed under natural or artificial light sources, with/without gloss clearcoat... Especially as green ist the color the human eye can distinguish the most shades!)
  • Actually I mixed in white for a seperate layer beneath main green layer for a weathered effect.
  • Black (diluted with water) for several burn marks.
  • Rattle can clearcoat for finish and protection. Sanded with 3M Scotch Brite until matte again. Revell Matte Clearcoat as I tried to lighten up the color (it gives a milky/opaque finish).
Outcome:
L+45 (2)_S.jpg
L+135 (3)_S.jpg
L-135_S.jpg
 
Part 3: Painting/Upper half & accessories

Painting the upper half was the same as the lower half. Creating the accessories was more varied and time consuming...

Whipcord housing:
  • Same technique as gauntlet: 1mm polystyrene (PS) parts glued together, filled up with polyester resin/putty mix.
  • Drilled holes and glued 4mm nuts into them (to attach the housing to the gauntlet with 4mm screws/bolts). Filled up with putty for better stability.
  • Drilled holes to hold the red/silver rotary switches. I have no idea how to translate this, so there's a link to what I used: Steckachse Schwarz Piher 5272, a part of a rotary potentiometer.
  • 10mm aluminium tube which I halved for the round part.
  • Then painted black everything (rattlecan), cut the white parts out of PS, rounded down the edges, applied grey base coat, smoothed and painted white. Suped glued them to the now black housing.
F+135D2_S.jpg


Top accessories:
  • Flip switches (I know that the original weren't flip switches, but they're hard to get here and/or really expensive...)
  • Black oval thingy: 10mm aluminium tube, squeezed into an oval in a bench vise, filled with putty, small hole on one side, 6mm hole on the other (to hold the laser diode).
  • Black top thingy: PS, filled, sanded, painted.
F+135D_S.jpg


Gauntlet darts:
Paid a visit to a local metal store to get:
  • 4mm aluminium rod (for the tips)
  • 2mm steel rod (for the thin part)
  • 4mm brass tube with 2mm hole (for the base)
  • The tips were the hardest parts: lathed in a box column drill with files and a hacksaw*. Trying to drill a centered 2mm hole into them to hold the steel rod.
  • Due to the fact that the base was made out of brass, I had to paint them silver (airbrush). Not 100% satisfied with it, though.
* Translating this was pretty hard, don't know if that makes sense...

DET0_S.jpg


Side button:
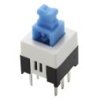
  • Somewhere I found a locking push switch (I always dissasemble broken electric devises to keep the parts if I need them), something like this:
pruxoo1337234388698.jpg The button itself was cut out of multiple layers of PS to fit on the switch. Painted silver and red.
BTN (2)_S.jpg


Removable hinge pin:

I wanted to be able to seperate the upper and lower part of the gauntlet if needed so I made the hinge pin removable:
  • Find a set of small/tiny hinges. Remove the hinge pins with a side cutter.
  • Find a metal rod with the diameter of the hinge pins (1.2mm in my case).
  • Align n hinges on the metal rod (n=6 in my case). Attach the hinges to one half of the gauntlet, while still aligned by your new long hinge pin.
  • Remove the hinge pin -> the hinges will fall apart, with the correct hinge halves fixed to the gauntlet.
  • Repeat with other half of the gauntlet and the remaining hinge halves.
  • To make it removable: Cut the metal rod to fit in all the hinges + a few millimeters for an end piece. I lathed a 4mm aluminium rod (from the darts) down to the diameter of the hinge knuckle, drilled a ~1.2mm hole in it and super glued it on the end of the rod/pin.
*Complicated description of something easier explained by a picture:*
Pin removed a little bit / Pin removed a little bit more
PIN (5)_S.jpg


PIN (3)_S.jpg
 
Last edited:
- Thanks, Fuse!

Part 4: Insides & functionality
  • 1mm foam rubber padding, folded to hide the corners, super glued to the inside. Might need more foam at the ankles for better fit.
  • Elastic straps with plastic buckles for tight fit. The straps could also be somewhat varied in length (in addition to being flexible), the left endings are held together with snap buttons. I could sew them on in a different position if the straps turn out to be too tight or loose. Super glued underneath foam padding.
LI+135 (3)_S - Kopie.jpg

  • The upper half contains batteries (2*AAA) and wiring for various functions. The cover is removable.
UI180 (2)_S.jpg
UI0_S.jpg

  • Red ~2.3V LED, handled by rear flip switch (really bright, maybe I'll have to include a resistor prior to the LED, the 3 Volts of the two 1.5V AAA batteries could be too much in the long term).
  • White ~3V LED, handled by side button.
Red_LED_S.jpg
White_LED_S.jpg


  • 3V red laser diode, handled by front flip switch.
LSR_S.jpg
LSR2_S.jpg


PS: Photographing the laser ray was pretty hard, I had to cook water on the kitchen stove to get enough steam for the ray to become visible, a dark background, long exposure and indirect flash for that pic. A foggy night would to it too...
 
- Yeah, could come in really handy at the next con to blind annoying people who (nah, I know, that's actually pretty dangerous) cameras that unsolicitedly take a photo of what is actually the galaxy's best bounty hunter on an undercover mission! :whistle:

Also, final result and fancy recap!

F+45 (1)_S.jpg F+135 (2)_S.jpg F-45 (3)_S.jpg F-135 (2)_S.jpg UNFOLD_S.jpg WEAR0_S.jpg

feat.jpg


Also, for all hi-res photos, there's my Postimage album: Boba Fett Right Gauntlet (v2, 2018) — Postimage.org

PS: Sorry for blatantly removed shadows and overly artificial sharpening effect. I inadvertently created a weird 70's aesthetics but liked and decided to stay with it.
 
Last edited:
This thread is more than 6 years old.

Your message may be considered spam for the following reasons:

  1. This thread hasn't been active in some time. A new post in this thread might not contribute constructively to this discussion after so long.
If you wish to reply despite these issues, check the box below before replying.
Be aware that malicious compliance may result in more severe penalties.
Back
Top