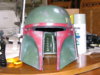
I've almost got a finished helmet, people! Anyway, this is a Don Post 95 green interior that I picked up on Ebay a little over a month ago:

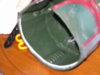
Basic DP 95, no serious problems. I didn't have to mess with the actual shape as much as I thought I would. There was a major warp in the back of the helmet, which I here is very common in all DP standards. What I did was leave the thing out in my car for an hour or so on a hot day. When I went to get it the thing was extremely soft. Took it inside, easily bent it into the shape I wanted, and dunked it in ice water. It hardened into shape flawlessly. Not a bad start. What I did after that was got a close hanger, straightened it with a vice, cut it in half, and curved it to fit the shape, then glued the sucker in with welding glue:

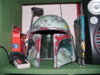
Voila, now the base rim of the helmet doesn't move. Anyway, instead of going over my entire painting process, I think I'll just skip on to the good part and show you the picture of the semi-final painted and weathered product. Perhaps a few touchups will be made, but I'm happy with it at the moment:

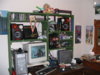
So there you have it, my helmet. Also notable is that I cut out the plastic that is inside the visor slot of the DP models (using a very small hacksaw blade, and if you try this, be very careful not to cut into the actual helmet) so that it would be easier to get my visor in place, and I need to sand it sometime (you can see the rough edges on the inside edge of the visor slot where I cut). So that's all it really needs, a visor, and I'll be set, at least for now. And, just a bit of eye candy, here's my Helmet on display in the middle of my huge shelf, which I just finished building for all my electronic appliances:

Comments, criticism?
Basic DP 95, no serious problems. I didn't have to mess with the actual shape as much as I thought I would. There was a major warp in the back of the helmet, which I here is very common in all DP standards. What I did was leave the thing out in my car for an hour or so on a hot day. When I went to get it the thing was extremely soft. Took it inside, easily bent it into the shape I wanted, and dunked it in ice water. It hardened into shape flawlessly. Not a bad start. What I did after that was got a close hanger, straightened it with a vice, cut it in half, and curved it to fit the shape, then glued the sucker in with welding glue:
Voila, now the base rim of the helmet doesn't move. Anyway, instead of going over my entire painting process, I think I'll just skip on to the good part and show you the picture of the semi-final painted and weathered product. Perhaps a few touchups will be made, but I'm happy with it at the moment:
So there you have it, my helmet. Also notable is that I cut out the plastic that is inside the visor slot of the DP models (using a very small hacksaw blade, and if you try this, be very careful not to cut into the actual helmet) so that it would be easier to get my visor in place, and I need to sand it sometime (you can see the rough edges on the inside edge of the visor slot where I cut). So that's all it really needs, a visor, and I'll be set, at least for now. And, just a bit of eye candy, here's my Helmet on display in the middle of my huge shelf, which I just finished building for all my electronic appliances:
Comments, criticism?
Attachments
Last edited by a moderator:

