A Simple Man Trying to Find His Way in the Galaxy Build- Pic heavy!

ComfyFett

New Hunter
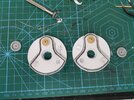
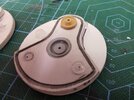
Greetings all! I've been lurking in here for about a week and I figured I'd firstly say "hello all!" and post up my WiP pics of my budget comfy-Fett costume.

Before anyone says anything, I'm not trying to be 100% screen accurate at all as this one is for me and my cosplay. This is a build for me to have a ton of fun making and wearing with essentially what I have kicking about. I've been making various props/costumes etc. for years, but this one will be my first Star Wars build. Gods only know why I haven't done one before.

Anyway, It'll take a wee while as I'm gathering bits/making bits etc. so hopefully you'll stay with me on my journey into the hunt!

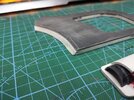
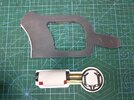
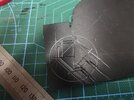
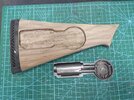
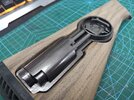
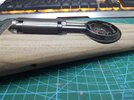
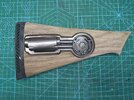
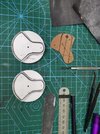
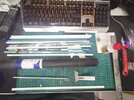
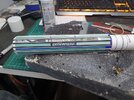
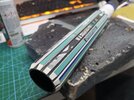
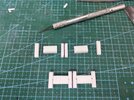
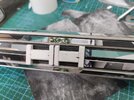
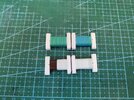
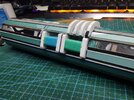
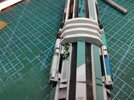
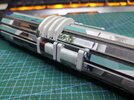
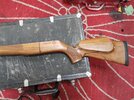
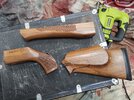
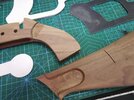
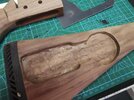
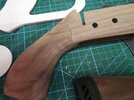
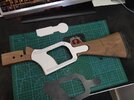
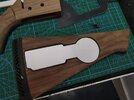
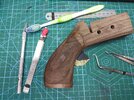
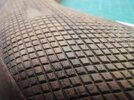
I'll start off with the ee-3 blaster rifle. I noticed it has an updated design from the Mando series, so this'll be based on that. Again, it's not screen accurate, some of the proportions are off etc. but I had an old rifle stock and decided to work from that! I also learned a new skill yesterday: chequering!
 

Attachments

  • 0001.jpg
    0001.jpg
    89.3 KB · Views: 280
  • 0002.jpg
    0002.jpg
    116.5 KB · Views: 233
  • 0003.jpg
    0003.jpg
    307.2 KB · Views: 269
  • 0004.jpg
    0004.jpg
    73.2 KB · Views: 254
  • 0005.jpg
    0005.jpg
    72.1 KB · Views: 250
  • 0006.jpg
    0006.jpg
    67.5 KB · Views: 256
  • 0007.jpg
    0007.jpg
    73.8 KB · Views: 254
  • 0009.jpg
    0009.jpg
    66.8 KB · Views: 248
  • 0008.jpg
    0008.jpg
    56.6 KB · Views: 260
  • 0010.jpg
    0010.jpg
    140.7 KB · Views: 262
  • 0011.jpg
    0011.jpg
    64.9 KB · Views: 281
More progress today! These are going to be primed tomorrow! Took ages to find something that resembled the greeblies..2 failed attempts and I decided to cut my own. Feckit.
 

Attachments

  • 0012.jpg
    0012.jpg
    76.5 KB · Views: 242
  • 0013.jpg
    0013.jpg
    122.1 KB · Views: 230
  • 0014.jpg
    0014.jpg
    74.9 KB · Views: 256
Here's the latest update! This greeblie part is now done. It'll be weathered with the rest of the blaster once it's all together. FYI, the entire blaster/costume's hard parts (except for the bucket) will be pretty much hand cut and shaped from Foamex and other bits and bobs. I'm essentially building this with what I have laying about.
 

Attachments

  • 0015.jpg
    0015.jpg
    125.4 KB · Views: 259
  • 0016.jpg
    0016.jpg
    82.9 KB · Views: 267
  • 0018.jpg
    0018.jpg
    64.9 KB · Views: 257
  • 0017.jpg
    0017.jpg
    126.4 KB · Views: 273
I did indeed! It's a combination of foamex, plastic duct, copper tube, a ball point pen barrel and swearing! Pretty much how the entire outfit is going to be
made!
 
sweet! and yea i know the feeling man :lol:
HAHAH!! Thanks!! It's pretty much the only way I make my own stuff! I save the good **** for my clients! Though an old uni friend who makes buckets, has donated one of his mould rejects which needs a bit of fixing up, so I'm more than grateful for that!
 
Good evening peoples!! A few more progress pics of his new blaster! Greeblies and straight thingemies!
 

Attachments

  • 0019.jpg
    0019.jpg
    104.9 KB · Views: 247
  • 0020.jpg
    0020.jpg
    105.7 KB · Views: 247
  • 0021.jpg
    0021.jpg
    59 KB · Views: 245
  • 0022.jpg
    0022.jpg
    87.4 KB · Views: 250
  • 0023.jpg
    0023.jpg
    99.4 KB · Views: 270
  • 0024.jpg
    0024.jpg
    55.3 KB · Views: 251
Thanks dude! Don't look TOO closely ha! That was my 32nd attempt! The first one I thought I'd use the same diameter pipe cut into strips, but I couldn't get the lines straight and clean enough. I used 3mm Foamex (Sintra) I got from work. It was an old display board, so I kept the vinyl print on the surface as the foamboard sometimes marks easily., I'm going to make the bulk of the armour from that. Except for the helmet, which has very kindly been donated by an old Uni friend who produces Mandalorian armour! He had an old one which was damaged and warped, so it needs fixing up, but it was a freebie! He couldn't use it for his client and was just going to throw it away!
 

Attachments

  • 141114242_10158888618416413_1893472704581256644_o.jpg
    141114242_10158888618416413_1893472704581256644_o.jpg
    163.6 KB · Views: 203
As I've been undertaking commission, my own build has taken the bench a little. But for a couple of days that is just waiting for paint to dry, so I took the opportunity to crack on with my blaster. When you don't have the right kind of greeblies, what do you do? Why you make them of course! SUPER happy with how these bits have turned out. I'll get rid of the glue marks with a little burr but on my Dremel.
 

Attachments

  • 0025.jpg
    0025.jpg
    113.7 KB · Views: 249
  • 0026.jpg
    0026.jpg
    60.5 KB · Views: 236
  • 0027.jpg
    0027.jpg
    106.4 KB · Views: 231
  • 0028.jpg
    0028.jpg
    56.1 KB · Views: 226
  • 0029.jpg
    0029.jpg
    81.2 KB · Views: 227
  • 0030.jpg
    0030.jpg
    63.1 KB · Views: 243
  • 0031.jpg
    0031.jpg
    69.5 KB · Views: 245
very nicely done, what do you plan to do after you get it all assembled? Like are you going to coat it in something or just paint it as is?
Thank you, my good fellow! Once I've done, I'm going to hit the whole thing (aside from the wood - I'll stain those) with yer basic automotive plastic primer, then a mix of anthracite and satin black paint for the various shades on parts. Theres an o-ring thingemy in the middle of the barrel that's silver, and so is the emitter on the end. I'm using aluminium foil to cover those. I'll then use a little powdered graphite, black oil paints and some silver leaf Rub n Buff to weather it with! Then (because I can't wait any longer) it's the helmet!
 
This thread is more than 2 years old.

Your message may be considered spam for the following reasons:

  1. This thread hasn't been active in some time. A new post in this thread might not contribute constructively to this discussion after so long.
If you wish to reply despite these issues, check the box below before replying.
Be aware that malicious compliance may result in more severe penalties.
Back
Top