crash22
No doubt is doing the grommet method a lot harder to do. At least for me it was. But again has been totally worth it. I'll outline how I accomplished this....
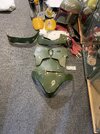
To start, I initially used hot glued for the the Stainless Steel bolts (
#10-32 1/2 inch) onto the armor - which held ok for a few troops, but then one by one they started to break free from the armor. I have since replaced the Hot Glue with Epoxy (
JB Weld's Plastic Bonder) and is it hasn't broke free at all....
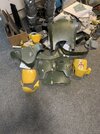
View attachment 234096
And you'll want to be sure you
DO NOT put them right at the edges of the armor - and this is because you
DO NOT want any of the grommets peeking out from underneath the armor. And one last pro tip is to use a single drop of super glue to hold the bolt to the armor, then apply your epoxy.
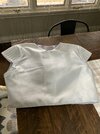
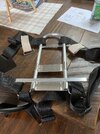
But once that is done, you'll want place your armor on your vest and then mark it out so you'll know where to put in the grommets, to do so refer to the steps and picture below...
Step 1: Place your armor with flat grommet pieces under it, and adjust where needed to get the armor looking right.
Step 2: Using something long and skinny (
I used a long scissors) maneuver the grommets in a way that they'll seat the screw just right. Also go under the fabric and gently lift it to see if the screw will land correctly in the grommet.
Step 3: Do Step 2, for all other grommets.
Step 4: Very gently lift the armor leaving the flat grommets in place and then with a sharpie, put a dot in the center of the grommets.
View attachment 234097
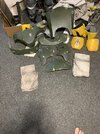
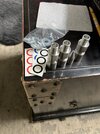
And then for the Grommet installation (
I used 3/8 inch Grommets) it was quite simple but it took forever to install them. But here is how I did that...
Step 1: Hammer on the grommet cutting tool, which doesn't cut Arkady's material by the way.
Step 2: You can see the circle indent it makes.
Step 3: Using a hobby knife, cut out the hole.
Step 4: You'll also have some padding to deal with underneath, so make sure to clean that out.
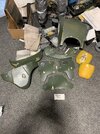
Step 5: Using the Grommet Cutting Tool Hammer the hole again. (
This is for the reverse side)
Step 6: Flip the Vest over and you should see the indent, Using a hobby knife, cut that piece out.
Step 7: Put on the Grommet.
Step 8: Pound on the Grommet.
View attachment 234101
Now, I'm not saying.....
View attachment 234102
But it was the way that worked out well for me. And let it be known that my ROTJ Boba Fett was thee very first cosplay I did! I'm not gonna lie though, in doing this....I felt quite queasy but I powered through it and the benefits of doing it paid off. And I think it looks good and I've not had one issue in trooping with this setup.
Best of luck in whatever you decide to do!
Cheers,
-Iron