You are using an out of date browser. It may not display this or other websites correctly.
You should upgrade or use an alternative browser.
You should upgrade or use an alternative browser.
Stylized turned to Accurate Pre Pro 2 slow build
- Thread starter Fettacini
- Start date
Fettacini
Hunter
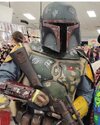
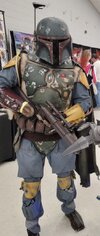
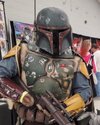
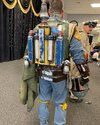
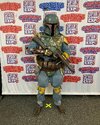
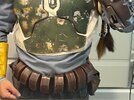
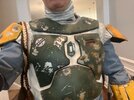
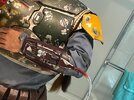
Alrighty. Well I tested out the suit at a local convention, please keep in mind this is my first time in the suit as a whole and it is not the final iteration.
Some things to keep in mind. I’m using my rotj se belt, just finally got my handmade horrors belt in for this suit so I now have the correct belt.
I’m also using my rotj se jet pack as I only have one jet pack, working on getting another.
I’m rocking the EE3 bc my vintage Kaiser and copyist sling gun was still being tweaked.
So aside from that, be kind lol and gentle, it’s not all accurate but I was just stoked to put it all on. I need to mod the vest so it doesn’t ride up as much and make me look like I have a belly poking out(I swear I don’t, but it sure looks like it in some of the pics).
Still have a lot of futzing to do to the clothe areas and trying to get everything sitting right is a beast.
As soon as I get my belt situation correct and my sling gun done, I’ll do a proper suit up and have the wife snap some good pics.
Attachments
-
 CCB4BD29-DA14-489B-A146-A9EE5A568B5C.jpeg322.8 KB · Views: 261
 -
 CF72896B-E0D7-4AC0-9B1D-98A6106E7219.jpeg362 KB · Views: 266
 -
 1A484172-0550-4839-AD13-6E59EF534A8F.jpeg2.5 MB · Views: 276
 -
 950E9C0A-52D4-447D-ABBA-82E18BD01A69.jpeg2.4 MB · Views: 276
 -
 9AFD20BD-31A7-416B-AE44-11294BB71404.jpeg294.8 KB · Views: 256
Fettacini
Hunter
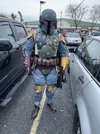
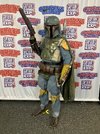
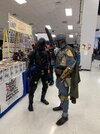
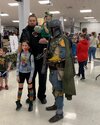
Here are a few more just because lol. I will say I was amazed at the response from the crowd, I couldn’t get more than 5 feet in any direction without getting asked to stop for a picture, which was so flattering and humbling, it really was amazing!
Attachments
-
 C3C986C3-7916-4C15-B844-0C11F7FEB61E.jpeg681.2 KB · Views: 279
 -
 E09DF754-B424-4CD2-9355-C6EBBBDDC751.jpeg2.2 MB · Views: 321
 -
 1BB643D6-6523-4A1B-8990-5FDB7F5484AA.jpeg1.7 MB · Views: 277
 -
 009B607F-DB25-4139-B1E5-A2DD26A7B86D.jpeg1.6 MB · Views: 268
 -
 E40A4D76-BA78-4569-89F3-F8D18953C922.jpeg427.5 KB · Views: 260
 -
 D992EC09-738D-47B9-B2DB-AE2DBB1D7238.jpeg908.9 KB · Views: 276
Mythos Fenn
Active Hunter
Aaaaaaaaaaaaw yeah. I will second the flight suit thing but this is so good.
spicy fett
Active Hunter
Hey man I just wanted to say after all this time it’s great to see you all suited up!! It looks amazing! I would definitely get the flight suit fitted a bit more snug as they said but other than that things are looking quite amazing! I love that you put your own spin on things!
Fettacini
Hunter
Thank you all so much for the encouragement and for the suggestions for areas I can improve! That’s what I’m here for, I need to know what to do better!
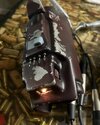
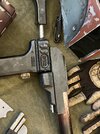
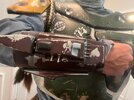
So I’m gonna do a bit of a photo dump here, been working on getting some things to look better, just bought a house and am moving so things are a bit crazy, but I just got done building (re-building) my gauntlets. Here is the new setup, I have started work on a 3d printed jetpack for this costume so the cords will hook onto the back side of this new jetpack.
I used Viva Fett’s new pp2 shells for the left gauntlet.
Quest Designs rocket.
CS Stallard Casio board casting and then I made another one of my all metal PP2 flamethrowers from found parts and Kuhnke brand valves.
Topped it all off with Tamiya and Duplicolor sprays. With Vallejo and Tamiya airbrushed shading and weathering.
Attachments
-
 6081B3B7-04B8-4D3A-B875-9AE2D03F588D.jpeg412.4 KB · Views: 219
 -
 6D8A0C6F-F728-4D7E-9E4D-C46425967F70.jpeg1.6 MB · Views: 213
 -
 BB941B8E-8F03-40B6-AA3F-DF2D58806B17.jpeg467.6 KB · Views: 213
 -
 D2A8E036-769E-4574-8B39-71B4408E6528.jpeg1.6 MB · Views: 230
 -
 771C8A5D-F115-4E2A-9429-48AA870037DA.jpeg564.8 KB · Views: 216
 -
 F8561B4C-A343-486E-8101-362C433E6550.jpeg1.6 MB · Views: 220
 -
 6DC7C517-B25E-40B3-B103-EFBFCBC754C8.jpeg658.3 KB · Views: 213
Fettacini
Hunter
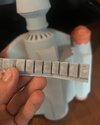
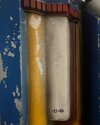
I also did some paint test work on my 3d printed rocket, just got the main parts for the pack printed so this was basically a test part that I had printed first and was able to smooth out and throw some color on.
I used metal foil duct tape to increase the diameter of the top fin portion and give that more metallic look, I may dull it down a touch with some semi gloss spray, it’s a bit too shiny.
I used metal foil duct tape to increase the diameter of the top fin portion and give that more metallic look, I may dull it down a touch with some semi gloss spray, it’s a bit too shiny.
Attachments
-
 C4F77892-9AC2-4433-9FB0-DCC63B00B16B.jpeg605.5 KB · Views: 222
 -
 2AAF24F2-7001-42C6-B336-289739EC228F.jpeg635.6 KB · Views: 220
 -
 FB9E2397-96B0-4CE8-A8DC-242E1961A41E.jpeg521.5 KB · Views: 218
 -
 AFFF2BCE-2676-473F-83BB-F49D577095D0.jpeg432.2 KB · Views: 219
 -
 34F23BA6-8EDC-4BB5-BC53-7CB344D75AC9.jpeg420 KB · Views: 221
Fettacini
Hunter
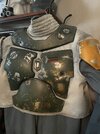
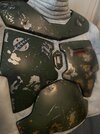
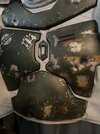
I will get the suit tailored, but I started to really see that my vest was a bit too tan, so using regular old rustoleum spray cans I added more gray and white tones to it to make it match the reference a bit more.
You can see the comparison between the RoTJ SE vest and the Prepro2 vest in the last pic.
You can see the comparison between the RoTJ SE vest and the Prepro2 vest in the last pic.
Attachments
Fettacini
Hunter
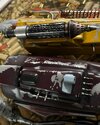
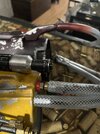
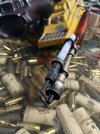
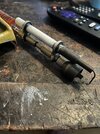
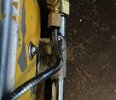
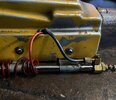
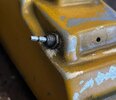
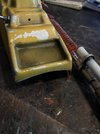
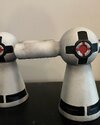
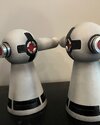
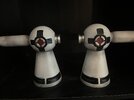
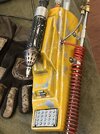
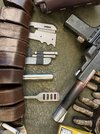
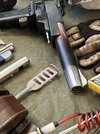
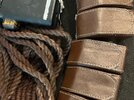
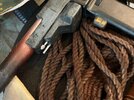
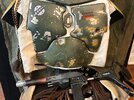
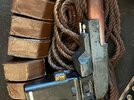
I built another gauntlet shell and another one of my metal flamers with Kuhnke found parts and full metal “flamer” end
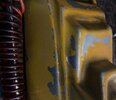
I just make them out of a craftsman telescoping magnet pickup Ron and various steel and brass tubes and spacers from lowes. The hard to find parts are the khunke tail pieces and the metal double washers. That damn red coil cord is also a pain, yeah you can wrap red electrical wire but it doesn’t have a nice uniform coil so I opt to go with spring coil lanyard cord. It’s a specialty large size for boating that is a steel wire core and sheathed in red plastic, it gives just the right look.
The metal shielded “fuel” line is flexible metal sheathed usb cord from Amazon cut to fit.
The customer is adding his own dental expander, rocket, and Casio keypad.
Attachments
-
 9E880C30-6CF4-4121-973A-2AC730406995.jpeg1.7 MB · Views: 215
 -
 EF9C4EA5-49A4-40AE-95E8-981823EFB785.jpeg260.3 KB · Views: 226
 -
 07537670-1C7E-47DE-BD38-B01013C85638.jpeg410.2 KB · Views: 211
 -
 98299721-0ECB-4CAF-8C66-D0E32E7C456B.jpeg261.2 KB · Views: 209
 -
 55C86EAC-40A0-40F2-9BC8-94AEDB5ABB7E.jpeg1.4 MB · Views: 222
 -
 0C78D409-389D-4425-B5DA-F29C72327C29.jpeg197.6 KB · Views: 210
Fettacini
Hunter
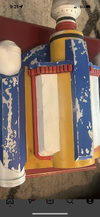
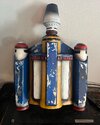
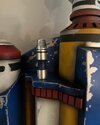
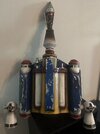
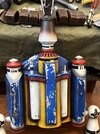
So I have done some work on a jetpack, honestly this started as a stylized version but the more I put into it the more it’s turning into an accurate version.
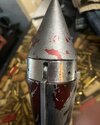
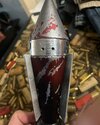
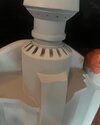
So her goes with the Prepro2 jetpack. I printed this one from some files on thingiverse and added Quest Designs metal parts and a real dental file. I also custom made an aluminum collar for the rocket. Topped off with dry transfer letters. Photo dump commencing!
First off the base coats.
So her goes with the Prepro2 jetpack. I printed this one from some files on thingiverse and added Quest Designs metal parts and a real dental file. I also custom made an aluminum collar for the rocket. Topped off with dry transfer letters. Photo dump commencing!
First off the base coats.
Attachments
-
 854FEE14-08C1-4344-8027-55D9F6939E4F.jpeg255.7 KB · Views: 188
 -
 96ABA4D0-BD80-40BF-9A75-59ADA8574025.jpeg220.7 KB · Views: 194
 -
 C0ADABD5-F123-4300-AA05-ADFD067922C7.jpeg226.1 KB · Views: 191
 -
 5D8F97FB-D417-499A-9A08-7502AC4BE20A.jpeg311.2 KB · Views: 206
 -
 285B35BD-1504-4884-815D-218F5281D9D5.png7.7 MB · Views: 209
 -
 CE2E0649-12E2-4FDF-B42C-8C8744F91ED7.png6.7 MB · Views: 216
Fettacini
Hunter
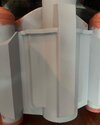
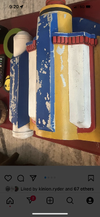
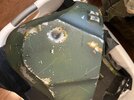
Here the pack is with a bit of weathering.
Attachments

Fettacini
Hunter
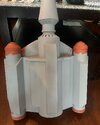
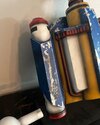
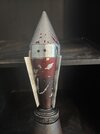
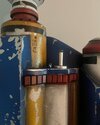
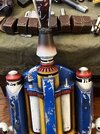
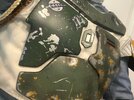
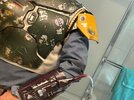
Now I start adding all the detail hand brushing and markings.
You can see the Quest Designs metal parts and real dental file.
You can see the Quest Designs metal parts and real dental file.
Attachments
-
 564953B7-7186-435A-9AFD-BBB8ACF3E884.jpeg327.6 KB · Views: 182
 -
 171EC8AE-E3B4-47B9-9BA1-AEAAB3EBD98F.jpeg355.4 KB · Views: 192
 -
 899ED0E4-0C81-4DB4-A771-DB43A81CFEEC.jpeg304.5 KB · Views: 195
 -
 D9953FB8-5667-4819-82EF-8CFC7BF00B34.jpeg306.6 KB · Views: 208
 -
 7650B24F-6AA6-453B-B0D4-94B6A9E211CA.jpeg1.1 MB · Views: 204
 -
 F54CE4E5-2DA8-4A11-80A5-72516430CF1F.jpeg1.3 MB · Views: 218
 -
 41F3CB88-AD56-4403-810F-E19A60B1F7DD.jpeg1.2 MB · Views: 198
 -
 16950737-F89C-48F4-96D7-45D49D61E6A1.jpeg1.3 MB · Views: 182
 -
 0C494D55-8953-42DC-95D7-2A1DB9C767BE.jpeg1.2 MB · Views: 197
 -
 512738DA-AC9E-44AA-9430-019D05F209C5.jpeg2.3 MB · Views: 200
Fettacini
Hunter
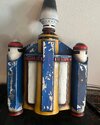
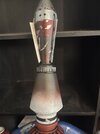
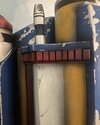
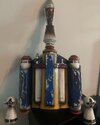
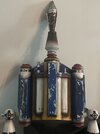
And the final painting and weathering and assembly. I used dry transfer letters to add the smaller markings.
Attachments
-
 7F374801-715B-4F6D-A0B4-EFF1A5F9219E.jpeg388.9 KB · Views: 185
 -
 5998C193-67A9-4942-BDAD-056453489F35.jpeg351.6 KB · Views: 170
 -
 682B3460-6956-45AB-A77B-5E574639C9BF.jpeg462.1 KB · Views: 176
 -
 0CA6C7E6-AE86-433B-8B28-C9A246584D59.jpeg261.9 KB · Views: 184
 -
 E74AB588-764A-4F73-B227-C2D49F506662.jpeg263.6 KB · Views: 185
 -
 D22AA55D-84CC-4A9C-8502-D4E4E61EE771.jpeg331.1 KB · Views: 186
 -
 40F7F85F-6B98-4070-9FFC-78B2C3671334.jpeg965.9 KB · Views: 193
 -
 725CAEF3-18F0-4E68-A58C-93F04F8FDC12.jpeg1.4 MB · Views: 201
Fettacini
Hunter
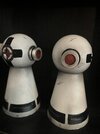
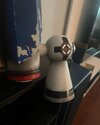
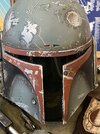
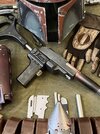
Here is a little photo dump from a layout of some of my corrected parts.
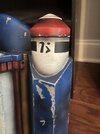
New blaster made from all vintage parts except the housing which is rafelfett’s print. New gauntlets, new repainted helmet that I’m pretty pleased with, I feel it’s the best paint job I’ve completed yet. Also my new 3d printed pack. I still want to replace it with a 7CS pack eventually but you know, money and all.
New blaster made from all vintage parts except the housing which is rafelfett’s print. New gauntlets, new repainted helmet that I’m pretty pleased with, I feel it’s the best paint job I’ve completed yet. Also my new 3d printed pack. I still want to replace it with a 7CS pack eventually but you know, money and all.
Attachments
-
 C19CAC8B-CCEB-4663-A750-163486EE7ADC.jpeg1.5 MB · Views: 182
 -
 8D742C44-4346-4610-AD5A-93EB38EE4340.jpeg1.5 MB · Views: 196
 -
 567F9E80-19C2-4995-8BC1-69458643B147.jpeg1.6 MB · Views: 198
 -
 FD9FC063-B694-4E6D-B98B-32CD9779FCE0.jpeg1.3 MB · Views: 205
 -
 09F49CFA-AC01-48FB-A2D7-4E1D765172E3.jpeg1.3 MB · Views: 217
 -
 9B4C7C52-FEF0-4C77-BED2-58F0B27C3851.jpeg1.4 MB · Views: 181
Fettacini
Hunter
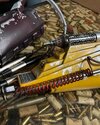
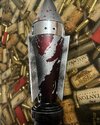
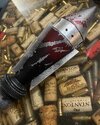
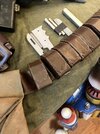
A few more shots. Did some paint work on the tools. This is my new right gauntlet with the darker maroon color and real vintage eveready light inside! Ohhhh and the icing on the cake, my new Handmade Horror belt wand pouches! Took ages to get but he delivered a stellar belt! I love it!
Attachments
-
 35A4EFCB-D5AA-4F1D-BC79-1245EDFBEBC3.jpeg1.5 MB · Views: 203
 -
 B21344A6-DF4A-4B68-9587-6A478D0194CE.jpeg1.5 MB · Views: 210
 -
 6454A223-193B-4239-91FC-290ED06CD38D.jpeg2.3 MB · Views: 200
 -
 0D83583C-6124-464C-BCF3-DD631CAB8942.jpeg1.6 MB · Views: 200
 -
 4D0FCF52-7405-45D4-BDB3-139BB37230EE.jpeg1.3 MB · Views: 209
 -
 02062C02-30D2-4F69-BB1D-27C2A4F12BDE.jpeg1.3 MB · Views: 185
 -
 747BB16A-EA62-4BEC-B656-60FA05CA08D5.jpeg2 MB · Views: 185
 -
 3288D4D7-E5FD-46B0-A7A6-2921E8692A08.jpeg1.6 MB · Views: 187
 -
 0DA78B7B-9AB9-45B4-BA85-B312498E89C1.jpeg1.3 MB · Views: 204
Fettacini
Hunter
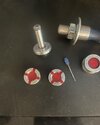
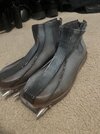
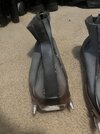
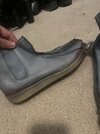
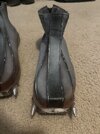
Started some more work to accurize the suit by repainting the shoes. I used Tamiya light ghost gray to spray them and then used Vallejo rust brown pigment powder to carry the brown up from the soles.
I then scrubbed the toe spikes down with steel wool to de-weather them a bit and used Angelus brand leather paint to paint the black striping and then chipped it with white to match reference photos.
I then scrubbed the toe spikes down with steel wool to de-weather them a bit and used Angelus brand leather paint to paint the black striping and then chipped it with white to match reference photos.
Attachments
-
 D9F8DA48-2CB1-4620-AE44-3407789DFE3B.jpeg1.7 MB · Views: 186
 -
 A18BBD6B-6C9E-4DDC-A93D-ACB9751B4420.jpeg1.7 MB · Views: 195
 -
 85117FE3-15A3-4EF0-BB5D-5221ED2BAEE4.jpeg1.6 MB · Views: 200
 -
 1FB80D85-D0A4-47F9-9E69-A7C12EC66030.jpeg1.5 MB · Views: 205
 -
 5F99F0EA-7C0A-4CD7-8E0D-B8BDA6DE650C.jpeg1.7 MB · Views: 187
Fettacini
Hunter
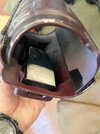
Started test fitting the new vest ( a much nicer and whiter version) with neck seal. The flight suit in this photo is not the regular one, I am sun fading the actual suit via the back window of my car for the right look.
I also didn’t tuck the neck seal in properly or route the hoses for the gauntlets as I was just trying to see the fit of the armor.( some of the photos are mirrored bc of the camera)
I also didn’t tuck the neck seal in properly or route the hoses for the gauntlets as I was just trying to see the fit of the armor.( some of the photos are mirrored bc of the camera)
Attachments
-
 AD15DA3A-2C91-4212-A13C-D817EEC5C8CF.jpeg318.3 KB · Views: 193
 -
 2EEFF5F7-2FE1-4587-9B6E-ADC25FBF1EC6.jpeg230.8 KB · Views: 192
 -
 DFC436FB-3548-4AAD-9F69-C10799627299.jpeg285 KB · Views: 182
 -
 E623C8E6-F18C-4ACB-BC81-CFB262898587.jpeg229.7 KB · Views: 182
 -
 9BF6D356-D8DD-4F36-9F65-448D61F1CDF5.jpeg243.4 KB · Views: 191
 -
 4D1E2C9F-DC22-48CC-90EF-FCBE2E3EF4BB.jpeg307.9 KB · Views: 212
Fettacini
Hunter
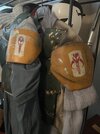
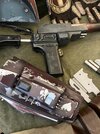
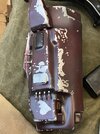
New belt from Handmade Horror shop! And new paint apps on my sling gun!
Attachments
spicy fett
Active Hunter
Honestly and I hope you don’t take this the wrong way but I would seriously think about getting a nice fitted flight suit from clothears or arkady because with how nice your paint ups are with the armor and everything else these cheap flight suits will never do it justice and you have some serious talent and I think getting a nice flight suit would complement everything way better! But regardless keep up the good work!!
Similar threads
- Replies
- 21
- Views
- 1,103