Stylized turned to Accurate Pre Pro 2 slow build

Looking good for sure!! You definitely have your own style of painting that’s for sure and I love it! It’s a grimy look and it really makes the piece stand out!
Thanks man, yeah I really can't help myself, I tend to paint things dark and moody, really shoot for a "jump off the comic book page or cartoon cell into real life" kind of look. Dramatic shading ect. It's not for everyone but I can tell you when it's all together and under the bright lights of a convention floor, it really looks pleasing. Thank you so much for the kind words!
 
Your jet pack came out really well!
Thanks man! Still have a looooonnngg ways to go on detailing and getting all the small chips thier multicolored look right. I still need to tighten some of the details and get the beacon on. I'll post some more detailed pictures soon as I get her to a look I'm ha with. Just gonna play with some washes and some brushwork with white and silver. I will probably hand paint all the markings as well.
 
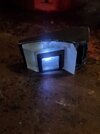
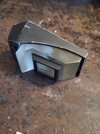
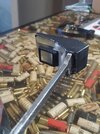
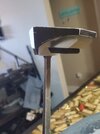
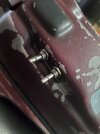
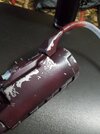
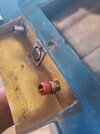
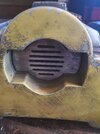
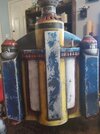
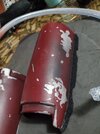
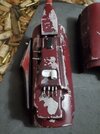
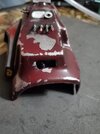
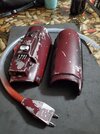
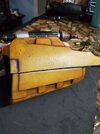
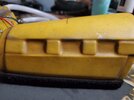
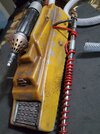
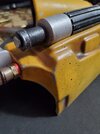
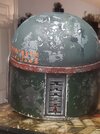
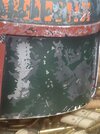
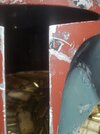
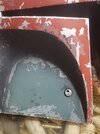
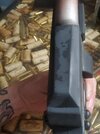
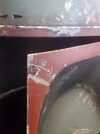
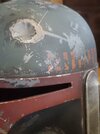
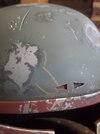
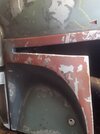
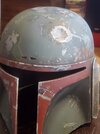
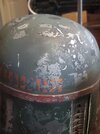
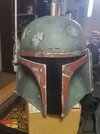
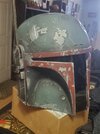
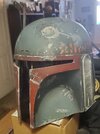
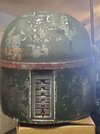
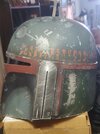
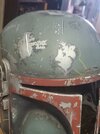
A couple of more detailed shots of my jetpack in progress. All the aluminum components ( vent on the bottom, stabilizer, jet thruster round parts, and the to be acquired beacon) are from Quest Designs of Canada on etsy.
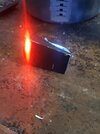
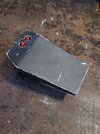
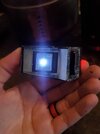
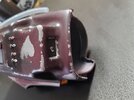
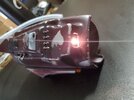
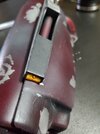
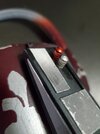
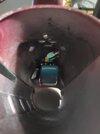
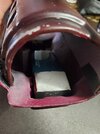
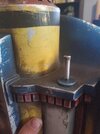
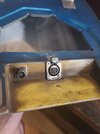
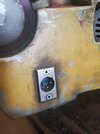
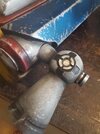
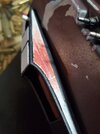
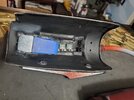
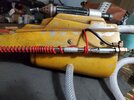
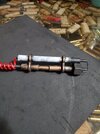
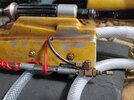
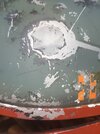
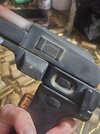
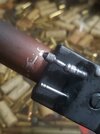
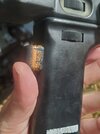
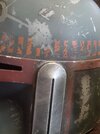
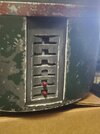
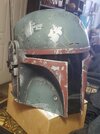
I also was able to fit the Canon itt plug port on the bottom back recessed area, it took a little creative dremeling but it fits. I just made the quick release port too, found an air tool hookup that looked appropriate, colored it with Tamiya clear red to give the anodized look then screwed on a double threaded nut from some extra rotj gauntlet hose hookups. I then drilled a hole and super glued that bad boy in. Worked pretty well.
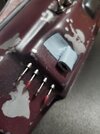
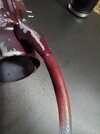
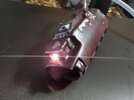
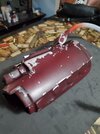
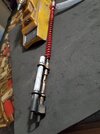
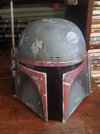
I will most likely replace it with the appropriate Kuhnke part but this works for now. I have my Big Dane harness rigged up with real US divers belt ( what a pain to rig, omg). I ended up using rivets and e6000 adhesive as sewing is not my strong suit. The rivets will hold plenty well. I was able to cut and sew the cutouts in my vest though, before my cheap sewing machine bit the dust.
Pro tip, invest in a quality sewing machine, stay away from the hobby lobby or Walmart brands as they have very poor instructions and threading them is a nightmare. I wish inbound have dropped 150 bucks on a quality singer machine and that would have been it.
Anyways, enjoy!
 

Attachments

  • 20210707_142149.jpg
    20210707_142149.jpg
    1.7 MB · Views: 175
  • 20210707_142145.jpg
    20210707_142145.jpg
    1.8 MB · Views: 162
  • 20210707_142155.jpg
    20210707_142155.jpg
    1.9 MB · Views: 163
  • 20210707_142201.jpg
    20210707_142201.jpg
    1.3 MB · Views: 177
  • 20210709_152246.jpg
    20210709_152246.jpg
    1.6 MB · Views: 163
  • 20210707_142315.jpg
    20210707_142315.jpg
    1.7 MB · Views: 158
  • 20210707_142254.jpg
    20210707_142254.jpg
    1.6 MB · Views: 162
  • 20210707_142227.jpg
    20210707_142227.jpg
    1.7 MB · Views: 168
  • 20210707_142201.jpg
    20210707_142201.jpg
    1.3 MB · Views: 167
  • 20210707_142205.jpg
    20210707_142205.jpg
    1.6 MB · Views: 164
  • 20210707_142155.jpg
    20210707_142155.jpg
    1.9 MB · Views: 166
  • 20210707_142149.jpg
    20210707_142149.jpg
    1.7 MB · Views: 166
  • 20210707_142145.jpg
    20210707_142145.jpg
    1.8 MB · Views: 164
  • 20210707_142327.jpg
    20210707_142327.jpg
    1.9 MB · Views: 179
Got some fettpride gauntlet kits from minutefett on etsy and decided to do them up as Prepro2. Now I have two sets of gauntlets. I painted these pretty much the same but with a bit less weathering (I know I know, I still went a little too dramatic on them, but you know I can't help myself).
First up the red gauntlet!
Also, these things are amazing, he included dental files(real) all the switches(alco found parts) and plugs plus metal darts! Man these things are bad@$$
 

Attachments

  • 20210717_194333.jpg
    20210717_194333.jpg
    1.7 MB · Views: 168
  • 20210717_194258.jpg
    20210717_194258.jpg
    1.8 MB · Views: 156
  • 20210717_194324.jpg
    20210717_194324.jpg
    1.2 MB · Views: 171
  • 20210717_194235.jpg
    20210717_194235.jpg
    2 MB · Views: 154
  • 20210717_194241.jpg
    20210717_194241.jpg
    1.6 MB · Views: 150
  • 20210717_194229.jpg
    20210717_194229.jpg
    2 MB · Views: 144
  • 20210717_194216.jpg
    20210717_194216.jpg
    1.8 MB · Views: 150
  • 20210717_194131.jpg
    20210717_194131.jpg
    2.1 MB · Views: 142
  • 20210717_194139.jpg
    20210717_194139.jpg
    1.7 MB · Views: 151
Last edited:
And now, everyone's favorite, the yellow gauntlet!

I scratch built the flamer and used the correct Kuhnke parts on the tail. I used a metal USB cord for the flexible metal wire and used velcro to attache the top half to the bottom.
 

Attachments

  • 20210717_192552.jpg
    20210717_192552.jpg
    8.6 MB · Views: 171
  • 20210717_192627.jpg
    20210717_192627.jpg
    2.2 MB · Views: 154
  • 20210717_192504.jpg
    20210717_192504.jpg
    1.4 MB · Views: 155
  • 20210717_192456.jpg
    20210717_192456.jpg
    1.8 MB · Views: 156
  • 20210717_192402.jpg
    20210717_192402.jpg
    2.2 MB · Views: 148
  • 20210717_192417.jpg
    20210717_192417.jpg
    8 MB · Views: 145
  • 20210717_192320.jpg
    20210717_192320.jpg
    7.6 MB · Views: 136
  • 20210717_192346.jpg
    20210717_192346.jpg
    2.3 MB · Views: 143
  • 20210717_192300.jpg
    20210717_192300.jpg
    8.1 MB · Views: 143
  • 20210717_192303.jpg
    20210717_192303.jpg
    1.3 MB · Views: 160
Ok aomita been a while. Life gets in the way and I've been focusing on Instagram.

But, I have recently picked the prepro2 back up and want to share a few things. First off the helmet!

Added a real Borden from ebay. I found a three whole Borden and cut it in half ( due to the hole orientation being backwards) and inserted it. I used a range finder stalk from Quest Designs and a topper from CS Stallard designs( both highly recommended).

I did a complete repaint, I used a Fettpride 2 kit and modified it as necessary.
What I'm really proud of it getting the weird grayish green on the dome and cheeks close.
I used Duplicolor silver as a base then coated it in testors dullcoat to help the maskol stay put when applied.

The back panels are Tamiya jn dark green, the base coat fo d the dome and cheeks is Tamiya Field gray, ovwrsprayed with field blue after all damage was unmasked..

the mandible are Tamiya dull red spray and the "pink" is Tamiya Hull red mixed with neutral gray and flesh.

Without further ado, here ya go!
 

Attachments

  • 20220125_191238.jpg
    20220125_191238.jpg
    1.2 MB · Views: 138
  • 20220125_191247.jpg
    20220125_191247.jpg
    1.2 MB · Views: 131
  • 20220125_191255.jpg
    20220125_191255.jpg
    1.2 MB · Views: 134
Last edited:
A few more. I tried to use the pre damage photos as much as I could plus Rafelfett templates. As you can see, i didn't get it perfect but im happy. I found that using silicon brushes for makeup from amazon( they come in a variety pack of wedge shapes, round shapes and others on real paint brush handles) worked beautifully for application on the humbrol maskol. Having tired many masking solutions I have determined that humbrol maskol is the absolute best, especially if you apply a clear flat coat over the base silver. Man it just stays put instead of running and dripping everywhere and it releases amazingly clean. Any stubborn areas I rubbed with a green scrotchbrite pad to get the masking off.

I'll upload some picks of my new all found parts Sling Gun! Got a new resin printer from the wife and man. It's a whole new ballgame, no layer lines!
 

Attachments

  • 20220125_191310.jpg
    20220125_191310.jpg
    1.2 MB · Views: 113
  • 20220125_191356.jpg
    20220125_191356.jpg
    1.3 MB · Views: 125
  • 20220125_191404.jpg
    20220125_191404.jpg
    1.1 MB · Views: 120
  • 20220125_191426.jpg
    20220125_191426.jpg
    1.4 MB · Views: 116
  • 20220125_191324.jpg
    20220125_191324.jpg
    1.1 MB · Views: 117
Last edited:
Next up, Hawk01 hooked me up with some found parts so I completely rebuilt my sling gun! This is just a sneak preview, new vintage kasier grip and stock, vintage copitar telescope and I 3d printed the Rafelfett designed main body parts on my new resin 3d printer. Oh yeah I also scored some real secomat arrows.
 

Attachments

  • 20220125_201549.jpg
    20220125_201549.jpg
    1.2 MB · Views: 128
  • 20220125_201556.jpg
    20220125_201556.jpg
    1.5 MB · Views: 122
  • 20220125_201600.jpg
    20220125_201600.jpg
    1.4 MB · Views: 119
  • 20220125_201614.jpg
    20220125_201614.jpg
    1.4 MB · Views: 119
  • 20220125_201635.jpg
    20220125_201635.jpg
    1.2 MB · Views: 124
Thank you much! I've been chipping away at boba all along, I just took a hiatus from the forum but im back with a bunch of new stuff. Will start a new RoTJ SE thread soon too!
 
Helmet looking good and good to see more updates!
Thanks buddy! I'm actually pretty happy with this one. I think the key was to pre draw my damage on with a soft lead pencil, then after all the damage was done I oversprayed the Tamiya Field gray( the bass green of the dome and cheeks) with medium field blue( a sort if blue gray).
This did two things, it tied all the damage together subtley, and added that bluish green tint to the main colors. I found that it took the starkness away without overweathering with shadows( which I tend to do).
Also the pink on the mandible, after staring at it for days I realized it was more of a rust color that was lightened with flesh. So having some Tamiya Hull red( a very dark rediah brown) I mixed that with flesh and got a freaking super close match to the original( pre Don Post and Ken tarello( sp?) Molding).I was trying to keep this one "clean" as opposed to the heavy shading and dust weathering I usually do.

I also concluded that since I read in the first hand acount of how these were painted that they actually took a rock and scratched it up, that some of the white gel coat actually does show through prior to it being molded and damaged. especially on the lower mandible edges and back panel edges and mandible t visor edges.
Overall i'm pretty dang happy and I really appreciate the feedback!

Waiting on my new ammo belt from handmade horrors shop on etsy.
More to come! Full suit up soon!
 
Looking great dude!

Looking forward to seeing the full suit up
Thanks man! I plan on doing a full suit up as soon as I get my new handmade horror belt and weather it so soon!

I really appreciate thw feedback, all is welcome wether it's positive or negative, we are all learning and trying to get better!

Here are a few more pictures, I took Rafelfett's advice and oversprayed the mandables and stripes with the same blueish gray ( Tamiya Field blue) to tone them down a notch and I think it works well. The prepro2 helmet has always looked to me like the entire thing was oversprayed bc the damage kind of fades into itself and is such more subtle looking. It's hard to put into words but it just looks less stark and lined than the esb or others.
 

Attachments

  • 20220127_124340.jpg
    20220127_124340.jpg
    1.1 MB · Views: 111
  • 20220127_124344.jpg
    20220127_124344.jpg
    1,007.8 KB · Views: 107
  • 20220127_124348.jpg
    20220127_124348.jpg
    1.2 MB · Views: 107
  • 20220127_124359.jpg
    20220127_124359.jpg
    1.2 MB · Views: 105
  • 20220127_124404.jpg
    20220127_124404.jpg
    716.2 KB · Views: 103
  • 20220127_124353.jpg
    20220127_124353.jpg
    1.1 MB · Views: 105
  • 20220127_124411.jpg
    20220127_124411.jpg
    1.2 MB · Views: 100
  • 20220127_124417.jpg
    20220127_124417.jpg
    1.3 MB · Views: 107
Took a few more shots under some different lighting while waiting to gwt my range finder parts. I plan on trying to light the range finder on this. The visor is just just standard wielding visor from Amazon cut to fit.

Full paint details in my thread in the helmet sections. I outline all the colors I used and techniques as well.
 

Attachments

  • 20220130_142049.jpg
    20220130_142049.jpg
    983.7 KB · Views: 113
  • 20220130_142158.jpg
    20220130_142158.jpg
    1.5 MB · Views: 104
  • 20220130_142209.jpg
    20220130_142209.jpg
    1.3 MB · Views: 108
  • 20220130_142148.jpg
    20220130_142148.jpg
    1.5 MB · Views: 105
  • 20220130_142302.jpg
    20220130_142302.jpg
    1.2 MB · Views: 105
  • 20220130_142252.jpg
    20220130_142252.jpg
    1.2 MB · Views: 103
  • 20220130_142321.jpg
    20220130_142321.jpg
    1.4 MB · Views: 102
  • 20220130_142224.jpg
    20220130_142224.jpg
    1.2 MB · Views: 103
  • 20220130_142239.jpg
    20220130_142239.jpg
    1.4 MB · Views: 106
  • 20220130_142219.jpg
    20220130_142219.jpg
    1.4 MB · Views: 109
Really loving the colours of this build and your painting style, Fettacini!

Looking forward to seeing the finished build! (y)
 
Really loving the colours of this build and your painting style, Fettacini!

Looking forward to seeing the finished build! (y)
Thank you so much! More to come! Just waiting on my new belt from handmade horrors and the helmet suspension system then I can do a full suit up with the new helmet.

I will probably end up buying another flight suit soon, I love this budget version bit my builds have evolved to where I just want a solid, good flight suit.

Thank you again for commenting, I love hearing from anyone and everyone on things they like and things they think I should change.
 
I got my range finder light board in from Westabay electronics. You can get it on etsy or his direct store. It only costs about 20 bucks and runs off a coin cell 2032 battery. This thing is amazing! Solid little unit and fits my custom 3d printed resin range finder housing. I used a low pro perspex block casting. Here are some pictures to show you what I mean.

The unit has a tilt switch in it so it comes on when you drop the range finder. I used high strength clear velcro to hold the perspex block place ( to allow battery changes and to allow me to activate the on/off switch)and the the board was just hot glued in.
 

Attachments

  • 20220201_143318.jpg
    20220201_143318.jpg
    1,010.5 KB · Views: 104
  • 20220201_143325.jpg
    20220201_143325.jpg
    1.4 MB · Views: 107
  • 20220201_143311.jpg
    20220201_143311.jpg
    1.2 MB · Views: 109
  • 20220201_143306.jpg
    20220201_143306.jpg
    1.4 MB · Views: 105
  • 20220201_143338.jpg
    20220201_143338.jpg
    1.3 MB · Views: 98
  • 20220201_160638.jpg
    20220201_160638.jpg
    1.3 MB · Views: 107
  • 20220201_160648.jpg
    20220201_160648.jpg
    1.5 MB · Views: 96
  • 20220201_160724.jpg
    20220201_160724.jpg
    1.3 MB · Views: 104
  • 20220201_160713.jpg
    20220201_160713.jpg
    1.2 MB · Views: 106
Thanks man! Here are some updated gauntlet build pics.. I started a seperate thread in which I endeavor to build an ultimate right gauntlet. A lofty goal for sure and I've already been shown some mistakes I have made and have begun correcting them.

For a full rundown, check out the thread, otherwise this is an RKD mold, I used Quest darts, vintage alco switches from ebay, a few 3d printed parts( protrusion above the darts. Hose connector ect), and what prompted this build, a real eveready light!

I painted this with Tamiya Maroon spray, a much darker red that I think captures the gauntlet color much better than my previous attempts with Tamiya Dull red spray. Otherwise I painted it with the same techniques of post shading with the airbrush and black and the gray misting that's prominent on this gauntlet. . .. . Guess I'll have to probably build another right gauntlet with my new and improved flamethrower build with found parts. I off the flamethrowers via my IG @ andrew.hoyt.rowell
I build them out of all metal parts and they extend and retract manually and have the correct Kuhnke brand parts and real flex metal shielded hosting as well as the 3.5mm red coil wire which incidently I found to probably be a Kaiser camera accessory. Kaiser produced a flash cord that is red and coiled and had 3.5mm connectors. Seeing as a few Kaiser parts where used I don't think it's a stretch to fathom that they may have used this vintage cord to make the red coil wire.
 

Attachments

  • 20220213_111841.jpg
    20220213_111841.jpg
    2.8 MB · Views: 100
  • 20220213_111838.jpg
    20220213_111838.jpg
    7.9 MB · Views: 97
  • 20220213_111859.jpg
    20220213_111859.jpg
    1.6 MB · Views: 103
  • 20220213_111847.jpg
    20220213_111847.jpg
    1.2 MB · Views: 108
  • 20220213_111903.jpg
    20220213_111903.jpg
    1.3 MB · Views: 98
  • 20220213_111910.jpg
    20220213_111910.jpg
    1.7 MB · Views: 105
  • 20220213_111926.jpg
    20220213_111926.jpg
    1.4 MB · Views: 103
  • 20220213_111922.jpg
    20220213_111922.jpg
    2.3 MB · Views: 100
  • 20220213_111932.jpg
    20220213_111932.jpg
    951.9 KB · Views: 102
  • 20220213_111934.jpg
    20220213_111934.jpg
    1.4 MB · Views: 100
  • 20220213_111821.jpg
    20220213_111821.jpg
    7.9 MB · Views: 105
This thread is more than 1 year old.

Your message may be considered spam for the following reasons:

  1. This thread hasn't been active in some time. A new post in this thread might not contribute constructively to this discussion after so long.
If you wish to reply despite these issues, check the box below before replying.
Be aware that malicious compliance may result in more severe penalties.
Back
Top