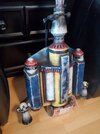
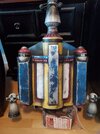
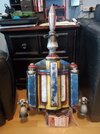
Stylized turned to Accurate Pre Pro 2 slow build

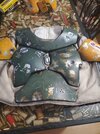
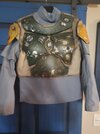
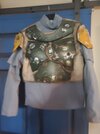
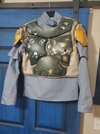
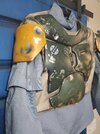
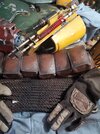
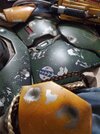
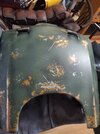
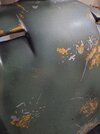
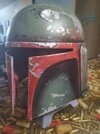
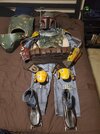
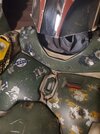
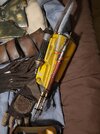
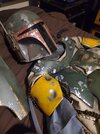
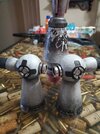
I also took the plunge into the soft goods and took my airbrush to the vest to weather it. This is just the base layer black sprayed in the seems and around the armor plates.
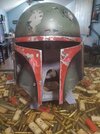
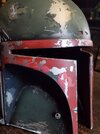
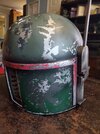
Yes yes, I may have gone a little overboard bc the Pre Pro 2 suit is actually pretty devoid of dirt and grime. But I wanted a dirty boba and I believe this will look great once you guys get to see the whole thing!

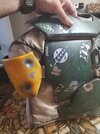
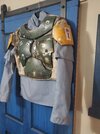
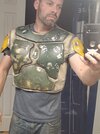
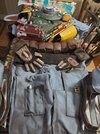
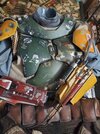
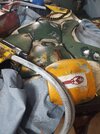
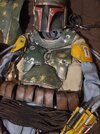
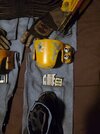
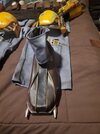
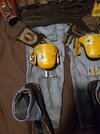
I also finally got around to dying my flight suit. I used RIT dye, denim blue and a turquoise color as well as recommended by NorCal Cap on intstagram. I believe he has a buikd thread here as well. One of the best PP2 suits out there!

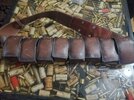
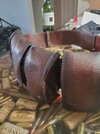
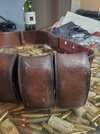
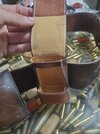
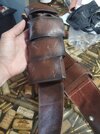
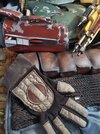
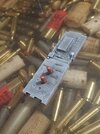
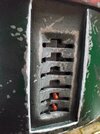
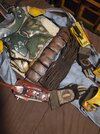
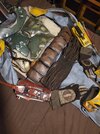
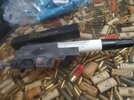
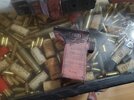
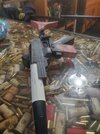
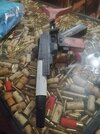
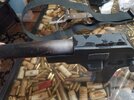
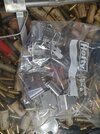
It came out a little light but that's ok, subsequent shading and weathering will darken it. I also got my girthbelt in and need to dye that and got the ammo belt in. Since this is a poor man's build I found a rather accurate ammo belt from Amazon, its a new Xcoser item, no it's not thier old larger squared ammo belt. They came out with a new more accurate belt that has smaller pouches that are shaped with the correct slope and size. Very nice for 30ish bucks. Little weathering and I believe it will do the trick!
 

Attachments

  • 20210527_160235.jpg
    20210527_160235.jpg
    2.2 MB · Views: 177
  • 20210527_160247.jpg
    20210527_160247.jpg
    1.8 MB · Views: 173
  • 20210528_104129.jpg
    20210528_104129.jpg
    973.1 KB · Views: 165
  • 20210528_104135.jpg
    20210528_104135.jpg
    893.6 KB · Views: 180
  • 20210528_104142.jpg
    20210528_104142.jpg
    2.1 MB · Views: 181
  • 20210528_104147.jpg
    20210528_104147.jpg
    2 MB · Views: 177
  • 20210528_104153.jpg
    20210528_104153.jpg
    2.4 MB · Views: 181
I also did a quick test fit of the flak vest. Overall it fits very well, im pretty happy with it so far. My electronics display came in so off comes the left chest plate and installation of the readout will commence! I'm also going to dye my girth belt today and weather the ammo belt and snap some pics for yall so you can see the new xcoser ammo belt. Like I said, it's pretty good actually!
 

Attachments

  • 20210529_134043.jpg
    20210529_134043.jpg
    1.1 MB · Views: 164
  • 20210529_134106.jpg
    20210529_134106.jpg
    953.1 KB · Views: 164
  • 20210529_134057.jpg
    20210529_134057.jpg
    1.1 MB · Views: 169
Forgot to flip the images!
 

Attachments

  • 20210529_134106.jpg
    20210529_134106.jpg
    1.7 MB · Views: 162
  • 20210529_134043.jpg
    20210529_134043.jpg
    1.9 MB · Views: 161
  • 20210529_134057.jpg
    20210529_134057.jpg
    1.9 MB · Views: 164
Here are some pics of the new improved xcoser belt. Freaking 30 bucks. Yeah it's no Delta Mike belt. But I'm Boba on a budget!
You can see that it has better stitching( well before I weathered it. I have airbrushed shading all over it to make the sticking less pronounced and then used Vallejo acrylics to paint fine scratches ranging from white to light brown).
Overall the shape of the pouches is more true to the real thing, I have them stuffed with pieces of plastic at rhe moment but I will add custom cut foam blocks or even maybe print the free "Boba fett utility pouch insides" from thingiverse, basically random "space pirate" gadgets that fit in the puoches and look like ammo packs, batteries and all other manor of space fairing gadgets.
 

Attachments

  • 20210530_134352.jpg
    20210530_134352.jpg
    3.6 MB · Views: 161
  • 20210530_134359.jpg
    20210530_134359.jpg
    1.4 MB · Views: 164
  • 20210530_134402.jpg
    20210530_134402.jpg
    1.5 MB · Views: 159
  • 20210530_134407.jpg
    20210530_134407.jpg
    1.6 MB · Views: 143
  • 20210530_134420.jpg
    20210530_134420.jpg
    1.5 MB · Views: 149
  • 20210530_134837.jpg
    20210530_134837.jpg
    2 MB · Views: 144
  • 20210530_134843.jpg
    20210530_134843.jpg
    2 MB · Views: 162
And it begins! Resin casting by GrimWorks Armory on etsy. I csnt recomend this helmet enough, the casting is absolutely stunning! Even the inside is gelcoated and reinforced and the accessories and packing are top tier.
I did replace the RF topper with CS Stallard ( also from etsy) parts. His casting is also top shelf and priced very well. Anyways, this is just the beginning. The GWA helmet is "clean" , basically just the dent is the only sculpted damage. So all the surface scratches need to be added with a Dremel. As I understand it, this helmet casting is based on a custom build using Rafelfett's templates and dimensions and GWA is the only one on Etsy that sells it.
Like I said, after handling a FettPride 2, and 3 other brands( some of them can not be named, and some I have no idea who actually made them as I got them in ebay lots of used Boba stuff), I cant say enough good things about Grimworks casting. It is downright beautiful!
So here is is just sprayed with a coat of primer after having cut the visor out. I did add some surface scratches with a dremel and cutoff wheel and diamond engraving tip.
Still whittling out the rear keys lots to which I will add a CS Stallard Mq1 board casting.
 

Attachments

  • 20210530_134000.jpg
    20210530_134000.jpg
    1.7 MB · Views: 155
  • 20210530_134004.jpg
    20210530_134004.jpg
    1.7 MB · Views: 147
  • 20210530_134008.jpg
    20210530_134008.jpg
    1.5 MB · Views: 167
  • 20210530_134012.jpg
    20210530_134012.jpg
    1.7 MB · Views: 151
  • 20210530_134019.jpg
    20210530_134019.jpg
    1.5 MB · Views: 149
  • 20210530_134101.jpg
    20210530_134101.jpg
    1,009.1 KB · Views: 155
  • 20210530_134056.jpg
    20210530_134056.jpg
    1.5 MB · Views: 151
  • 20210530_134105.jpg
    20210530_134105.jpg
    1.7 MB · Views: 169
So still sorting out the helmet. Should have an update soon. In the meantime, finished the backplate and decided to do a bit of a layout spread. Attached the elastic to the knees and the glue is still drying as it's clamped so they are absent.
Overall I'm pretty stoked at how it all looks together. You can see the girthbelt too, I dyed and spray painted it, still need to add some more color to it but it's all coming together. Just need to find a jetpack harness and start my jetpack!
 

Attachments

  • 20210602_152434.jpg
    20210602_152434.jpg
    1.7 MB · Views: 143
  • 20210602_152440.jpg
    20210602_152440.jpg
    2.4 MB · Views: 154
  • 20210602_152444.jpg
    20210602_152444.jpg
    2.3 MB · Views: 155
  • 20210602_152458.jpg
    20210602_152458.jpg
    1.7 MB · Views: 153
  • 20210602_152503.jpg
    20210602_152503.jpg
    1.6 MB · Views: 148
  • 20210602_152512.jpg
    20210602_152512.jpg
    2.3 MB · Views: 141
  • 20210602_152531.jpg
    20210602_152531.jpg
    2.1 MB · Views: 141
  • 20210602_152539.jpg
    20210602_152539.jpg
    1.5 MB · Views: 130
  • 20210602_152603.jpg
    20210602_152603.jpg
    2.5 MB · Views: 144
Alrighty, so here are some progress shots of the helmet. Man, my tape kept pulling up paint ( mostly bc I was impatient lol) ans I was not happy with the mandible. So I have repainted the mandible and cheeks twice now.

All colors are Tamiya sprays, I also used a mix of Rustoleum corral and pink to do the pink portions. Still not terribly happy with the color but im calling it good.

Still have a long ways to go, also waiting on the visor. One note, I used Tamiya clear red over a silver bade coat on the dental files on the board and it gave me a pretty good "anodized"look. I'm happy with it.

The Borden connector is a real 3 hole Borden from ebay. Removed the housing then cut it in half, to be able to use the correct side. I then polished and smoothed the cut side and added a paint wash and then hit it with steel wool.

Using Super Jedi's methods, I mounted it to a circle of styrene and then inserted it from behind the mandible. The board was also glued inside and I used Superjedi's method of adding a backer from curved styrene.

Awsome helmet casting by GrimWorks on Etsy

MQ 1 with dental files and some of the range finder parts castings by C S Stallard designs

I have a T visor on order so waiting on that. To finish the look.

I also used a cheap airsoft helmet suspension system that had an uncannily accurate chin cup so I will install that.
 

Attachments

  • 20210607_160605.jpg
    20210607_160605.jpg
    1.5 MB · Views: 143
  • 20210607_160620.jpg
    20210607_160620.jpg
    1.1 MB · Views: 136
  • 20210607_160542.jpg
    20210607_160542.jpg
    1.7 MB · Views: 142
  • 20210607_160628.jpg
    20210607_160628.jpg
    1.6 MB · Views: 131
  • 20210607_160646.jpg
    20210607_160646.jpg
    1.2 MB · Views: 138
  • 20210607_160652.jpg
    20210607_160652.jpg
    1.7 MB · Views: 141
  • 20210607_160712.jpg
    20210607_160712.jpg
    1.3 MB · Views: 129
  • 20210607_160716.jpg
    20210607_160716.jpg
    1.3 MB · Views: 124
  • 20210607_160455.jpg
    20210607_160455.jpg
    1.9 MB · Views: 126
  • 20210607_160444.jpg
    20210607_160444.jpg
    1.9 MB · Views: 126
Here are some cleared pics, including pictures of the chin strap and Mq1 board. I have also started adding some of the small scratches and color spots across the helmet.
 

Attachments

  • 20210608_164827.jpg
    20210608_164827.jpg
    2 MB · Views: 138
  • 20210608_164814.jpg
    20210608_164814.jpg
    1.8 MB · Views: 123
  • 20210608_164821.jpg
    20210608_164821.jpg
    1.5 MB · Views: 127
  • 20210608_164801.jpg
    20210608_164801.jpg
    2.1 MB · Views: 124
  • 20210608_164807.jpg
    20210608_164807.jpg
    1.5 MB · Views: 117
  • 20210608_164756.jpg
    20210608_164756.jpg
    2 MB · Views: 125
  • 20210608_164750.jpg
    20210608_164750.jpg
    2.3 MB · Views: 127
  • 20210608_164745.jpg
    20210608_164745.jpg
    2 MB · Views: 125
  • 20210608_164738.jpg
    20210608_164738.jpg
    1.4 MB · Views: 126
  • 20210608_170235.jpg
    20210608_170235.jpg
    1.9 MB · Views: 124
  • 20210608_170239.jpg
    20210608_170239.jpg
    1.7 MB · Views: 120
  • 20210608_170251.jpg
    20210608_170251.jpg
    2.3 MB · Views: 134
Love it man looks really good!! I would take some steel wool 0000 and go over the whole helmet to give it a more natural weathered look and it cleans up the edges a bit
 
Here is a better more comprehensive layout. All that's left is the jetpack and harness as well as a few other small details.
 

Attachments

  • 20210613_192601.jpg
    20210613_192601.jpg
    1.8 MB · Views: 157
  • 20210613_192611.jpg
    20210613_192611.jpg
    1.7 MB · Views: 143
  • 20210613_192618.jpg
    20210613_192618.jpg
    1.9 MB · Views: 141
  • 20210613_192626.jpg
    20210613_192626.jpg
    1.5 MB · Views: 130
  • 20210613_192622.jpg
    20210613_192622.jpg
    1.4 MB · Views: 125
  • 20210613_192636.jpg
    20210613_192636.jpg
    1.7 MB · Views: 119
  • 20210613_192642.jpg
    20210613_192642.jpg
    2.2 MB · Views: 131
  • 20210613_192647.jpg
    20210613_192647.jpg
    1.5 MB · Views: 124
  • 20210613_192652.jpg
    20210613_192652.jpg
    2.2 MB · Views: 116
  • 20210613_192702.jpg
    20210613_192702.jpg
    2.1 MB · Views: 117
  • 20210613_192700.jpg
    20210613_192700.jpg
    2.1 MB · Views: 125
  • 20210613_192709.jpg
    20210613_192709.jpg
    1.8 MB · Views: 149
So I know this isn’t completely spot on and by no means don’t take that offensively but this is AMAZING!!! It has such a real look to it and the dark colors give it so much depth I love it!! I like how you took the idea and gave it your own spin on it and I’m dying to see what it looks like all suited up! Absolutely an amazing job my friend!
 
Thanks buddy! I appreciate alm your feedback. Yes, this is a memory based and stylized pre pro. Basically how I remember it from the Kenner card back and the old 1/4, scale Screamin brang model kit. I'm alright with it being somewhat inaccurate.
I'll always be tweaking it though lol. Thank you again for all of your feedback, not much attention on prepro2 so I appreciate any and all feedback.

Next on the build is jetpack ( Man of War with Quest metal parts) harness and sling gun!

So the sling gun, I can not for the life of me find the kaiser parts, so Rafelfett steps in again and knocks it out of the park with print files. Man, Rafelfett, seriously, if you ever come to Mt pleasant sc, you have a personal invite to come hang with my team and you won't ever get a speeding ticket lol.

I found a Japanese copitar telescope, cut to fit and have just roughly fit the parts together and started the initial stages of sanding and filling.
 

Attachments

  • 20210614_150343.jpg
    20210614_150343.jpg
    3.2 MB · Views: 119
  • 20210614_150353.jpg
    20210614_150353.jpg
    8.1 MB · Views: 111
  • 20210614_150358.jpg
    20210614_150358.jpg
    3.3 MB · Views: 125
  • 20210614_150624.jpg
    20210614_150624.jpg
    1.3 MB · Views: 124
  • 20210614_150427.jpg
    20210614_150427.jpg
    2.2 MB · Views: 117
Ok, so I have my stand in Sling Gun. It was built using Rafelfett's 3d files and a vintage Tasco telescope. It's a little rough, I am waiting to gwt my resin printer and I will redo the parts with resin printed parts( much smoother).
I also took a page out of some builder's books and kind of fudged the under barrel greeblies using airbrush parts.
Overall I'm not terribly happy with it, but it's a good stand in. I will definitely redo this.
 

Attachments

  • 20210627_163527.jpg
    20210627_163527.jpg
    8.9 MB · Views: 115
  • 20210627_163535.jpg
    20210627_163535.jpg
    7.7 MB · Views: 114
  • 20210627_163538.jpg
    20210627_163538.jpg
    3 MB · Views: 119
  • 20210627_163542.jpg
    20210627_163542.jpg
    3.1 MB · Views: 115
  • 20210627_163557.jpg
    20210627_163557.jpg
    7.7 MB · Views: 119
  • 20210627_163617.jpg
    20210627_163617.jpg
    1.4 MB · Views: 115
I also am working on my Man of War jetpack. I am very impressed by it. I know Wasted Fett, and Darth Voorhees do excellent jetpack as well and some prefer those but im pretty happy with Christian's pack. All the parts were cleanly molded and casted beautifully.
So because I am on a budget, this pack will be for my RoTJ SE and Pre Pro2. I know the Pre pro2 has some major differences so yet another reason this is "stylized". It will work as I am not going for 501st certification. So this will be more of a RoTJ SE pack than Prepro2.
I have added Quest Designs aluminum parts on the jets and I have ordered thier bottom grill, rocket knurled nut, and beacon.
I have started the painting on the pack and man. . .. . . Yall did not warn me how difficult an Rotj jetpack is. This is easily the most frustrating thing to paint.
Having no templates the damage is eyeballed and even the references are all very different ( stunt packs, vs the hero packs vs the same pack a week or two into shooting. . .. it's all different).
Anyways, here are a few pics of the nozzles and rocket, once again the rocket nut will be replaced with the Quest Designs part when it comes in.
I did notice that the entire pack, much like all Boba's armor, has fine black paint splatter all over so I gave started that on the nozzles.
 

Attachments

  • 20210627_163730.jpg
    20210627_163730.jpg
    2 MB · Views: 113
  • 20210627_163734.jpg
    20210627_163734.jpg
    1.8 MB · Views: 112
  • 20210627_163737.jpg
    20210627_163737.jpg
    1.6 MB · Views: 110
  • 20210627_163743.jpg
    20210627_163743.jpg
    2 MB · Views: 111
  • 20210627_163744.jpg
    20210627_163744.jpg
    1.5 MB · Views: 111
  • 20210627_163753.jpg
    20210627_163753.jpg
    2 MB · Views: 104
  • 20210627_163814.jpg
    20210627_163814.jpg
    2.1 MB · Views: 107
  • 20210627_163802.jpg
    20210627_163802.jpg
    1.7 MB · Views: 109
  • 20210627_163757.jpg
    20210627_163757.jpg
    2 MB · Views: 115
Last edited:
Also, sorry for the photo dump, hot my Fullmetal Fett clips in and BigDane harness! Both of which are well made, now I have to figure out how to get my cheap ass sewing machine working. I'm going to try and sew it myself and I'd rather not do it by hand.
I also scored a real U.S. divers buckle on ebay. It was cheap and came in a lot of a bunch of belts so I got an additional metal us divers buckle of a slightly different style and a plastic one( to be used on my animated version).
 

Attachments

  • 20210627_163625.jpg
    20210627_163625.jpg
    1.5 MB · Views: 122
  • 20210627_163635.jpg
    20210627_163635.jpg
    2.2 MB · Views: 113
  • 20210627_163642.jpg
    20210627_163642.jpg
    1.9 MB · Views: 115
Another jetpack preview. Just doing some color work on the pack. Man this thing is a beast, im also trying to get my Bigdane harness rigged. Got an o.g. us divers belt buckle and man that thing is a pain to get rigged.
Anyways, the pack has the main colors on, I had to redo some of them due to my rookie mistake of not wash the resin clean enough before painting.
So I have shaded it and hit it with a steel wool pad. I now need to go in and do the fine details and chipping with a brush and some black spatter and other details. Also need to order my beacon from Quest.
 

Attachments

  • 20210629_154918.jpg
    20210629_154918.jpg
    1.8 MB · Views: 127
  • 20210629_154913.jpg
    20210629_154913.jpg
    2 MB · Views: 129
  • 20210629_154909.jpg
    20210629_154909.jpg
    2 MB · Views: 131
Looking good for sure!! You definitely have your own style of painting that’s for sure and I love it! It’s a grimy look and it really makes the piece stand out!
 
This thread is more than 1 year old.

Your message may be considered spam for the following reasons:

  1. This thread hasn't been active in some time. A new post in this thread might not contribute constructively to this discussion after so long.
If you wish to reply despite these issues, check the box below before replying.
Be aware that malicious compliance may result in more severe penalties.
Back
Top