Stormmauer
New Hunter
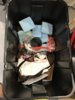
For the past year or so I have been gathering parts to build a Boba Fett Costume. Recently however, following a brilliant thread by my now friend, bh19812, who has been helping me with bits and pieces. He's a fantastic chap and a real hard worker when it comes to all this. My many thanks go to him for his videos and posts (and for making me do this....) and to all you other Boba's who have made me spend so much bloody money.
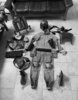
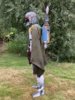
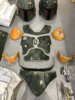
My build is for a Boba ROTJ HERO suit and I'm going for basic 501st approval, but aiming for something really special. Currently its all unassembled but in varying stages. Other than the helmet, everything is painted by me.
SO, here's the situation from head down:
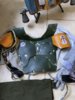
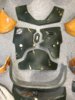
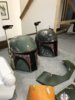
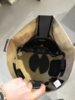
HELMET ROTJ:
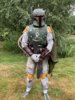
My helmet was purchased second hand off TDH, but it is an RS painted helmet and I've done a few upgrades including a new visor, dental files, insides, sorted the range finder, added a chinstrap, repainted the red and added physical damage. I think it's good to go!
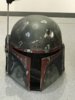
HELMET ESB:
Just for fun and what got me into this, a Terminal Fettler ESB painted helmet from ebay.
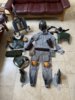
NECK SEAL:
BM neck seal sewed into flight suit.
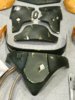
FLAK VEST:
Arkady, slots cut and weathered.
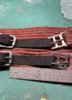
BRAIDS:
Woodman. No more to be said
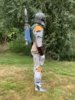
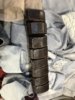
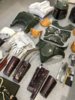
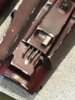
ARMOUR:
WF Armour, painted by me using Tamiya Cans, humbrol airbrush and tamika airbrush. Stickers by BM (though they're not very sticky and may come off). Metal darts machined by myself and electronics by unknown. Don't like to blow my own trumpet but I think I really nailed this.
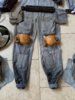
FLIGHT SUIT:
BM, second hand but fits like it was tailored. I have some ankle ties for this also by BM to sew in.
GLOVES:
Mike M. They're perfect
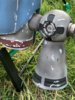
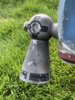
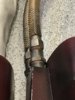
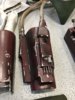
GAUNTLETS
Man of War studios, RS components red light, Machine craft Rocket (electroplated copper head), metal darts. 'Developed' a technique to weather the tubes quickly involving leather dye. My friend bh19812 has the details for this. They require magnets attached and then some more work. Lighter in colour in person than my images show, darn lights.
GIRTH BELT:
No idea the maker, but it needs straps.
AMMO BELT:
Second hand MoW belt, repaired for scratches and dyed by me.
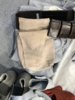
POUCHES:
BM ROTJ Pouches, very nice and I think are the right colour??
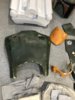
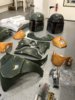
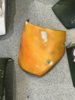
ANKLE SPATS:
Arkady, re-dyed to what I believe is the correct colour.
BOOTS:
RS/IB Boots with metal spikes. Very nice.
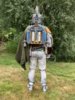
CAPE:
US Army shelter, needs that weird plastic plate thing but cut and sewn at the edges.
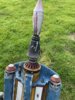
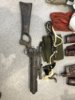
BLASTER:
Off eBay in the UK. It has been painted by me and the scope is a real correct vintage scope. I plan on using this for trooping and buying a nice (metal?) kit to have one for display.
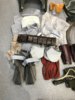
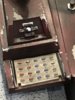
TOOLS:
Real parts, modified and painted by myself. Mitchell arms turned by myself and added on.
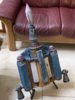
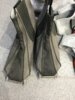
JETPACK:
MoW Studios, I also have the majority of metal greeblies but am collecting more. This is very unpainted and unassembled. It'll be the last thing I do, and i'll be airbrushing with humbrol. Harness might be big dane, might be a DIY Job. I feel i can do this myself in my shop. The hard part for me is the darn sewing......
So, whats left? Assembly mainly which consists of; sewing, gluing, electronic-ing (otherwise this doesn't work..), strapping, painting, wearing, swearing, crying and smiling.
I'll be doing semi-regular updates from now but hopefully this will be good for those UK Bobas who wish to do this all.
Anyway, enjoy these (slightly darker than real life) photos:
My build is for a Boba ROTJ HERO suit and I'm going for basic 501st approval, but aiming for something really special. Currently its all unassembled but in varying stages. Other than the helmet, everything is painted by me.
SO, here's the situation from head down:
HELMET ROTJ:
My helmet was purchased second hand off TDH, but it is an RS painted helmet and I've done a few upgrades including a new visor, dental files, insides, sorted the range finder, added a chinstrap, repainted the red and added physical damage. I think it's good to go!
HELMET ESB:
Just for fun and what got me into this, a Terminal Fettler ESB painted helmet from ebay.
NECK SEAL:
BM neck seal sewed into flight suit.
FLAK VEST:
Arkady, slots cut and weathered.
BRAIDS:
Woodman. No more to be said
ARMOUR:
WF Armour, painted by me using Tamiya Cans, humbrol airbrush and tamika airbrush. Stickers by BM (though they're not very sticky and may come off). Metal darts machined by myself and electronics by unknown. Don't like to blow my own trumpet but I think I really nailed this.
FLIGHT SUIT:
BM, second hand but fits like it was tailored. I have some ankle ties for this also by BM to sew in.
GLOVES:
Mike M. They're perfect
GAUNTLETS
Man of War studios, RS components red light, Machine craft Rocket (electroplated copper head), metal darts. 'Developed' a technique to weather the tubes quickly involving leather dye. My friend bh19812 has the details for this. They require magnets attached and then some more work. Lighter in colour in person than my images show, darn lights.
GIRTH BELT:
No idea the maker, but it needs straps.
AMMO BELT:
Second hand MoW belt, repaired for scratches and dyed by me.
POUCHES:
BM ROTJ Pouches, very nice and I think are the right colour??
ANKLE SPATS:
Arkady, re-dyed to what I believe is the correct colour.
BOOTS:
RS/IB Boots with metal spikes. Very nice.
CAPE:
US Army shelter, needs that weird plastic plate thing but cut and sewn at the edges.
BLASTER:
Off eBay in the UK. It has been painted by me and the scope is a real correct vintage scope. I plan on using this for trooping and buying a nice (metal?) kit to have one for display.
TOOLS:
Real parts, modified and painted by myself. Mitchell arms turned by myself and added on.
JETPACK:
MoW Studios, I also have the majority of metal greeblies but am collecting more. This is very unpainted and unassembled. It'll be the last thing I do, and i'll be airbrushing with humbrol. Harness might be big dane, might be a DIY Job. I feel i can do this myself in my shop. The hard part for me is the darn sewing......
So, whats left? Assembly mainly which consists of; sewing, gluing, electronic-ing (otherwise this doesn't work..), strapping, painting, wearing, swearing, crying and smiling.
I'll be doing semi-regular updates from now but hopefully this will be good for those UK Bobas who wish to do this all.
Anyway, enjoy these (slightly darker than real life) photos:
Attachments
-
 IMG_4214.jpg1.6 MB · Views: 449
 -
 IMG_4215.jpg1.4 MB · Views: 442
 -
 IMG_4216.jpg1.9 MB · Views: 409
 -
 IMG_4217.jpg1.8 MB · Views: 398
 -
 IMG_4219.jpg1.8 MB · Views: 465
 -
 IMG_4220.jpg1.9 MB · Views: 446
 -
 IMG_4221.jpg1.5 MB · Views: 459
 -
 IMG_4222.jpg1.3 MB · Views: 400
 -
 IMG_4223.jpg1 MB · Views: 459
 -
 IMG_4224.jpg1.7 MB · Views: 435
 -
 IMG_4225.jpg1.3 MB · Views: 448
 -
 IMG_4226.jpg1.2 MB · Views: 435
 -
 IMG_4227.jpg934.6 KB · Views: 385
 -
 IMG_4229.jpg953.3 KB · Views: 425
 -
 IMG_4230.jpg1.2 MB · Views: 458
 -
 IMG_4231.jpg972.2 KB · Views: 434
 -
 IMG_4232.jpg1.1 MB · Views: 446
 -
 IMG_4233.jpg744.2 KB · Views: 427
 -
 IMG_4234.jpg677.6 KB · Views: 426
 -
 IMG_4235.jpg1.4 MB · Views: 461
 -
 IMG_4236.jpg1.4 MB · Views: 385
 -
 IMG_4237.jpg1.1 MB · Views: 427
 -
 IMG_4238.jpg796.2 KB · Views: 466
 -
 IMG_4212.jpg1.3 MB · Views: 446
 -
 IMG_4213.jpg2.1 MB · Views: 453
Last edited:
")