ROTJ Repaint and Modifications: Updated

Tfett40

Active Hunter
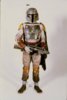
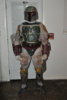
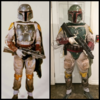
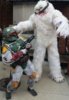
A fellow 501st buddy, before meeting me, purchased a completed Boba Fett from Sith Planet/ Randy Johnson. When I was asked to look at it, I observed several things wrong with the completed suit ranging from the paint scheme to overall quality. Sith Planet is a Star Wars prop maker out of Arizona and sells items on both ebay, facebook and his website. Some of his work looks great, but Boba Fett is not his specialty. If you are looking to get 501st approved with his completed suit, you will have to make several modification and repaint if you choose to buy from him.

I decided to help out my buddy by repainting and modifying his Sith Planet suit to reach 501st standards. Here are a few images of what he received.
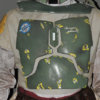
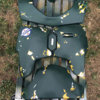
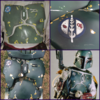
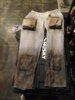
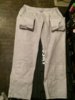
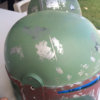
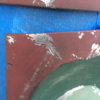
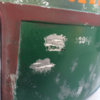
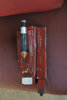

Armor:
His armor is a decent plastic shape, however the paint job was less than desireable. It was blasted with green and the damage was topical applied with a brush and sponge brush and the decal was already peeling off.
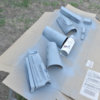
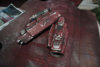
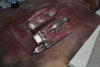
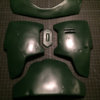
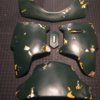
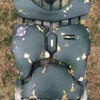
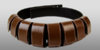
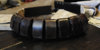
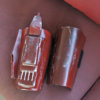
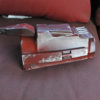
1warn.jpg


Gauntlets:
The mold was a basic calm shell set up. However, it was missing several greeblies, hose attachments, buttons and the paint damage once again was simply brushed on:
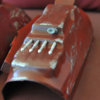
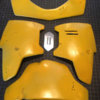
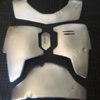
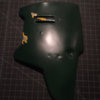
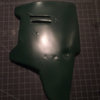
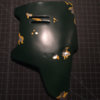
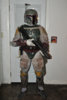
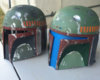
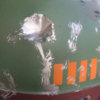
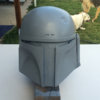
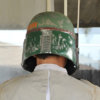
SMP_2851.jpg

SMP_2848.jpg

1b.jpg

2.jpg


Helmet:
Helmet is a mystery mold. The rangefinder and earcap did not stay in the up position and kept popping off. The colors and damage are wrong and paint style is the same as the armor and gauntlets:

wrn1.jpg

warn4.jpg

warn2.jpg

warn3.jpg


This is my first tackle at ROTJ paint up, but I am feeling more comfortable with it since I had 1 go around with completing my ESB.
 

Attachments

  • 1warn.jpg
    1warn.jpg
    181.3 KB · Views: 348
  • SMP_2851.jpg
    SMP_2851.jpg
    382.9 KB · Views: 354
  • wrn1.jpg
    wrn1.jpg
    183 KB · Views: 340
  • 2.jpg
    2.jpg
    232.5 KB · Views: 343
  • 1b.jpg
    1b.jpg
    380.1 KB · Views: 354
  • SMP_2848.jpg
    SMP_2848.jpg
    219.1 KB · Views: 352
  • warn3.jpg
    warn3.jpg
    135.6 KB · Views: 344
  • warn2.jpg
    warn2.jpg
    172 KB · Views: 353
  • warn4.jpg
    warn4.jpg
    160.3 KB · Views: 338
Last edited by a moderator:
Helmet is NOT a mystery mold its a recast fettpride helmet (FPH2) The colors are actually closer then some Ive seen (helmet) the upper cheeks are the major issue....but its actually better looking then the armor.
 
Helmet is NOT a mystery mold its a recast fettpride helmet (FPH2) The colors are actually closer then some Ive seen (helmet) the upper cheeks are the major issue....but its actually better looking then the armor.
Thanks. I really have no idea on where any of these parts came from. So It is good to know.

- - - Updated - - -

1st thing I tackled were the gauntlets

I created a gauntlet hose by drilling a hole. I next cut a plastic pen in half, smashed it down to get a cylinder shape and filled it with filler.
16.jpg

17.jpg

19.jpg


I stripped the gauntlets with acetone, washed with with soap and water. Then I started over with a base layer of primer and then shot with a layer of silver (not pictured)
20.jpg


When I masked the silver, I used the images from the Magic Of Myth as my reference and just eyeballed it:
http://www.thedentedhelmet.com/gallery/g536-magic-of-myth-2001-08-07.html
I simply printed the images and used them as I painted or masked the damage
28.jpg


I found a nice red match from Lowes called, Satin Royal Garnet
25.jpg

24.jpg


I did not document my process very good, but here is my completed repaint with added greeblies and buttons. It is not perfect but an improvement
3.jpg

4.jpg
 

Attachments

  • 16.jpg
    16.jpg
    275.9 KB · Views: 323
  • 20.jpg
    20.jpg
    314.6 KB · Views: 329
  • 19.jpg
    19.jpg
    270.2 KB · Views: 338
  • 17.jpg
    17.jpg
    470.1 KB · Views: 348
  • 24.jpg
    24.jpg
    262.4 KB · Views: 331
  • 25.jpg
    25.jpg
    262.8 KB · Views: 332
  • 28.jpg
    28.jpg
    350.2 KB · Views: 327
  • 4.jpg
    4.jpg
    220.3 KB · Views: 263
  • 3.jpg
    3.jpg
    208.5 KB · Views: 350
"cut a plastic pen in half, smashed it down to get a cylinder shape and filled it with filler"

OMG, I am laughing so hard my cheeks hurt!! You're the man, TAguirre. I can't believe it could be so simple! The rest of your paint-up looks great, and as a sad owner of Sith Planet gauntlets, it is much better than that product.

Also kudos to the eye of Fett4Real, calling out the helmet from just those pics -- you're the best!

It was discussed before...I actually noticed it because of the damage and such...and Fettpride confirmed it for me...said Korbath has been recasting peoples work for years Gino told me the other day same thing with some of his stuff...
 
So my repaint continues. I ultimately end up using RafelFett's template as my guide for my first attempt at ROTJ Armor.
http://www.thedentedhelmet.com/f20/boba-fett-rotj-armor-stencils-42480/
I did not create stencils, I basically just used the images as reference and I balled it. Not super accurate, but an improvement over this:

a.jpg


For this repaint, I used Tamiya Spray Paint found at Hobby Stores and then I used an airbrush to add the weathering details. So here is a quick run down, without getting into much details.

First thing I did was strip the paint with acetone and blasted it with a base of grey primer and silver.
a1.jpg


a2.jpg


Next layer is the Yellow. I used Tamiya "Camel Yellow" TS-34 and began masking the damaged after it dried.
a3.jpg


After the yellow masking, it hit with Tamiya Dark Green AS-17.
a4.jpg


Obviously, once it dries, you can start peeling back all the masking:
a5.jpg

a6.jpg

a7.jpg

a7a.jpg


The rest of the damage was topically applied with a brush:
a8.jpg


Then I finished off the weathering details with grey and black airbrushing:
a9.jpg


I purchased the ROTJ decal from Delucks Designs
a10.jpg


The owner of the armor and I are happy with the results.
a12.png
 

Attachments

  • a1.jpg
    a1.jpg
    192.9 KB · Views: 347
  • a.jpg
    a.jpg
    181.3 KB · Views: 343
  • a4.jpg
    a4.jpg
    240.4 KB · Views: 323
  • a3.jpg
    a3.jpg
    267.4 KB · Views: 324
  • a2.jpg
    a2.jpg
    220.8 KB · Views: 344
  • a6.jpg
    a6.jpg
    221.3 KB · Views: 318
  • a5.jpg
    a5.jpg
    224.5 KB · Views: 336
  • a8.jpg
    a8.jpg
    432 KB · Views: 349
  • a7a.jpg
    a7a.jpg
    261.6 KB · Views: 328
  • a7.jpg
    a7.jpg
    226.3 KB · Views: 335
  • a9.jpg
    a9.jpg
    431.8 KB · Views: 340
  • a10.jpg
    a10.jpg
    234.4 KB · Views: 361
  • a12.png
    a12.png
    1.6 MB · Views: 355
Continuing with the ROTJ Modifications....
One of the items we received was the Man of War Belt. Nice quality with functioning pockets. The only issue was the color was a light brown, which is not consistent with the ROTJ color.
mow.jpg


To fix, we simply stripped with acetone then re-dyed it using brown leather dye and used a combo of brown and black shoe polish for weathering effect. The color has held up and we are happy with the results.
mow2.jpg

belt.jpg


The MOW came to us already dyed. Unfortunately, it was dyed a dark grey (look at spats). I used a bleach wash to lighten the color and did so twice until I got the color I liked. I did not dye the spats knowing that those are darker than the suit.
For weathering, I simply used a combo of rattle can black as a base. I then added the finishing touches using a combo of burnt umber, brown, sand yellow acrylic paints and airburshed them on.
I used this Photo as my visual reference for the suit weathering:
IMG_8613.jpg

IMG_0765.jpg


IMG_0768.jpg


I believed that we had enough items for a test fitting. The helmet used is mine and not the Randy Johnson helmet (which I will attempt to repaint). The blaster is by Hyperfirm and braids are Woodman's.

bf2.jpg

bf1.jpg

IMG_8778.png


So far my buddy and I are extremely happy with the modification I have made. All that is left is modifying the Jetpack and repainting the helmet and we will be ready to go.
 

Attachments

  • mow.jpg
    mow.jpg
    107.7 KB · Views: 338
  • IMG_0768.jpg
    IMG_0768.jpg
    205.9 KB · Views: 319
  • IMG_0765.jpg
    IMG_0765.jpg
    172.1 KB · Views: 312
  • IMG_8613.jpg
    IMG_8613.jpg
    27.8 KB · Views: 294
  • belt.jpg
    belt.jpg
    91.2 KB · Views: 331
  • mow2.jpg
    mow2.jpg
    141.9 KB · Views: 331
  • bf1.jpg
    bf1.jpg
    218.8 KB · Views: 367
  • bf2.jpg
    bf2.jpg
    217.8 KB · Views: 327
  • IMG_8778.png
    IMG_8778.png
    1.1 MB · Views: 318
Your left gauntlet flamethrower is not attached correctly. You will want to adjust it forward...reference the photo you laid it on.

In addition the belt pouches and spats for RoTJ are now supposed to be khaki color not gray like the spats are colored now. That's how it was colored when worn in the movie scenes.

Your armor spacing on your chest is off. If you adjust your left chest breast piece a little up and right it will make it look more accurate.

Lastly you will want to adjust how your hoses are attached and work on your gauntlets. I used to have the same hose issue you have now until I did 2 things. First I took a heat gun to the hoses. When the tubes got hot I straightened them out removing the curled memory they used to have. Then I have my hoses attached via a small d clip that hooks onto a key circle in the very top of my shoulder under the sleeve. While it still bulges out a little it looks a lot better. Doing both those things will help you a lot.

Sent from my SM-G900V
 
No matter what you do, due to the three hoses (unless you push the hoses through the back of the flight suit like seen in dressing Fett photos) it will always tug a little.

13319999_605888936240189_8076063202671078278_n.jpg


The above was a photo taken at a troop taken recently in Reading, PA. my hoses really start to pull when I angle my arm high (as shown in the picture) but are not so bad when its low.

2400_Small_CosPlay_39.jpg


The above was taken two weeks later at a different location on a troop. Notice the reduced pull on the arm when its horizontal. It becomes none when the arm is at my side obviously.
 

Attachments

  • 13319999_605888936240189_8076063202671078278_n.jpg
    13319999_605888936240189_8076063202671078278_n.jpg
    149.5 KB · Views: 211
  • 2400_Small_CosPlay_39.jpg
    2400_Small_CosPlay_39.jpg
    414.8 KB · Views: 300
Last edited by a moderator:
Thanks for your input. Those minor changes and mistakes will be noted upon our final submission photos.

For 501st CRL purposes the RoTJ costume is not considered complete and as such the DL Major will weigh in on your costume evaluation. I HIGHLY recommend posting current, accurate photos of your costume on thebhg.net for 501st review by Major if you are submitting for 501st approval. This will help prevent kick backs on things you may have missed and will cover you on possible CRL changes as the current 501st CRL is conflicting with the one that will be updated from thebhg.net. If you are going for Mando Merc approval...that's a whole different ball game.
 
I solved this issue with elastic and a sbap clip at an angle sticked onto the flight siut, the angle is critical for it to work with elastic.

20160206_224458_zpsdyrc93hu.jpg


20160206_224210_zpsuygquihh.jpg


I dont like that bunching feeling and it kind of looks odd, but this method is tired and tested fellas (y)

20160206_224443_zpshedwlhen.jpg


20160206_224458_zpsdyrc93hu.jpg


20160206_224210_zpsuygquihh.jpg


20160206_224443_zpshedwlhen.jpg
 
Another heads up...based on the hoses it looks like your top one is a different size from the sides. They are all to be the same thickness.

Sent from my SM-G900V
 
So, I am taking the plunge into repainting this helmet to help make it more accurate and improve the overall look of it. I am using my ROTJ lid as my visual reference and RafalFetts ROTJ stencils for this paint up.
h2.jpg

h1.jpg


The first thing I did was use a dremel to add the much needed damage and scuffs for the ROTJ lid.
h3.jpg

h3a.jpg

h4.jpg

h4a.jpg


A bit of sanding and stripping with acetone and the first layer of primer is on:
H5.jpg
 

Attachments

  • h3.jpg
    h3.jpg
    418.5 KB · Views: 304
  • h1.jpg
    h1.jpg
    263.1 KB · Views: 304
  • h2.jpg
    h2.jpg
    260 KB · Views: 286
  • h4.jpg
    h4.jpg
    488.9 KB · Views: 274
  • h3a.jpg
    h3a.jpg
    509.9 KB · Views: 276
  • h4a.jpg
    h4a.jpg
    490.6 KB · Views: 287
  • H5.jpg
    H5.jpg
    355.4 KB · Views: 288
I purchased the same kit as your buddy.
Move repainted my armor and now I'm tackling the gauntlets and helmet.
GREAT WORK!
I can't wait to see more of the helmet work.
*following*
 
This thread is more than 5 years old.

Your message may be considered spam for the following reasons:

  1. This thread hasn't been active in some time. A new post in this thread might not contribute constructively to this discussion after so long.
If you wish to reply despite these issues, check the box below before replying.
Be aware that malicious compliance may result in more severe penalties.
Back
Top