PrePro2 Helmet paint up

Fettacini

Hunter
Good morning everyone!

I haven't been active in a while but rest assured I'm working away on my PrePro2 and RoTJ SE Suits.

Anyways, after being a newcomer to Fett builds but having been building life size props and iron man suite for 5 years now, I found Boba Fett to be a deceptively difficult paint job. Hear me out. To someone who has 3d printed and built some truly awsome( said with no ego, just confidence in my skills as a painter and craftsman with a few awards to prove it, but once again, I'm not the best, far from.it, I'm just pretty decent), I thought Boba would be easy.

For a newcomer who has never painted a layer paint job or put together a suit, sure, Boba is the hardest costume to do right.

Man. . .. man was I wrong. This paint job is a nightmare, no matter what scheme or version you choose. I'm my humble opinion it comes down to two.factors.

Color tone. Some of the color tones are eccentric to say the least. We know Floquil colors were used sure, but lighting and photo manipulation has a huge effect on color and what "looks right" isn't always accurate, thus we all.must bridge this gap between, correct color, and colors that people.can look at and be like "yeah thats the Boba I know!".

Second, the damage. This is the only suit where we all try to match this randomly created damage exactly. Deliberate chaos or replicating such is difficult for artist. This is the truly aggravating part.

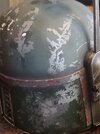
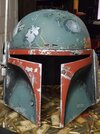
Please note, I do not get everything perfect on this. Its no Blaidon props or Superjedi or Famous fett paontjob, but the overall.tone I achieved I was pretty stoked about. There are mistakes. I repainted the dome and cheeks twice and the mandibles twice and they still aren't perfect, so never get discourage guys and girls


First off. Rafelfett has done us all so much work and is such a good dude. How good? I asked him to send me his PayPal so I could donate to him bc he gives everything for free, u know what he told me? He said no, don't worry about it, I do it for you all so enjoy the templates. I wasn't trying to buy anything from him, I just wanted to throw him some money to show how much I appreciated his hard work and he declined, he was just happy to heave helped me. Now that dude is the best of us. We all need to thank him and if anyone has his PayPal name, let.me know via dm so I can give that man a gift of money to really showy thanks. What a great guy.

Anyways. After painting several helmets, I finally think I'm getting the hang of it.

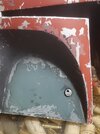
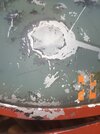
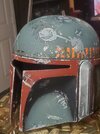
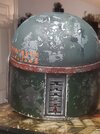
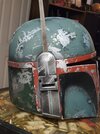
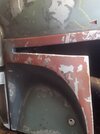
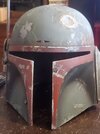
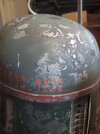
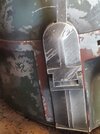
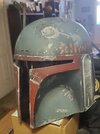
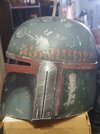
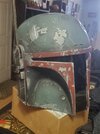
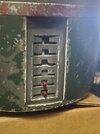
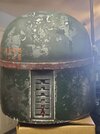
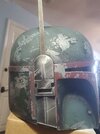
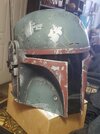
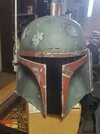
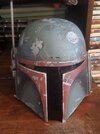
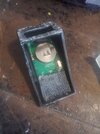
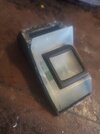
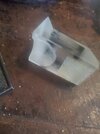
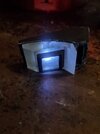
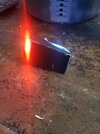
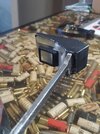
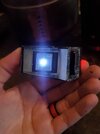
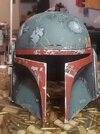
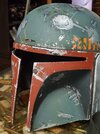
This is a Fettpride 2 helmet that I filled the damage in on to.get rid of.the ESB damage and added the PrePro2 damage. I cut out the circuit board and used a CS Stallard board with real dental files from Hawk01( who is a super nice dude as well, so dang helpful!)

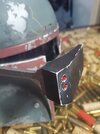
I used a Quest Designs rf stalk and CS Stallard range finder topper.

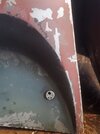
I also used a real 3 hole borden from ebay that I cut in half due to.the hole pattern being mirrored.

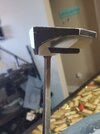
So here are some initial photos, I didn't take any step by step but you can find some on my IG @andrewhoytrowellIV
 

Attachments

  • 20220125_191201.jpg
    20220125_191201.jpg
    1.3 MB · Views: 197
  • 20220125_191230.jpg
    20220125_191230.jpg
    1.2 MB · Views: 186
  • 20220125_191238.jpg
    20220125_191238.jpg
    1.2 MB · Views: 192
Last edited:
Here are a few more.

So what have I done differently? Glad you asked( or didnt).

I used Duplicolor silver as the base then clearcoated with Testors dullcoat to help the humbrol maskol stay put.

I then used a pencil with 6b lead to roughly draw on the damage and then using my silicon brushes ( highly recommended for maskol, u just let it dry on the silicone and then peel.it off) to apply the damage. They come in a variety pack of wedge shapes. Round shapes and large and small, all attached to an actual paint handle. No more using disposable brushes.

The key I have found is to make the damage smaller than your brain wants too.
The next key I did was not over weather it. Weathering is my weakness, I love making things look dirty, but I tried to restrain myself.

Liquid masking. I've tried then all. Humbrol maskol is hands down the best. It is a wholly unique formula, its not liquid latex, but some analog of it. But it goes on the cleanest and releases under any paint( acrylics, sprays, lacquer ect)
I'm very proud of two colors on this. The dome and cheeks, and the "pink"

First, the dome and cheeks were painted to completion, base color if Tamiya Field gray. After all.the silver and dark gray was unmasked, I then sprayed a light mist coat of Tamiya Field blue over it. It gave it that awsome blueish gray green we see on the pre pro helms. It makes the world on difference.

Second I studied that pink color. Most pp2 helms make the pink too pink, whereas it actually looks like bleached rusty red or faded mandible color. I used Tamiya Hull red( a brownish rusty red) mixed with neutral gray and flesh and man, holding it next to.pre mold damage pics of the Pp2 helm, its spot on.
 

Attachments

  • 20220125_191324.jpg
    20220125_191324.jpg
    1.1 MB · Views: 167
  • 20220125_191315.jpg
    20220125_191315.jpg
    1.1 MB · Views: 157
  • 20220125_191310.jpg
    20220125_191310.jpg
    1.2 MB · Views: 166
  • 20220125_191303.jpg
    20220125_191303.jpg
    979.8 KB · Views: 166
  • 20220125_191255.jpg
    20220125_191255.jpg
    1.2 MB · Views: 162
  • 20220125_191247.jpg
    20220125_191247.jpg
    1.2 MB · Views: 164
More posts to come as I do some of the finer detail and get the visor, suspension system and Range finder done. I found a great cheap airsoct helmet suspension system that actually has a rubber chin cup.that looks like the vintage climbing helmets. Perfect!

All.the damage is layered but I will use a fine detail brush to add more of the small.scratch and chips.

I have also done the chips around the lower edges and back where the white gelcoatis showing..after reading about the original painters of these using rocks to scratch them up and reviewing the photos of the pp2 helm pre molding damage, I have concluded that it is indeed white gelcoat, not camera flash on silver showing through on the lower edges and mandible in placed.

Adding that subtly increases the realism of the look and I'm shocked that it's the little.things like that, that push helmets to.the edge of realism
 
First off, thanks a lot for the much too kind words!

Second, the helmet looks great and you really captured most of the colors. Maybe it's me or the lighting in the photos, but the killstripes looks too orange and the main red is a bit bright. I would use this image, from the Media section, to compare the colors, because they look natural and accurate to me:
Boba-Fett-Second-Prototype-Helmet-01.jpg
 
Good catch! I'll tell you why, lol. I actually repainted the mandibles after I finished the helmet bc I didn't like how they looked and just added the stripes. So they both could probably use a misting of the bluish gray that I did on the green portions to help tone them down. Thank you for letting me.know! It didn't even occur to me to do that. I like to add some airbrush misting to certain things to just color shift the tones so that's how I'll try to fix that! And man, Raf, your contribution to us is amazing! I still wish I could get the sling gun stl file without the barrell, I had to try and cut it out in meshmixer and it didn't go so well. The file can't be bought on its own on shapeways but ill.figure somthing out. Anyways, thank you sir!
 
Dude you are too kind. I juat need the main body. I got a new resin printer and a real kaiser and copitar telescope so I would seriously flip out recieveing that. My email is blackmane_wolf@hotmail.com

You sure I can't pay you anything? I'm not a rich man but you deserve something. Anything I can paint for you? Or if you ever need paintwork done via commission I'll hook it up for you
 
Ok so I took Raf's advice and I misted some grey blue over the stripes and mandavles to bring the tone down a notch and I have to say I'm pretty stoked.

I've always hated how stark some helmets look with no misting or shading and me being me ( over weather and over highlight , I.e. my crap looks like it's a live action comic book which looks cool on the show floor at a con but looks less cool on close scrutiny). I think this misting really ties everything together. Studying pictures of Sandy painting the helmets and seeing all the helmets with layers of random misting and colors I can see how this technique brings out a subtle but necessary look.

Here are a few pics under normal room lighting, I'll take some better ones soon.
 

Attachments

  • 20220127_124404.jpg
    20220127_124404.jpg
    716.2 KB · Views: 147
  • 20220127_124359.jpg
    20220127_124359.jpg
    1.2 MB · Views: 152
  • 20220127_124344.jpg
    20220127_124344.jpg
    1,007.8 KB · Views: 155
  • 20220127_124340.jpg
    20220127_124340.jpg
    1.1 MB · Views: 153
  • 20220127_124411.jpg
    20220127_124411.jpg
    1.2 MB · Views: 152
  • 20220127_124417.jpg
    20220127_124417.jpg
    1.3 MB · Views: 153
  • 20220127_124700.jpg
    20220127_124700.jpg
    1.1 MB · Views: 143
  • 20220127_124427.jpg
    20220127_124427.jpg
    1.2 MB · Views: 137
  • 20220127_124422.jpg
    20220127_124422.jpg
    1.1 MB · Views: 155
Once again I'm just really stoked at how the white gelcoat chips help frame and draw the eyes around the helmet. As a classically trained artist( said with no ego, I just went to an art school for 4 years and learned art history and techniques with traditional mediums like oil paint and pastels and stuff) it is important in any art piece to have focal points and things that naturally and subconsciously draw the viewers eyes across and around the piece.
Boba definitely has many of these parts, every thing from his shin tools poking out to the knees, then gauntlets and chest then head. All parts that people tend to see first then start following rapidly around. It's It's composition, color and juxtaposition of these items that make this costume what it is and why I am a fan of the RoTJ and PrePro Fetts because they are less consistent( all.the armor is different colors and more interesting, especially the jetpack!).
 
It's a big improvement and I'm glad you did the correction!
Thanks man! You know, looking at the pics the prepro2 helmet has a really subtle blended look, like the damage and whole helmet has been oversprayed to reduce the starkness ( I just can't think of another word, im not a thesaurus lol) of it. It's like the chipping fades into the helmet so I think this subtle overspray all around really did the trick. I'm digging the green too. I think I got it just right ( in real life) with the hues of blue and gray. Most prepro2 helmet paint ups I've seen people tend to use just rotj green or Tamiya Field gray ( the standard for most esb greens if not using archive x paints).
But the prepro2 has always looked sort of bluish to me, possibly the lighting or tone of the pictures but that's what I went for. So overspraying field blue gives it that ghosted blended grayish blue green rhats so hard to capture with a single color, and also blends and tones the weathering down to an appropriate level. I'm pretty happy.

Installation of the visor and harness system coming soon. Found a helmet harness system on ebay that has a chin cup just like the real thing( the old style British racing or riot helmet style). Sidenote, anyone watch star trek the original series? There is an episode where they go to a planet and it's a highly militarized police state like government. The British riot helmets they all wear have those chin cups. Seeing that prop studios often work for several movies or TV shows, I can absolutely see that this prop studio may have been the one that provided these helmets to give boba his harnesses. The timing (years) and proximity of film studio and the way prop inventory is bought and sold and leased kind of makes sense. Just an interesting theory.
 
I put the visor in, it's just a welding shield from Amazon. I laid it in with hot glue and took a few more pics under some different light.

Here is a paint list as well for all who are integrated.

Main base coat is duplicolor silver sprayed with Testors dullcoat, this allowed me to easily use a 6b pencil to draw on the damaged areas.

This basecoat was masked with humbrol maskol and then oversprayed with Tamiya German gray and flat black mixed to achieve the faded grayish silver areas.

The cheeks were simply painted black and misted with Tamiya dark sea blue and medium gray.

The mandibles where painted with Tamiya dull red spray can.

The pinkish areas on the cheeks is a 50/25/25 mix of Tamiya Hull red( a brownish red) , flesh, and neutral gray

I used a cheap medium gray from Delta Ceramicoat or plaid brand acrylics for the medium gray damage areas.

The dome and lower cheeks is just Tamiya Field gray ( which is really a green) from the spray can. This was then misted with medium blue and Tamiya Field blue with the airbrush.

The back panels are just Tamiya medium green ( the Japanese military version) and mixed with Tamiya dark green, no real ratio just eyeballed it. I know, everyone hates when partners say that but it's the way a lot of us work.

The keyhole slot area and mq1 board was just Rustoleum gray primer. . .super easy.

The kill stripes were painted with Tamiya yellow then oversprsyed with Tamiya flourescent red ( more of an orange) both fromt the spray can. Nothing fancy. They got the overspray of Field blue and medium blue to tone them down a bit.

The helmet was post shaded around the lower cheeks( where they meet the blackish upper cheeks) and around the helmet dome where it meets the mandible edges.

I used Vallejo foundation white to hand paint the areas where the gel coat shows through and/or what appears to be circular white splatter on the dome is. I really liked this step, when kept to a subtle minimum it frames the helmet and adds something you can't quite put a term on that makes it pop!

I added thin scratches and damage with vallejo german gray. Just a series of thin barely perceptible scratches that bring out the contours..

I used games workshop incubi Darkness to paint the dark gray bluish catches and damage.. this was also thinned and sprayed onto the cheek . This color is amazing. Every fetr partner should own a few bottles of it. It's a dark bluish greenish gray black. It's that amazing csnt really explain what color it is type of paint that nails a multi tonal color shifting under different lighting look type of color.. . .if that makes sense.

Here are some shots under different lighting while waiting on my range finder parts to come in. You can see how the tone changes just under different lights in my own house. Which is kind of the look I was going for more or less.
 

Attachments

  • 20220130_142148.jpg
    20220130_142148.jpg
    1.5 MB · Views: 143
  • 20220130_142321.jpg
    20220130_142321.jpg
    1.4 MB · Views: 146
  • 20220130_142209.jpg
    20220130_142209.jpg
    1.3 MB · Views: 146
  • 20220130_142302.jpg
    20220130_142302.jpg
    1.2 MB · Views: 145
  • 20220130_142252.jpg
    20220130_142252.jpg
    1.2 MB · Views: 160
  • 20220130_142239.jpg
    20220130_142239.jpg
    1.4 MB · Views: 139
  • 20220130_142224.jpg
    20220130_142224.jpg
    1.2 MB · Views: 134
  • 20220130_142219.jpg
    20220130_142219.jpg
    1.4 MB · Views: 142
  • 20220130_142158.jpg
    20220130_142158.jpg
    1.5 MB · Views: 152
  • 20220130_142049.jpg
    20220130_142049.jpg
    983.7 KB · Views: 144
Last edited:
Got my range finder light board in from Westabay electronics. I love it. Nice little compact unit, built very well. It has a tilt switch in it so when you turn it on, the lights activate when you drop the range finder.
Solid build and great customer service. I got it on etsy and it only coats about 30 bucks total.

I used my custom 3d file for a hollow range finder printed in resin on my printer. I then used a low pro perspex block casting and carved out the section of the block where the battery holder would bump it.

I used hot glue to glue in the board then I used high strength clear velcro to hold the perspex block in so I could remove it easily to change the battery and turn the unit on and off.
 

Attachments

  • 20220202_114653.jpg
    20220202_114653.jpg
    1.7 MB · Views: 132
  • 20220202_114705.jpg
    20220202_114705.jpg
    1.5 MB · Views: 137
  • 20220202_114657.jpg
    20220202_114657.jpg
    1.5 MB · Views: 134
  • 20220201_143318.jpg
    20220201_143318.jpg
    1,010.5 KB · Views: 129
  • 20220201_143325.jpg
    20220201_143325.jpg
    1.4 MB · Views: 132
  • 20220201_160638.jpg
    20220201_160638.jpg
    1.3 MB · Views: 134
  • 20220201_160648.jpg
    20220201_160648.jpg
    1.5 MB · Views: 129
  • 20220201_160724.jpg
    20220201_160724.jpg
    1.3 MB · Views: 138
  • 20220201_160713.jpg
    20220201_160713.jpg
    1.2 MB · Views: 132
  • 20220201_143338.jpg
    20220201_143338.jpg
    1.3 MB · Views: 136
This thread is more than 2 years old.

Your message may be considered spam for the following reasons:

  1. This thread hasn't been active in some time. A new post in this thread might not contribute constructively to this discussion after so long.
If you wish to reply despite these issues, check the box below before replying.
Be aware that malicious compliance may result in more severe penalties.
Back
Top