Wow, I can't believe almost a month has gone by since my last post on this. Which is deceiving because I've been working a lot on this build in that time. But it's mostly been a ton of research and scouring the planet for hard to find items, doing paint tests, etc, which takes time to bear fruit. I've been working on different parts in parallel so I have a range of topics to cover before finally getting to the part where I actually paint my armor. I'm going to start with my efforts at improving the girth belt.
RESEARCH PROJECT #1: In Search of a More Screen Accurate Girth Belt
[Spoiler: I recognize most people don’t care too deeply about the girth belt, so in the interest of saving your time, this post is about making your own girth belt using vintage buckles, so if geeking out on the girth belt makes you want to vomit, better skip this or get a bucket.]
Like probably many folks, I’ve long been content with the simple girth belt I bought off Amazon ages ago. After all, it’s a girth belt. The only concern has ever been, ‘is it the right color?' Once I made that decision, that was the end of it, because after all, it’s a girth belt.
But as I’ve been picking apart the costume piece by piece, I finally started noticing details in the girth belt which at first were interesting, until at some point they began to really nag at me — because my girth belt wasn’t like that. Then they started to actually annoy me. So I began doing research on the girth belt to explore whether or not I could correct the inaccuracies I was seeing.
I’m sure there must be horse riders in the Fett community who know loads about this stuff, so please chime in with your knowledge and fill in the gaps or make corrections if you like. I’m not a rider, and I know virtually nothing about horses so I was starting at zero.
From what I can tell, among sellers and makers (and perhaps riders?) they’re not called girth
belts. It’s only a belt in relation to the Boba Fett costume. Otherwise they’re just simply known as ‘girths’. Except in the western riding, where they are a different style and called a cinch.
It’s already well established the type of girth on Fett is an English style made of 14 1/4” cords with 2-ply yarn to bind the cords. There are 4 roller buckles attached at the ends with lark’s head knots. The buckles for the Fett girths are specifically only found on the English style girth. And it was these roller buckles that began to annoy the heck out of me. The buckles on my girth might have matched the screen-used girth hardware in shape, but not in detail. And the devil is in, well you know.
I have this girth from
Amazon, the Ovation/Centaur I purchased ten years ago:
It’s still the same belt available on
Amazon today and probably the most commonly available standard English girth (Showman makes a similar looking one, if not simply rebranded). This girth is not actually mohair, though it is often sold as such. It’s made of a synthetic fiber called Trevira. Ovation makes the claim that the Trevira in their girth is an acrylic fiber, but according to the maker of Trevira it’s a thermoplastic polymer resin of the polyester family. Acrylic and polyester are not the same thing, so maybe there is a misunderstanding somewhere. Trevira as a brand name synthetic fiber first appeared in the 1970’s, though its current form was introduced in 1980. I remain undecided on what the cords are made of on the original. It could be mohair, cotton, Trevira or another form of synthetic fiber. However, I will note there are different forms of polyester and if it turns out the original is a polyester, it does not mean all polyester girths are correct. Some polyester girths look wildly incorrect (The
Stubben, for example). But the fiber type is ultimately not the issue I’m focused on here, so I will leave that for future discovery. The answer to that will probably have to come down to finding the original maker. I discussed with
RafalFett and it is just as likely if not more the girth was purchased in California, since it seems the girth was first added to the costume for the PP1, and was not present on the Supertrooper. In regards to popular brands at the time, I received this tidbit from a vendor: “There were quite a few popular [brands] during that time [late 1970s]: Crosby, Stubben, Courbette, and the list goes on. It could be a cheaper Argentinian maker though.” The original maker may ultimately be lost to time.
My focus for the rest of this is on the roller buckles. Current versions bear only a passing resemblance to the vintage style on the screen-used belt. This is the buckle on my Ovation:
Here is the ESB buckle:
So the shape is correct. Surely one must be mad to think this isn’t good enough. Hmmmm…. well…… maybe. But let’s take a closer look at the buckles on the screen-used girth.
Here is a good close up of the ROTJ costume on display (MOM). I’d bet money this is probably the ESB belt itself although I’m not sure if that has been confirmed or not. Certainly it’s the same maker, regardless.
and now compare again to the Ovation hardware:
Under closer scrutiny I'm not having it. The Ovation has a flat surface as opposed to the screen-used buckle which is noticeably more rounded. The original girth buckles are cast metal. The Ovation looks more like its stamped or cut.
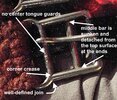
(for discussing the parts of the buckle I made up some anatomical terms

The tongue bar on the Ovation is much wider and the middle bar is thinner than the screen version, though the placement is the same. The middle bar on the Ovation also is not sunken as it is on the screen-used one, and overall the Ovation looks much blockier.
The more I saw the differences the more I wanted to replace it with the correct thing. I found a few other styles of the same kind of english girth roller buckle on other commercial-made girths. Here they are:
A)
B)
C)
D)
Besides the first one (A), they seemed more promising, but they are also not quite right. There are enough obvious inaccuracies we can safely rule them out as being from the same make or style as the screen-used girth. (Note: C is largely only used on synthetic girths, while A is probably most common, used a lot for leather and other non-cord girths)
What’s wrong with them? For starters, B & C have guards on the tongue to keep the tongue centered. The screen-used girth buckles don’t have the guards, just a thinner section of the bar in the center to keep the tongue centered. And you can see in many photos of the screen-used girth the tongue doesn’t always stay centered very well with that design. Also the middle bars are not sunken down from the main frame enough, or at all (D), and none have the crease in the corners where the frame meets the tongue bar. Additionally, C has an over-wide loop bar for the lark’s head knots, as well as a middle bar that is placed differently — its closer to the tongue bar than the roller bar. D is more like the Ovation in that the frame and bars are flattened — less rounded.
Finer details of the english style roller buckle not seen in current versions:
The most promising contemporary buckle, B (from ubraidit.com), although high quality and better than the Ovation, does not have any of the details of the screen-used one pointed out above:

So far I have not found any current versions that have buckles better than B, and I have not found them on any currently available corded girths (yet). So where does that leave us if we want something more like the screen-used version? As far as I can tell, it leads us into the dreaded ‘vintage & rare’ ebay search category, not entirely unlike other difficult found part searches such as everyone’s favorites: ‘vintage 70’s Northern Ireland British Anti-Riot Cromwell Helmet’ (which I just saw one on ebay recently --- couldn't believe it) and ‘vintage Glenross dental thingy’, etc. Except not knowing the maker makes a search all but impossible. And to make things worse, unlike many vintage parts of the Fett costume, girths are not typically still around decades after being made. The fibers wear-out, the buckles rust. There doesn’t seem to be much of a market for dirty, old, worn-out, used saddle girths from the 1970’s, much like how there isn't too much vintage used underwear from 1978 on ebay. Most of it gets thrown away. So it’s not going to be like tracking down vintage 70’s 47µF 6,3v blue tantalum capacitors with black lettering or anything like that. It’s probably going to be harder.
So far the best I’ve been able to do is search for old girths, the few there are, and examine the buckles closely based on my observations of the originals. I hope that doing this will eventual lead me to find the correct maker. Or maybe someone else reading this will now have what they need to find it.
Now, maybe someone already knows the original maker and I missed it. Or someone knows of a contemporary model available that has the correct hardware and it’s easy to get. I hope so. Please let me know.
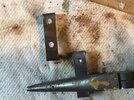
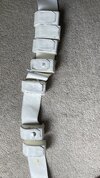
That said, after weeks of searching, I did find an old girth for sale on the interwebs which did have very promising buckles. Here is how they were pictured online:
blurry and poor quality pic, but immediately clear they were vintage. A little rusty. They seemed to have many of the hallmarks noted above in the ROTJ buckle.
But when I got them I noted several differences. They are very very close. Ever so close. Much closer than any currently available contemporary version. However, they are not a 100% exact match.
(L to R ubraidit.com, unknown vintage, Ovation)
Also, unfortunately the cords were a tough, shiny diamond-braided polyester, maybe even nylon. I bought them anyway and hatched a plan.
THE PLAN: take the hardware off and make my own girth with them.
Unless you get lucky and find the correct buckles on an old girth that isn’t in terrible condition, you’ll have to snag some correct buckles that were salvaged and make your own girth using them.
I ended up with several specimens to do tests and maybe a final belt from
After learning how to braid so I could make the scalps, I was feeling extra confident I could do a girth, too. Like for everything else you can think of, there are how-to videos on YouTube for it.
And actually, believe it or not, it's not hard at all. It isn’t much harder than braiding the scalps. Or you could hire someone to do it.
Three easy(?) steps:
1) Find vintage buckles.
2) Get some fiber for your cords, either 8-ply & 2-ply mohair, twisted cotton cord, or polyester twisted cord.
3) Watch some how-to videos.
You’ll need some kind of loom to stretch out the cord from buckle to buckle. I improvised one with my lifting rack.
For my first test I used 8 ply ristra red mohair from ubraidit.com with their roller buckles. I made some rookie mistakes, like not calculating the length correctly on the first half, then letting the length get away from me a tad on the second. But not bad. Easy to fix.
Next step is to learn how to do the weave which connects the two halves and keeps it all together. It'll probably be a little more tedious than the main cords, which are super easy once you get the hang of it.
I also sourced some white polyester cord for another test. It has the look and feel of the Ovation cord, which I think is also a better match to the original than the mohair, based on photos.
However to my great irritation, the polyester cord is twisted in the wrong direction! I'd be going through a lot of trouble to trade one screen inaccuracy for another.
Bother. I will have to source new polyester cord from somewhere else. Alas, this little side project will take more of my time than I had wanted. I'm getting a little burned out on sourcing stuff lately. The helmet interior has been a major pain to source all the vintage parts, although it's largely been successful. I will be posting soon about that and other parts I've been working on in-depth that might be more sexy than the girth belt.


