I'm in the process of building a complete set of hard parts that will be 3D printed. I'm a bigger guy and the parts all need to be custom scaled to fit. Completely possible to eliminate all print lines but do yourself a favour and get a Dremel detail sander to make the process easier.
3D Printing is the path to the Dark Side. Printing leads to layer lines. Layer lines leads to sanding. Sanding leads to frustration. Frustration leads to hate. Hate leads to suffering. And suffer you will for hours upon hours if you don't have various powered detail sanders.
I have done parts in both PLA and PET-G. PLA is hard but brittle and is really hard to sand as it doesn't like heat. You need to start at 80 grit to break down the lines then move to 120 and then 180 grits to smooth things out. Do not stay on one area for long as the filament will start to melt and make a mess. I have since moved to PET-G for the jetpack and eventually will print the armour with this material. For PET-G I was able to start with 120 grit sandpaper vice 80 and sanding was much easier and then followed the same process as the PLA. PET-G is also more heat resistant then PLA and easier to sand and will be able to survive living in your vehicle during those hot summer days.
Some will print in ABS but you need to do it in a well ventilated area as smells like ... well melting plastic. PLA and PET-G don't smell at all as my wife will attest to. She is super sensitive to smell and she hasn't complained at all in the months that I have been printing. ABS is known to warp during printing and needs the print bed to stay at 100-110 degrees Celsius and be tented to keep the part warm during printing to reduce warping. I have stayed away from it.
Once that is done your initial sanding, whichever product you choose to use, get some automotive glazing putty to fix any remaining deep scratches that you might have missed or get into some corners that you couldn't with the sanding. Once the glazing putty dries use some sanding sponges at 120,180 and 220 grit and sand till smooth. Glazing putty turns to powder pretty easily and doesn't take much to sand down. Once it is to your liking you use an automotive filler type primer to get an extra smooth finish. Sand primer with 220 grit and then paint to your desired colour. I have a flash tube for my EE3 that has a high luster finish and no print lines. The rest of the EE3 parts are primed waiting for me to start the paint process but they have minimal print lines. Some parts are really difficult to get at and ultimately if they are not that noticeable or will get covered up anyway. You can spend a lot of time during this refinement depending how picky you are about the finer details. For me I am fighting with the pulse 40 that I am in the process of finishing. It is a bigger challenge as it is a one piece (the EE3 was printed in individual parts) and it is much harder to sand and finish. Since it sits in the holster anyway I'm not overly worried but I may print out an individual parted gun in the future.
I am printing out parts on a Anycubic Chiron and since it has a capacity of 400x400x450mm I can print out any part in one piece such as the Jetpack body at 110% up-sized of Rafal Works model. Sometimes capacity isn't the issue and in this case I ended up splitting it into two due to bed adhesion issues. I haven't printed out the armour yet but according to Cura I can print that the back armour (biggest piece) at 110% in one piece as well.
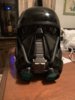
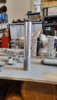
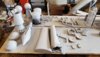
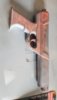
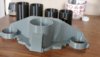
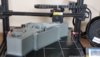
Pics are of pieces at various states of the process. The flash tube is the furthest along in the process as it just needs some carbon scoring added for effects. The EE-3 and jetpack parts are primed and need final refinement before painting. The pulse 40 is in the process of having the glazing putty applied. I might go back on the handle again and do some more refinement as there are lines appearing in it. It is made from PLA infused with aluminum so it is a little more difficult to work with. Originally I was just going to polish the barrel so I used a product that could achieve this. If the barrel was a separate piece I would have done that but sadly I now know I need to do a full paint job on this part. The other pictures are of the top of the Jetpack that is finished printing and the bottom is on the printer at about 25% complete. As I am printing with a 0.4mm nozzle at a layer height of 0.2mm the total time to print the Jetpack is 31 days. Yes I could have moved to a 0.6mm nozzle which would allow me to do 0.3mm layer height and print much faster but I didn't want to loose detail.
I have also gone overboard on my infill settings. The EE-3 was printed with 100% infill so all parts are solid except for the stock which I printed it out in 50% infill using a cubic pattern for strength. The Jetpack is being printed with a 4mm wall width and 30% infill where required. It will be strong but the total weight of the Jetpack will come in at something like 10-12 pounds. I'm not too worried as I am use to carrying a 50 pound rucksack for 10 miles but you might want to consider the weight. Admittedly I likely didn't need to print at this wall width nor infill but I wanted to ensure that the parts would be strong and last.
I'm no expert on 3D printing but there are lots of resources on it and I continue to learn more as I finish each item. I think building what you can of your own costume is part of the fun.