First thread and first cardboard bucket scratch build

Skeksis

Jr Hunter
Hello!

My name is Matthew, and I live in America. So this is my first WoF build (I have done another mando bucket before) and I am very excited + nervous.
I found my way to TDH by way of an instructible and since then have read a lot of WoF build threads (especially AntMan's) and finally decided to try it myself (not that i have much to do anyways given the new lockdown here).

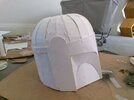
So far I haven't made any progress, here is a pic of all the papers laid out on my bedroom floor
IMG_20201205_120944.jpg


and that's all I've done so far. (sorry about the photo quality, it looks like i just died in a video game like this) Hopefully I will have time to post another progress pic soon.

--Matthew
 
Last edited:
Ant mans build is detailed and a good one to follow. I started out like this for my first, nice clean cut lines is the key, if you use cardboard misting it with water can soften it up and prevent hard folds. Fiberglass the inside for strength you will end up with a decent helmet..

Good luck keep posting your progress
i will thank you!
 
sorry i haven't posted in a long time. i will try to get some pics soon, unfortunetly (but fortunetly for me i guess?) i have made quite a lot of proggress since last time so ill try to explain what i did
 
Okay here we go, first off i'm not a very good writer so i'm going to let the images talk for themselves

IMG_20210123_133017.jpg

IMG_20210123_133104.jpg

IMG_20210123_133023.jpg

IMG_20210123_133029.jpg
img_20210123_133023-jpg.206051

IMG_20210123_133037.jpg


okay there we go. few! so, i misted the cardboard base layer, then rolled it up(i had some trouble making it the right size because i had cut off the "back extra space" on the WoF template, soooo... don't do that, any way next i cut out the top flat part of the bucket then cut out the middle of it so i had a small ring around the top. after that i very sketchily cut out the area where the cheeks were going to go, then i cut out all the cheek bone parts(the top part, cheek plate, and cheek backplate) after that I kind of mashed the top cheek part in to the top of the hole that i cut out... by the way i know that it looks like its not going to fit but its just trial and error(well it was for me anyway) any way after that i got a whole bunch of glue and spread it all over the cheek backplate then put the cheek on top following the inner guidelines. I then used something heavy to put on top of the two pieces to keep them together while they were drying. when they dried i very lightly misted the top cheek section and shaped it so that the plates would fit in better, and then put glue on the edge of the backplate and put it in place after that i let it dry, when it had dried i put more glue in the cracks to seal it better and get a more flush surface. after that i went to work on the dome i rough cut all three pieces, taped them to my cardboard and traced then with my x-acto knife. after that i peeled off the templates and fully cut out the cardboard. when it was all cut out i got a piece and misted it with water so that it would be more pliable. when he cardboard was fully moist (but not too wet) i bent it into shape and taped it there. i did the same thing for the other three and i had my dome pieces! next i put a butt-ton of glue on all of them and let it dry, i did this about 3 times until i was satisfied. then i taped the three parts together and put even more glue on the whole thing to keep it together really well. now, you may or may not have noticed that my dome is kind of uneven... not really sure how that happened but if anyone knows, feel free to comment. anyways, after that i kind of smooshed the dome into shape on the base. when i was done with that i poured a lot of glue around the edge. so that's pretty much how far i am so far. i will try to post more frequently so stay tuned!

until next time-
Matthew
 

Attachments

  • IMG_20210123_133104.jpg
    IMG_20210123_133104.jpg
    466.8 KB · Views: 214
hello again everyone!

im am working on the keyslot, um wondering if anyone knows where to specifically place it. if not thats okay but just wondering
 
Hello Everybody!

some progress pics of the key slot, the half cut out key slot and a birds eye and side view of the base plate thing
IMG_20210204_100219.jpg

IMG_20210204_100309.jpg
 
This thread is more than 3 years old.

Your message may be considered spam for the following reasons:

  1. This thread hasn't been active in some time. A new post in this thread might not contribute constructively to this discussion after so long.
If you wish to reply despite these issues, check the box below before replying.
Be aware that malicious compliance may result in more severe penalties.
Back
Top