This is my first shot at creating my own variation of the EE-3, and so far I'm pretty happy with the results (and I've only spent about $8 on it so far).

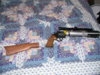
This picture is a completely unpainted shot, showing the materials used. The first thing you'll notice, most likely, is the Darth Vader lightsaber ($7 Wal-Mart version) used for the barrel of the gun. I got the toy pistol from a yard sale, and a toy rifle at the same yard sale (I took the butt off of it), for a grand total of 75 cents. So, I took the blade out of the lightsaber (you can probably figure out a way to do this for yourself, I used a vice to pull the top part of the lightsaber off and then slid the blade out) and super glued an air gun scope I had laying around to the top of it. Obviously, the interior of the lightsaber is going to be much larger than the circumference of the toy pistol's barrel, which comes to the yellow stuff you're seeing inside the saber. Play-doh. That's right, I stuffed the thing full of Play-doh, put some super glue in to hold it in the right spot, and let the Play-Doh dry (the stuff gets hard as a rock, so it's not unstable or anything). If you pack it tight enough and let it dry you don't have to worry about crumbling, especially with a coat of primer and a coat of low gloss black over it as seen here:

As you can see, the semifinal product is pretty nifty, and the whole procedure requires very little time and very little money. Not pictured in the painted photo is the butt, which is painted with the same primer and low gloss black as the gun. After painting, I took both pieces and dusted them with some grey paint for the faded used look, then took some basic sand paper and rubbed little scratch-like wear marks into it. Tonight or tomorrow I'm going to use the torn-sponge technique with some chrome paint to get it the chipped appearance.
I've also got a little experiment going making the brackets to connect the barrel to the gun out of an expired license plate that I flattened. I'll have some pictures of that up after I finish it.
Also, as you guys can probably see, this gun isn't meant to be movie accurate at all. Something like this is great for a temporary gun if you plan on making a more awesome one later, or a gun for your kid to play with. Not a lot of time goes into it, and if you're kid breaks it, no big loss. Plus I think think it looks pretty nice. I'll be using mine as a temporary for anything I go to in my Boba suit until I get around to making a movie accurate one. More pictures up as soon as I finish the wear and tear effects. Comments and criticism are appreciated!
Thanks!
This picture is a completely unpainted shot, showing the materials used. The first thing you'll notice, most likely, is the Darth Vader lightsaber ($7 Wal-Mart version) used for the barrel of the gun. I got the toy pistol from a yard sale, and a toy rifle at the same yard sale (I took the butt off of it), for a grand total of 75 cents. So, I took the blade out of the lightsaber (you can probably figure out a way to do this for yourself, I used a vice to pull the top part of the lightsaber off and then slid the blade out) and super glued an air gun scope I had laying around to the top of it. Obviously, the interior of the lightsaber is going to be much larger than the circumference of the toy pistol's barrel, which comes to the yellow stuff you're seeing inside the saber. Play-doh. That's right, I stuffed the thing full of Play-doh, put some super glue in to hold it in the right spot, and let the Play-Doh dry (the stuff gets hard as a rock, so it's not unstable or anything). If you pack it tight enough and let it dry you don't have to worry about crumbling, especially with a coat of primer and a coat of low gloss black over it as seen here:
As you can see, the semifinal product is pretty nifty, and the whole procedure requires very little time and very little money. Not pictured in the painted photo is the butt, which is painted with the same primer and low gloss black as the gun. After painting, I took both pieces and dusted them with some grey paint for the faded used look, then took some basic sand paper and rubbed little scratch-like wear marks into it. Tonight or tomorrow I'm going to use the torn-sponge technique with some chrome paint to get it the chipped appearance.
I've also got a little experiment going making the brackets to connect the barrel to the gun out of an expired license plate that I flattened. I'll have some pictures of that up after I finish it.
Also, as you guys can probably see, this gun isn't meant to be movie accurate at all. Something like this is great for a temporary gun if you plan on making a more awesome one later, or a gun for your kid to play with. Not a lot of time goes into it, and if you're kid breaks it, no big loss. Plus I think think it looks pretty nice. I'll be using mine as a temporary for anything I go to in my Boba suit until I get around to making a movie accurate one. More pictures up as soon as I finish the wear and tear effects. Comments and criticism are appreciated!
Thanks!

 looks cewl 2 me, indeed not acc, but definetly a cewl sci-fi prop!!

") :cheers
:cheers