DrToothache
Hunter
Hey guys, I have been a long time lurker on here and always wanted to make a Fett costume when I was a kid. Finally 15 years later (3 years ago) I started building both Boba and Jango. After getting 25% of the way through both builds and not being happy I realized that I needed to prioritize on one build at a time - so I started to focus in more on my Jango. I wish that I would have taken more progress pictures but I do want to create a thread still and list where I purchased my parts as well as document my final steps to finishing the build. My goal is to eventually get to 501st approval but I definitely still need some work before that! So far the parts that I have for my Jango are as follows:
Parts that I have received:
Still waiting for shipment:
Mounting the Armor
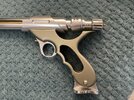
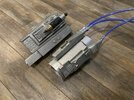
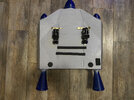
Mounting the armor wasn't as bad as I thought it would be once I finally found out where I placed my strong pinbacks at. Initially I had lost them and tried to use regular clutchback pin keepers which was a disaster. I ended up finding them and using the pin/pinback method that I found a member posted in the Boba Fett forums on here (Edit: Figured out who it was - thank you Fettastic !!!). I used extra strong pinbacks that I purchased on Amazon and just regular pins that I glued onto all of the armor pieces. I just roughened the surface of each of the pins using a dremel and sanded the backside of the armor. I then used gorilla glue to attach all of the pins onto the backside of each of the armor pieces. Here is a picture that I saved a long time ago when browsing the forums here (from Fettastic 's post):

Once the adhesive fully set, I then roughly aligned the armor pieces onto the flak vest and flight suit to start. I then pushed the pins through the cloth/leather and secured the armor by using the strong pin keepers that I purchased on Amazon. I found it easier to do the flak vest while it was laying on the ground and the flight suit while it was on the mannequin.
Here is a picture of the pin keepers that I used that are easy to find on Amazon:

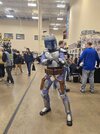
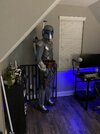
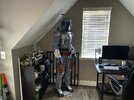
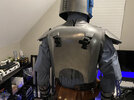
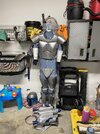
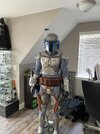
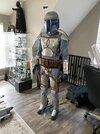
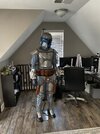
Once the armor was initially attached, I then suited up and checked armor locations and made adjustments as needed. Once I got back to my house I was able to use the mannequin to get a better starting point:


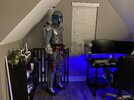
Once everything was on the mannequin I began making more adjustments to try and get the armor as ideal as possible. The great thing about the pin keeper method is that you don't have to get it right the first time. Note that this mannequin is 6 feet tall and I am only 5'9 so I tried to space things apart knowing that the armor is going to be closer together once I switch the suit from the mannequin to me.

Now to mount the jetpack. Currently I am using an inaccurate 3D printed arena style jetpack. I just threw some silver and blue paint on it and called it a day. Ultimately I need to build my MoW Z-6 jetpack as I am doing a Kamino build.
To attach the jetpack, I am utilizing MoW's jetpack harness. I purchased 1-inch buckles and nylon straps to use for mounting and repurposed some picture hanging hardware to help keep the jetpack closer to my back. After mounting the jetpack I realized that I put the female and male ends the wrong way. I learned that the female end is supposed to be on the jetpack and the male end of the buckle on the harness for Jango, so this is something that I will have to fix when I mount the Z-6 eventually.
(Disregard above, proper jetpack assembled and finished - see later post)
The gauntlets that you see on the mannequin are the disney toy boba gauntlets with leather wraps under them. I also have these 3D printed ROTJ gauntlets that I am using as placeholders until I receive the Jango CC ones. Unfortunately the 3D printed ones don't currently fit onto the mannequin, so he has to keep the toy ones for now.
(Disregard above, cold cast gauntlets received and are now a part of the build - see post later in this thread)
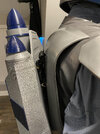
Last thing I did was swap the purple hoses for the more accurate blue ones from Amazon:


So this is where I am currently at, I still have quite a bit of work to do! The next step is going to be sanding and painting the resin blasters. After that I will work on the Z-6 jetpack and get that mounted. I will make sure to post more updates as I make progress in the build. Thanks for checking it out!
-------------------------------------------------------------------------------------------------------------------------------
Major Updates!
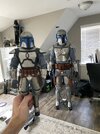
Almost every part of this build has changed since this post was initially made. This is where I am currently at:

Continue below to see the various updates that were made!
Parts that I have received:
- Helmet (undented) - Denuo Novo
- Helmet (dented) - DC Props and Armor
- All armor (cold cast)- BobaMaker
- Boots - CrowProps
Placeholder Jetpack - 3D Cauldron on Etsy - arena style jetpack. Not using for my final build as it is not full size and I am going for Kamino version of Jango.- Z-6 Jetpack - MoW (painted by myself)
- JT-12 Jetpack - MoW (Painted by Christian at MoW)
Jetpack Harness - MoW- Updated Jetpack Harness: Custom harness made by myself
- Girth belt - Strategic Props on Etsy
- Holsters Setup - Strategic Props on Etsy
- Ammo belt - Strategic Props on Etsy
- Westar-34 Blasters x2 (resin) - Minute fett
- Westar-34 Blasters x2 (Lead Chemist by Watto's Junkyard)
- Gloves - Amazon (Leather Navy blue women's gloves)
- Hoses - Correct size hoses bought from hardware store - dyed with Rit Denim Blue
Placeholder vest - Pleather vest salvaged from a halloween costume from eBay a few years ago- Updated Vest: Boba Maker
Placeholder gauntlets set 1 - Disney boba fett toy gauntlets that I repainted and and placed on top of leather wraps that I painted silverPlaceholder gauntlets set 2 - 3d printed ROTJ Boba Fett gauntlets painted and weathered to look similar to Jango's- Updated Gauntlets - DC Props and Armor cold cast gauntlets
Flight Suit - re-purposed Boba flight suit from Evolution props- Updated Flight Suit - evolution props (I believe) - dyed with Rit navy blue and purple, altered by myself to fit better.
Still waiting for shipment:
- JT-12 Jetpack - MoW
- Dented helmet - DC Props
Mounting the Armor
Mounting the armor wasn't as bad as I thought it would be once I finally found out where I placed my strong pinbacks at. Initially I had lost them and tried to use regular clutchback pin keepers which was a disaster. I ended up finding them and using the pin/pinback method that I found a member posted in the Boba Fett forums on here (Edit: Figured out who it was - thank you Fettastic !!!). I used extra strong pinbacks that I purchased on Amazon and just regular pins that I glued onto all of the armor pieces. I just roughened the surface of each of the pins using a dremel and sanded the backside of the armor. I then used gorilla glue to attach all of the pins onto the backside of each of the armor pieces. Here is a picture that I saved a long time ago when browsing the forums here (from Fettastic 's post):
Once the adhesive fully set, I then roughly aligned the armor pieces onto the flak vest and flight suit to start. I then pushed the pins through the cloth/leather and secured the armor by using the strong pin keepers that I purchased on Amazon. I found it easier to do the flak vest while it was laying on the ground and the flight suit while it was on the mannequin.
Here is a picture of the pin keepers that I used that are easy to find on Amazon:
Once the armor was initially attached, I then suited up and checked armor locations and made adjustments as needed. Once I got back to my house I was able to use the mannequin to get a better starting point:
Once everything was on the mannequin I began making more adjustments to try and get the armor as ideal as possible. The great thing about the pin keeper method is that you don't have to get it right the first time. Note that this mannequin is 6 feet tall and I am only 5'9 so I tried to space things apart knowing that the armor is going to be closer together once I switch the suit from the mannequin to me.
To attach the jetpack, I am utilizing MoW's jetpack harness. I purchased 1-inch buckles and nylon straps to use for mounting and repurposed some picture hanging hardware to help keep the jetpack closer to my back. After mounting the jetpack I realized that I put the female and male ends the wrong way. I learned that the female end is supposed to be on the jetpack and the male end of the buckle on the harness for Jango, so this is something that I will have to fix when I mount the Z-6 eventually.
(Disregard above, proper jetpack assembled and finished - see later post)
(Disregard above, cold cast gauntlets received and are now a part of the build - see post later in this thread)
Last thing I did was swap the purple hoses for the more accurate blue ones from Amazon:
So this is where I am currently at, I still have quite a bit of work to do! The next step is going to be sanding and painting the resin blasters. After that I will work on the Z-6 jetpack and get that mounted. I will make sure to post more updates as I make progress in the build. Thanks for checking it out!
-------------------------------------------------------------------------------------------------------------------------------
Major Updates!
Almost every part of this build has changed since this post was initially made. This is where I am currently at:
Continue below to see the various updates that were made!
Attachments
-
 unnamed.jpg1.6 MB · Views: 349
 -
 unnamed (1).jpg748.2 KB · Views: 349
 -
 IMG-7403.jpg2.8 MB · Views: 413
 -
 IMG-7404.jpg3 MB · Views: 437
 -
 IMG-7366.jpg1.6 MB · Views: 336
 -
 IMG-7370.jpg1.7 MB · Views: 373
 -
 IMG-7375.jpg1.7 MB · Views: 333
 -
 unnamed (2).jpg1.2 MB · Views: 358
 -
 unnamed (3).jpg1.5 MB · Views: 340
 -
 IMG-7109.jpg2 MB · Views: 349
 -
 IMG-7118.jpg1.5 MB · Views: 482
 -
 IMG-7119.jpg1.6 MB · Views: 354
 -
 IMG-7120.jpg1.3 MB · Views: 350
 -
 IMG-7126.jpg1.6 MB · Views: 361
 -
 beforeafter.jpg191.1 KB · Views: 55
Last edited: