Interesting I got a pair from him as a backup and the opening does not go up that far, but yea it won't be seen and doesn't really matter imo.
Your wiring plan sounds very thought out and looking forward to seeing that come together.
Personally I would recommend keeping the helmet electronics untethered via separate power bank inside if you are planning on trooping with the costume. You will want to be able to easily remove the helmet for water breaks ect and if you run a cord to it you will have to deal with routing that cord through upper body softparts/ neckseal ect just seems like a hassle.
I like the option of being able to turn my fans off while having a conversation since hearing in my helmet is really poor with fans running, especially in crowded spaces I can't hear for crap lol I originally put a micro toggle switch on the inside back edge of the helmet and could easily reach up an flick it on and off, but I recently got new fans with variable speed switch Off/Lo/Med/Hi and it works even better
The cables are overkill in length but I shortened them up and wired the fans in parallel right to the switch which runs into a slim USB power bank.
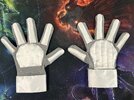
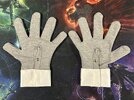
I agree on the gloves that it should be fine for basic as you can't see the inside. As I hope to hit Level 2 one day I did reach out to Clothears to see how quickly they can make a set of gloves for me. The pricing document says 10 months

but hopefully a single set of gloves can be done sooner.
For the helmet electronics, I am going to try the cable and see how it works. The disconnect is going to be right at the back of the helmet with some slack so "in theory" I can just reach back and pop the cable off and then the helmet comes off. I am going to see if I can mount the ethernet breakout "upside down" so the tab is easier to reach (tab on inside of helmet vs pressed against the outside). Sounds good in theory, but we'll see how it works in practice. I should get my helmet late next month or early August so I will have time to mess with it and see if its bothersome or not. Part of that cable is also the audio cabling for my headphones and mic for the personal audio amp so if I get rid of the cable, I'll have to find other options for those.


Here is the first rev of the electronics pack. The loose USB-A connector plugs into the power bank to power the whole thing. The loose USB-C plugs into the mini mic amp mounted to the top for recharge power. The disconnects for the main body components are all Cat 5/6 disconnects so I can use commercial cables. I also have 2 RCA connectors (1 mounted, 1 loose) and an 1/8" stereo. As I wrote before, the left gauntlet uses flat ethernet so it can make the tight turn from sleeve into gauntlet. Jetpack and Helmet are using PoE Cat 6 (24 AWG). The JP uses that so the cable fills out the strain relief on the XLR connector to protect the solder joints. This way the required connector and cable also serve a purpose and I don't have to try and hide it. I wired 2 of the pins in the required XLR connector for power so I can run the JP beacon off the main electronics. Helmet uses that gauge so I can run the required current for the fans. The hard mounted RCA jack provides power to the chest electronics; the loose RCA will provide recharge power to my voice amp; and the 1/8" stereo provides the audio signal to my voice amp. All of the RCA jacks are color coded too so I can't mess up what plugs in where. At present, the whole pack is 5" x 7" and about 1.5" thick. I measured another person's pouches so this should fit inside the left belt pouch with the connectors facing "up" so I can simply open the pouch and access the connections. The power buttons are also easily accessible through the outward facing side of the pouch without having to open it. The rocker switches also require a deliberate press to change so I shouldn't have to worry about accidentally turning things off mid-troop. The top piece also does a good job of blocking out the lights from the relays so they won't shine through the fabric.
On the top of the electronics pack is my main power switch, 2 recharge switches, power bank pouch, and the headset amp. The power bank pouch has 2 pouches so I can house extra power if needed. The headset amp allows me to put a lavalier mic somewhere on my costume (likely hidden in the belt) and run a pair of headphones off of it (up through the helmet line). The little amp, lavalier mic, and headphones work wonders; I put them on and covered my ears and I could easily hear my wife on the phone in the other room. The power buttons on the amp are also readily accessible and I could likely get to them through the pouch. The main power switch turns on the main electronics and activates power to the gauntlet LED, JP LED, chest electronics, and makes power available for the fans. Fan power is then turned on/off by the 2 buttons on the gauntlet. The 2 recharge switches turn on the recharge lines for the mic and headset amps so I don't have to pull them and recharge them individually, just plug in the main power bank and flick those on and they charge in place. I have already tested the recharge circuits and I can run everything (LED's, chest electronics, and fans) while charging and it doesn't overload my power bank or cause any overcurrent issues with my wiring. The only item I don't have on hand is my JP LED, but that won't make a difference.
The helmet also has 2 stereo audio lines, one for my headphones, and one for my mic/amp.
lowberg, the helmet fans I picked are the same as you linked (when I clicked the link it noted that I have purchased these before). They are quiet and blow quite a bit of air. Again, I need to see how this works, but I plan on having wired headphones and a mic inside the helmet that I can wear inside the balaclava to help keep them in place. They plug into the ethernet breakout so the cables will be fully contained inside the helmet. The current mic I have wraps around my head and I may change that just mount it to the inside of the helmet so I don't have to mess with tucking the cabling in anywhere. Can't do that with the headphone cable, but I stuffed the extra wire inside my balaclava as a test and it didn't bother me in the least.
For my chest electronics, it came with an attached USB power cable and I just rewired it so that its a red male RCA to match what I have on the main pack (extension cable will be part of the cable bundle so its disconnectable.
For the personal amp, I was thinking of putting it inside my vest. Arkady puts a pocket on the right inside of her vests and the amp I have will fit in there and is only about an inch thick. That way my voice is closer to my head but out of the way of everything else. I am hoping its also close enough that if I need to adjust the volume, I should be able to stick a finger under the armor and access the volume knob. The helmet mic audio goes through the connected Cat 6 cable and ends at the female 1/8" jack coming off the pack. Part of the cable bundle will be an 1/8" stereo cable that plugs into that loose connector and the top of the amp. I also plan on having a custom made (by me) RCA->USB-C charge cable as part of the bundle to power/recharge the amp while in use; that's the loose white RCA cable.
I am going to have to make a second iteration though. I didn't do a great job lining up the holes for the standoffs and when I installed them, some were slightly crooked and I have cracks forming in the plastic. One corner has already broken off due to being too close and I overtightened the screw. I also need to run some grommet edging around the edges to protect the edges so it doesn't cut holes in the pouch fabric.
For the interested folks, here is some info on the pieces:
R1 - This is the main power relay, activated by the main power switch and provides 5V to TB2.
R2 - This is the fan control relay, activated by the front button on the left gauntlet. It receives its common relay power from TB2.
R3 - This is the fan hold relay. Since the activation button for R2 is momentary, the coil activation voltage is lost when the button isn't pressed and the relay would turn off. This relay solves that. Once R2 is activated, it provides power to the common on R3 whose NO position routes that power right back to the input on R2, thus "holding" the relay closed. Once the off button on the gauntlet is pressed activated R3, the NO voltage on R3 is lost and since the ON switch isn't pressed, R2 looses its coil voltage and turns off.
TB1 - This is the common terminal block for 5V ground for the whole system. All ground/negatives route here.
TB2 - This is the common 5V source power once main power is activated. The recharge circuits don't use this and can charge straight off the power bank regardless of main power selection
LG - Connector for the left gauntlet
JP - Connector for the jetpack
H - Connector for the helmet
Unlabeled - The RCA connector for the chest electronics (no good way to label it)
Since this picture was taken, I have since covered the bare copper wire seen with shrink tubing to prevent shorting. I unfortunately can't shrink tube the contacts on the switches as there is not enough vertical room once its closed. I use 1" standoffs between the 2 plates and trying to 90 degree turn the wires after soldering put a lot of strain on the solder joints.
One of my favorite parts is the power bank I found. I figured this was pretty on theme for the costume. Its ROTJ SE Fett, but it's close enough.
This is all probably overkill, but its one thing I like doing. I don't care much for painting or other things, but designing electronics is fun for me. You should see the boxes I built for my Christmas light show.