Ord Mantell's ESB build

This is probably way off-topic. But what mannequin did you purchase in the first page? I see you're able to safely rig up the jetpack and the mannequin doesn't tip over. Is it custom-made or a certain brand? I bought a simple $100 one from Amazon and it would fall right over if I tried to put on the jetpack, which is disappointing.
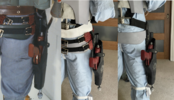
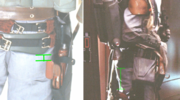
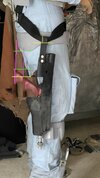
not off-topic at all. the mannequin on the first page... there are two different ones there actually. Both are capable of standing without tipping over from the weight of the jetpack. One is basically this type: ebay link (not my auction) and the other is this: another ebay link

I ended up tossing the first one because, though its posable, the joints break easily. I had both hips break on it so it's basically garbage now. I don't recommend it.
 
The primer on the helmet had gotten so beat up with all the handling that I stripped it off. Better than putting on a second coat. I want to preserve as much relief detail as possible. I cut out the keyslots, re-patched the cracked eye corner and cleaned up some other spots.
IMG_9994 copy.jpg


went ahead and installed the MQ-1 board. First, that sticker has to go:

IMG_0002 copy.jpg
IMG_0016 2 copy.jpg


IMG_0011 copy.jpg


Now working more on the interior before re-primering. Made a mock-up of the suspension with the JB helmet cradle, which by the way came with a black headband, not the correct color. I painted it acrylic flesh color and weathered with just a bit of rust color. For the suspension, there still seems to be some mystery to me about certain lengths and how exactly all the loops are threaded with the tape. I think the mock-up has helped. The herringbone tape here was too thin and 1mm shy of the width it claimed to be online, so I ordered more, this time from [intwenothor's source. Will be able to finish this up once that arrives.
IMG_0025 copy.jpg

IMG_0030 copy.jpg


IMG_0033 copy.jpg


Ordered the nylon hair for the scalps
Screen Shot 2021-01-02 at 1.16.00 PM.png


And finally taught myself how to braid thanks to youtube. Never done this before, so I had a learning curve.
IMG_0047 copy.jpg

Blonde braids complete. Two more to go. I found this nylon stuff to be extremely hard to work with. It seemed like if I breathed on it, it would get kinked and tangled. Ultimately though, this is a pretty easy part of the costume to do yourself. Using RafalFett 's instructions here for lengths and widths.


IMG_0035 copy.jpg
 
Last edited:
If you want to do the correct cover around and below the MQ1 circuit board, you'll have to cut the visor material like this (@Art Andrews can confirm this):
Thanks, Raf. I'm still waiting for the extra visor material to arrive. The ESB circuit board and visor over the slots also has some kind of strange gloopy brownish adhesive sloppily spread all along the sides. Any guesses as to what it is? I was going to experiment with contact cement.
 
Last edited:
If you want to do the correct cover around and below the MQ1 circuit board, you'll have to cut the visor material like this (Art Andrews can confirm this):

I hope someone can confirm or deny this. I mean, I have seen this being made for the first five (?) helmets, but the ESB is different in a few ways, like the fiberglass, the stress cracks, and I think this one item is different too.
 
Last edited:
I think they used contact cement (or similar) to strengthen the inside areas along the ears, the visor clips and some repair work of the wavy brow. The glue used for the borden connector looks closer to the one used on the circuit board:
Boba-Fett-Empire-Strikes-Back-Helmet-06.jpg
 
I think they used contact cement (or similar) to strengthen the inside areas along the ears, the visor clips and some repair work of the wavy brow. The glue used for the borden connector looks closer to the one used on the circuit board:
Agreed about the borden.


Also I was wondering about that hanging transistor on the bottom right of the board. It seems to me it was removed. Do we know?

Screen Shot 2021-01-26 at 9.15.00 AM.png

I hope someone can confirm or deny this. I mean, I have seen this being made for the first five (?) helmets, but the ESB is different in a few ways, like the fiberglass, the stress cracks, and I think this one item is different too.
It wasn't put in with milliput like the ROTJ, either.
 
Agreed about the borden.

Also I was wondering about that hanging transistor on the bottom right of the board. It seems to me it was removed. Do we know?

It wasn't put in with milliput like the ROTJ, either.
I hope it was removed, I removed it on mine :lol:

And about the milliput, 100% right. Some kind of beige epoxy glue? I used epoxy glue for the borden, but I couldn't found a beige one, even the one I used was beige at the begining and then it became clear.
 
And about the milliput, 100% right. Some kind of beige epoxy glue? I used epoxy glue for the borden, but I couldn't found a beige one, even the one I used was beige at the begining and then it became clear.
I don't know for sure, it's just a hunch, but I wonder if the butter brown color on the borden and the keyslots is just from oxidation over time. I had a block of perspex that turned amber over a decade of just sitting around. The brand of contact cement I bought has an amber color, so will see how that looks in a few days.
 
The glue used on the borden is lighter in color than the one used on the circuit board:
agreed, but I think the reason is because of what is underneath, because the 'glue' is somewhat translucent. Translucent amber over black visor material is going to look darker. Over aluminum it might show up brighter. Or maybe it is something completely different, but whatever is on the borden is also translucent, and has an amber hue. If I were going to try to replicate that look, and I am, I would put white milliput around the base of the borden and then build up some amber contact cement on top of it. I have no idea if that's what it is on the real thing, but I bet I could get it to look similar. I'm going to experiment as soon as the contact cement is in.
Ord Mantell let's chat about the whipcord housing. Do you need some copper?
Thanks man. I actually have a whole roll of copper metal adhesive tape at the ready and will have way more than I will ever need. lol. But I appreciate you asking. (y)
 
Last edited:
This just arrived: the Elstree gauntlet 'lazer'.... This is truly a superior Fett piece made by the original makers...

IMG_0092 copy.jpg


I got this to replace my rebelscum.com gauntlet lazer, which I thought was pretty good, but next to the Elstree you can see the differences are not insignificant:

IMG_0093 copy.jpg

IMG_0094 copy.jpg

IMG_0095 copy.jpg

IMG_0096 copy.jpg
IMG_0097 copy.jpg


note: the rebelscum lazer pictured here is from 2010. They have since revised it in the last few years to be more accurate according to their claim.
 
Last edited:
This just arrived: the Elstree gauntlet 'lazer'.... This is truly a superior Fett piece made by the original makers...

View attachment 206297

I got this to replace my rebelscum.com gauntlet lazer, which I thought was pretty good, but next to the Elstree you can see the differences are not insignificant:

View attachment 206298
View attachment 206299
View attachment 206300
View attachment 206301View attachment 206302

note: the rebelscum lazer pictured here is from 2010. They have since revised it in the last few years to be more accurate according to their claim.
Impressive. Most impressive.
 
Screen Shot 2021-01-31 at 6.23.51 PM.png


in scene 371, the belt got really loose and the pulce dropped really low:

Screen Shot 2021-01-31 at 6.25.39 PM.png


maybe something like this, or a little lower:

index.jpg


RafalFett has pointed out that the sidearm drifted lower as the shoot went on through the day. It started off higher. I'll sling it in the higher position b/c it looks better.
 

Attachments

  • Screen Shot 2021-01-31 at 6.23.51 PM.png
    Screen Shot 2021-01-31 at 6.23.51 PM.png
    3.6 MB · Views: 189
  • Screen Shot 2021-01-31 at 6.25.39 PM.png
    Screen Shot 2021-01-31 at 6.25.39 PM.png
    3.3 MB · Views: 164
  • IMG_0058 2 measure.jpg
    IMG_0058 2 measure.jpg
    2.4 MB · Views: 179

Your message may be considered spam for the following reasons:

If you wish to reply despite these issues, check the box below before replying.
Be aware that malicious compliance may result in more severe penalties.
Back
Top