Re-painted Boba Fett Build

56Strat

New Hunter
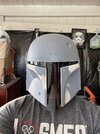
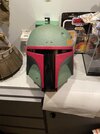
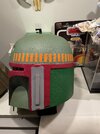
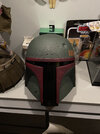
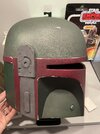
Hey gents, posting my build here for all of your advice/comments/viewing. Starting with the helmet. I ordered a cast from Red Bow Props and can not be happier. It was a fantastically smooth cast which needed extremely little work to prep for paint outside of removing the visor and smoothing the bottom out. I will post a comparison of size next to a BS proto helmet and an EFX. It is considerably smaller and for me, being 5'6" and 130lbs, is perfect. This was my first attempt at a helmet ever and trimming/prepping were easy enough. I slipped with the dremel a couple of times and had to use bondo to fill out the cheek and mandibles where I had taken chunks out...rookie mistake. However it all smoothed out perfectly fine. I used the grey rustoleum primer and then masked off the damage using cap-that and howtoboba.com reference photos. I used rustoleum texture spray for the texture and applied slightly heavier on the upper cheeks. I used Montana spray cans for the majority of the color. Storm for the dome and lower cheeks, Tag Green for upper cheeks, Cardinal for the mandibles/ back trim, and Celtic for the rear green. I used orange for the killstripes and the 19th one flat black. I'm still in search of colors for both ears, so that will be updated as I find them. I also gave the whole helmet a few acrylic black washes and that really toned the paint and made it look really nice. I will be adding the silver damage topically as well as adding the paint in the turn signals and then I'll airbrush some more wear once helmet is complete. I will post updates here as I have them. Also received my RKD armor. Aside from the chest plates being very curved (I fixed with a heat gun) pieces feel quality and the smaller size is going to be essential for me. I'll post updates on that in the next few days hopefully.
 

Attachments

  • image_50417665.JPG
    image_50417665.JPG
    2.5 MB · Views: 551
  • image_67186689.JPG
    image_67186689.JPG
    1.4 MB · Views: 362
  • image_67224833.JPG
    image_67224833.JPG
    1 MB · Views: 426
  • image_67192065.JPG
    image_67192065.JPG
    1.7 MB · Views: 385
  • image_67172865.JPG
    image_67172865.JPG
    1.8 MB · Views: 431
  • image_55415491.JPG
    image_55415491.JPG
    1.9 MB · Views: 614
Added the colors in the turn signals, the metallic damage, and another weathering wash. I had to color correct the spot with the black kill stripe since the masking tape peeled off as I sprayed it. Still have some airbrush weathering to do as well as paint and install the ears and rangefinder. Long way to go, but progress is progress and I’ll take it.
 

Attachments

  • CB5AE393-1E86-4749-B151-CB4BFEC5BB2A.jpeg
    CB5AE393-1E86-4749-B151-CB4BFEC5BB2A.jpeg
    1.5 MB · Views: 348
  • 40B3BFA8-3CBC-448B-9F14-3DBAC9466C0A.jpeg
    40B3BFA8-3CBC-448B-9F14-3DBAC9466C0A.jpeg
    1.6 MB · Views: 333
  • 5333E6FF-AF13-40EB-8033-4B86064B4150.jpeg
    5333E6FF-AF13-40EB-8033-4B86064B4150.jpeg
    1.6 MB · Views: 353
  • FB3B5779-E271-4561-99DF-724B9D677C74.jpeg
    FB3B5779-E271-4561-99DF-724B9D677C74.jpeg
    1.8 MB · Views: 365
Slight update. Sliced the fingertips off of the black gloves for the chestnut to show through. Have to figure out how I want to attach hand plates, Velcro or E6000. I thought I saw glue residue on a couple screen caps, but I will do a little more research before committing. Rubber hand plates from Wasted Fett and the gloves are the screen accurate Patrol X.
 

Attachments

  • 1DF07FB1-D3F8-4950-9468-E9B75FEB7B4B.jpeg
    1DF07FB1-D3F8-4950-9468-E9B75FEB7B4B.jpeg
    2.4 MB · Views: 264
This thread is more than 3 years old.

Your message may be considered spam for the following reasons:

  1. This thread hasn't been active in some time. A new post in this thread might not contribute constructively to this discussion after so long.
If you wish to reply despite these issues, check the box below before replying.
Be aware that malicious compliance may result in more severe penalties.
Back
Top