The Supertrooper helmet has always been one of my favorites, so I challenged myself to build one with as many authentic parts as I could find. I have to admit that I completely underestimated how difficult it is to build something in pristine condition. There is literally no margin for errors!
Parts breakdown;
FPH2 dentless helmet kit - Wasted Fett
RF hollow stalk and metal ear set - MachineCraft
RF topper - terminal fettler
Visor clips - Sidewinder
#15 dental files - 01Hawk
Authentic parts - borden connector and Casio MQ-1 calculator circuit board
First order of business was to cut the borden connector and flip it around so the two small holes are in the correct orientation.


Dry fitting the ears, rangefinder and borden connector.


A platform was fabricated out of styrene and four chicago screws to mount the circuit board in the back. I decided not to paint the circuit board so it's uniquely mine.


Primed helmet and filled gaps with epoxy putty.

Metal ears primed with Mr Hobby Metal Primer

Gloss white paint down. I had already painted the red and blue triangles which are masked with Blu Tack here.


The helmet had patches of matte texture after three coats of white and two coats of gloss clear.

To resolve the inconsistent surface, I wetsanded it with 1000, 1500 and 2000 grit sandpapers to smoothen it. Then I polished it with Turtle Wax polishing compound and buffed with microfiber cloth.

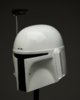
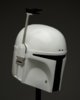
Finally, I installed the visor with metal clips and used a heat gun to press the visor so it aligns perfectly with the helmet's curvature.


And here's the finished helmet!

I will bring it to the studio for beauty shots soon.
Parts breakdown;
FPH2 dentless helmet kit - Wasted Fett
RF hollow stalk and metal ear set - MachineCraft
RF topper - terminal fettler
Visor clips - Sidewinder
#15 dental files - 01Hawk
Authentic parts - borden connector and Casio MQ-1 calculator circuit board
First order of business was to cut the borden connector and flip it around so the two small holes are in the correct orientation.
Dry fitting the ears, rangefinder and borden connector.
A platform was fabricated out of styrene and four chicago screws to mount the circuit board in the back. I decided not to paint the circuit board so it's uniquely mine.
Primed helmet and filled gaps with epoxy putty.
Metal ears primed with Mr Hobby Metal Primer
Gloss white paint down. I had already painted the red and blue triangles which are masked with Blu Tack here.
The helmet had patches of matte texture after three coats of white and two coats of gloss clear.
To resolve the inconsistent surface, I wetsanded it with 1000, 1500 and 2000 grit sandpapers to smoothen it. Then I polished it with Turtle Wax polishing compound and buffed with microfiber cloth.
Finally, I installed the visor with metal clips and used a heat gun to press the visor so it aligns perfectly with the helmet's curvature.
And here's the finished helmet!
I will bring it to the studio for beauty shots soon.
Last edited:


")
