MoeSizzlac
New Hunter
What a freaking year. I posted this on the 405th but I totally forgot to post this here. Figured I could give a few people ideas if they need them. It is not 100% screen accurate but it is mine and I love it.
I had just finished up the majority of the prints in March, Just before the pandemic. This is the first suit where I was using a lot of other peoples designs to make the finished product. Here's the links to all the files that I used:
Helmet
Forearms - Left - Right
Shoulders, Chest, Hand Shields, and Jetpack (These are mine although I didn't get to print the Jetpack yet)
Right Leg
Belt
Mine Holder
Detonators
Cartridges
Sling Rifle Clip
So let's start off with the helmet. Using Rop Pauza's design from my minifactory and poking all types of holes through it, I printed it out and worked into the system a fan and speaker phone.

Helmet - Raw

Speaker contraption I set up for the chin area.

Wiring the mic.

Wiring the rest of the speaker system.

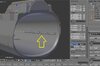
On/off latching button built into the side of helmet.

Inside of helmet

Outside - Finished.
Speaker Test.
Armor:
Nothing new here, just print and go.

Redesigned gauntlets so that they can be locked using pins on the inside.

Raw Print

Lock works!

Prepping the pieces for sanding. Need to get rid of the lines.

Prime Time!

Shoulders I designed.

Steel coat.

Right leg integrated with costume leather I got off of ebay.
Sewing: I purchased off of ebay this outfit:

The spare parts and padding are next to useless but the sewing is close enough when it comes to material used. I did a lot of adjusting to get this to look and fit well.
For the shirt? I cut off the arms and sewn them to a t-shirt I like.

Original shirt above.

My t-shirt I attached them to.
I had just finished up the majority of the prints in March, Just before the pandemic. This is the first suit where I was using a lot of other peoples designs to make the finished product. Here's the links to all the files that I used:
Helmet
Forearms - Left - Right
Shoulders, Chest, Hand Shields, and Jetpack (These are mine although I didn't get to print the Jetpack yet)
Right Leg
Belt
Mine Holder
Detonators
Cartridges
Sling Rifle Clip
So let's start off with the helmet. Using Rop Pauza's design from my minifactory and poking all types of holes through it, I printed it out and worked into the system a fan and speaker phone.
Helmet - Raw
Speaker contraption I set up for the chin area.
Wiring the mic.
Wiring the rest of the speaker system.
On/off latching button built into the side of helmet.
Inside of helmet
Outside - Finished.
Speaker Test.
Armor:
Nothing new here, just print and go.
Redesigned gauntlets so that they can be locked using pins on the inside.
Raw Print
Lock works!
Prepping the pieces for sanding. Need to get rid of the lines.
Prime Time!
Shoulders I designed.
Steel coat.
Right leg integrated with costume leather I got off of ebay.
Sewing: I purchased off of ebay this outfit:
The spare parts and padding are next to useless but the sewing is close enough when it comes to material used. I did a lot of adjusting to get this to look and fit well.
For the shirt? I cut off the arms and sewn them to a t-shirt I like.
Original shirt above.
My t-shirt I attached them to.

")