My humble ESB Fett build (so far)

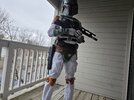
I've been working on the rifle sling for my EE-3, and the lanyard rings. I knobs themselves are off Etsy. Rather than expend the effort to make them swivel, I just glued them in place. The rings are too small, as I've added a pair of split rings, which I intend to replace with some blackened steel ones. I used ConvergenceProps's tutorial. I still need to weather the strip of leather.

I also made a few adjustments to my armor. I attached some heavy duty pieces of plastc after drilling holes small enough to let me thread the screws through. This was I have a makeshift washer than will keep the screws in place. It has made attaching the back plate to the collar by myself much easier.

I also made some slits in the back of the vest for the harness straps to feed through. They look like crap, but hopefully won't be too noticeable once it's dyed and the whole outfit is assembled. In order to feed them through the back plate without assistance, I think I'll attach some electrical tape or something to act as handles.

Finally I've added a new jetpack rocket collar yellow "topper." I though I was pretty creative here, and used an empty Play Doh container. I did paint it of course. Lol

DSCN4111 resized.jpg20240317_152119 resized.jpg20240317_152114 resized.jpg20240317_152107 resized.jpg20240317_150009 resized.jpg20240317_144712 resized.jpg20240317_144659 resized.jpg20240317_144644 resized.jpg20240317_144640 resized.jpg20240317_144622 resized.jpg

Josh
 
My mother-in-law was able to finish making thigh pouches and attach them to the coveralls. I'm hoping to work on the hanging pouches and sleeves some time this week. It definitely needs work, but it definitely seems to be coming together!

Josh

PS: I should have thought to pick up all the junk off the floor lol
1000111534.jpg20240613_182628.jpg20240613_182704.jpg20240613_172233.jpg20240613_172255.jpg
 
Happy New Year, everyone!!

Many apologies for my absence. I'm sure you've gotten by without me . I have no progress to share, sadly. I decided it has been too long since I've worn it. So, I put it on, with a little help from my son. I managed to get a few pictures taken as well.

Bear in mind these were taken with an old camera on a timer, and my Samsung Galaxy S24 by a 5-year-old. I think the 5-year-old's are actually better.


1000118974.jpg1000118975.jpg1000118976.jpg1000118977.jpg1000118957.jpg

Happy hunting,
Josh
 

Attachments

  • 1000118952.jpg
    1000118952.jpg
    1.4 MB · Views: 64
Happy New Year MrFusion1138
Welcome Back! I do hope you and the family had a great Holiday season! Them pics taken by your son look great! Didn’t pack on too much Holiday weight it seems - as the suit still fits!
;)(y)

Looking forward to more updates!

Best,
-Iron
 
Last edited:
Happy New Year! Your kit is looking great, I can't wait to see it with the flight suit dyed. You're like me - I make great progress and then stop for like 3 months or so before diving back into it again.

For the EE-3 - I had the one that you are currently using and also noticed how small it is after putting it together. Someone else released the same model (but correct scale) on Etsy though for like $60 and I ended up getting that one - then I really realized how small it was!

IMG_9728.jpg

At first I was bummed that I would have to build it again but I think its fun putting these together and painting them. I added the screws under the barrel by cutting down nylon screws and attaching them with super glue to make them a little more accurate.
 
Happy New Year! Your kit is looking great, I can't wait to see it with the flight suit dyed. You're like me - I make great progress and then stop for like 3 months or so before diving back into it again.

For the EE-3 - I had the one that you are currently using and also noticed how small it is after putting it together. Someone else released the same model (but correct scale) on Etsy though for like $60 and I ended up getting that one - then I really realized how small it was!

View attachment 245312
At first I was bummed that I would have to build it again but I think its fun putting these together and painting them. I added the screws under the barrel by cutting down nylon screws and attaching them with super glue to make them a little more accurate.
Thanks! And yes! I had the same feeling about the EE-3 model. And bless you for showing yours compared to the updated version (it looks fantastic). It's great to see the size difference. Once I get my flightsuit finished and everything dyed respectively, the rifle is to be one of my first upgrades.

Josh
 
Okay, updates. The construction of my flightsuit is mostly complete. My mother-in-law still has stitching to add to the sleeves, make and attach the shin tool pockets, and finish the belt-hanger pouches. Then we dye it. Hurray! Lol.

I did a little paint reworking on the armor, primarily the right chest plate. I have since touched up the yellow paint on the left chest and ab plate.

I did some significant reworking on the flamethrower. I removed several greeblies, made new wires using a cut up coat hanger, sanded down a few parts, repainted the whole thing, and for the clear end piece, I added... wait for it... a piece off of a hand soap pump! It plays the part well enough.

Lastly I dyed a new girth belt. The one I've had wasn't wide enough. This one ended up being too wide, but after synching it up in a few spots (which should be covered by the hanging pouches), it's just about right. I used diluted acrylic paint to dye it and some Rustoleum clear matte to seal it.

Josh
20250423_122521.jpg20250423_154813.jpg20250424_203748.jpg20250429_124731.jpg20250429_124704.jpg20250429_124643.jpg20250429_124628.jpg20250510_140912.jpg20250510_140906.jpg
 
Last edited:


Write your reply...

Your message may be considered spam for the following reasons:

If you wish to reply despite these issues, check the box below before replying.
Be aware that malicious compliance may result in more severe penalties.
Back
Top