clmayfield
Active Hunter
I thought about whether to put this in my other knee pad thread, but I think it is worth another thread here. My original thread on making my knee pads is found here:
http://www.thedentedhelmet.com/showthread.php?t=56980
One of the problems that I had was trying to find the appropriate colored rings for the knee darts. Black rubber washer / o-ring / gaskets are relatively easy to find. However, red gaskets are really tough to find. I had an idea to pour some in place using Plastidip. It was kind of expensive (seeing that I only needed one red o-ring), but it delivered me what I wanted in the right color.
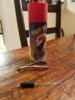
Here are the tools I used (painter's tape not pictured). Plastidip, a medicine dropper (small syringe will work as well), and a cuticle trimmer:

I recommend getting the red plasidip straight out of a can, but all they had was the aeresol. The problem with the aeresol is that it still contains gases from the aeresol can, which results in bubbles.
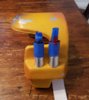
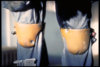
I sprayed the plastidip over a piece of wax paper until it was thick. Then, I sucked it up in the medicine dropper. I tried this once without the medicine dropper and the result was that I got plastidip all over the walls, which was very difficult to remove. The next picture is of that first effort (without the medicine dropper).

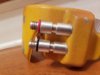
In my second effort, I only used painter's tape on the outer layer as the inner layer of painter's tape was difficult to remove. The plastidip kept wanting to stick to it. I let it dry in place overnight and ended up with a nice o-ring. There were two problems, though. One was that residual plastidip had climbed up the sides of the painter's tape. That is where the cuticle trimmers came into play. THey made a very nice straight trim of the excess plastidip. Don't tell your wife you are doing this.
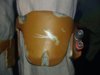
The second issue is the bubbling from the aeresol gases. I fixed this by sliding the o-ring off, flipping it over, and gluing to the dart with CA glue. And here are the results.


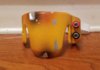
Please note that I ended up using a good old fashioned black o-ring for the black. I had to expand the hole in the center with a drill and a dremel and had to sand it down to get the thickness right.
http://www.thedentedhelmet.com/showthread.php?t=56980
One of the problems that I had was trying to find the appropriate colored rings for the knee darts. Black rubber washer / o-ring / gaskets are relatively easy to find. However, red gaskets are really tough to find. I had an idea to pour some in place using Plastidip. It was kind of expensive (seeing that I only needed one red o-ring), but it delivered me what I wanted in the right color.
Here are the tools I used (painter's tape not pictured). Plastidip, a medicine dropper (small syringe will work as well), and a cuticle trimmer:
I recommend getting the red plasidip straight out of a can, but all they had was the aeresol. The problem with the aeresol is that it still contains gases from the aeresol can, which results in bubbles.
I sprayed the plastidip over a piece of wax paper until it was thick. Then, I sucked it up in the medicine dropper. I tried this once without the medicine dropper and the result was that I got plastidip all over the walls, which was very difficult to remove. The next picture is of that first effort (without the medicine dropper).
In my second effort, I only used painter's tape on the outer layer as the inner layer of painter's tape was difficult to remove. The plastidip kept wanting to stick to it. I let it dry in place overnight and ended up with a nice o-ring. There were two problems, though. One was that residual plastidip had climbed up the sides of the painter's tape. That is where the cuticle trimmers came into play. THey made a very nice straight trim of the excess plastidip. Don't tell your wife you are doing this.
The second issue is the bubbling from the aeresol gases. I fixed this by sliding the o-ring off, flipping it over, and gluing to the dart with CA glue. And here are the results.
Please note that I ended up using a good old fashioned black o-ring for the black. I had to expand the hole in the center with a drill and a dremel and had to sand it down to get the thickness right.