You are using an out of date browser. It may not display this or other websites correctly.
You should upgrade or use an alternative browser.
You should upgrade or use an alternative browser.
Hawk_Fett_ ESB Build
- Thread starter HawkFett
- Start date
HawkFett
Active Hunter
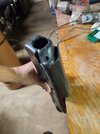
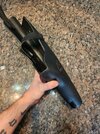
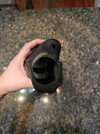
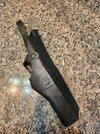
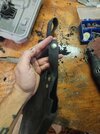
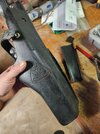
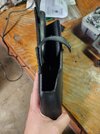
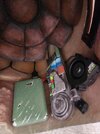
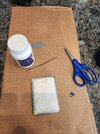
(Photos on the marble counter top are finals FYI) Cut and sanded the trigger guard opening and the divers knife area on my real Nemrod Holster today. I also repaired the area where the Pulce 40 will slide through. It was rough when I got it. I saw several references where this thing is roughed up pretty good so I scored it with some medium and fine grit sandpaper. May do some more. Sanded the holster strap ribs down as well. Shot it fresh with some matte black lightly and also blacked out the snaps per the CRL. Just need to cover the Nemrod logo with some tape and I may call it good.
Attachments
-
 20220925_154038.jpg1.1 MB · Views: 239
 -
 20220925_171611.jpg2.1 MB · Views: 228
 -
 20220925_171546.jpg2 MB · Views: 220
 -
 20220925_171537.jpg3 MB · Views: 219
 -
 20220925_162330.jpg1.8 MB · Views: 207
 -
 20220925_161048.jpg1.4 MB · Views: 221
 -
 20220925_154354.jpg1.6 MB · Views: 211
 -
 20220925_154047.jpg1.5 MB · Views: 229
Last edited:
HawkFett
Active Hunter
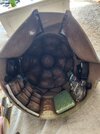
Built the inside of the helmet today. I used WhiteShadow Helmet liners which I cut to fit as needed. Installed Henry's Helmet fans dual switch dual fan setup. I also weathered and painted the power cell that runs the fans. I will probably dirty it up some more but am pretty happy with it. Boba green with some layers and a smattering of grey and tucked away.

Attachments
Slave1Pirate117
Active Hunter
Looking fantastic! Everything fit quite nicely there.
HawkFett
Active Hunter
Thanks man! Definitely feel good about it. The fans are legit. I thought they might dry my eyeballs out but they're good. Won't be able to hear much when they're running but a welcome relief to a humid helmetLooking fantastic! Everything fit quite nicely there.
Slave1Pirate117
Active Hunter
You actually made me switch gears on mine and I am planning on purchasing this version for my helmet. I am also considering a divorced fan. Instead of marrying it to the helmet. Maybe put it in the jetpack and run a hose into the helmet that way hearing is increased and a high flow fan would move plenty of air through.Thanks man! Definitely feel good about it. The fans are legit. I thought they might dry my eyeballs out but they're good. Won't be able to hear much when they're running but a welcome relief to a humid helmet
HawkFett
Active Hunter
That actually sounds like a great idea! Like having it come up through the flak up the back of the neck seal or something. Looking forward to seeing what you come up with man. Your build is awesome! Having a metal Fett is sweet I bet. Especially the sound it will make when you knock on it. Like real armor.You actually made me switch gears on mine and I am planning on purchasing this version for my helmet. I am also considering a divorced fan. Instead of marrying it to the helmet. Maybe put it in the jetpack and run a hose into the helmet that way hearing is increased and a high flow fan would move plenty of air through.
HawkFett
Active Hunter
Thanks Buda! Wasn't sure how it would cut but everything went smooth. That sheath was the scariest part. Got her done though. Waiting on Wasted Fett to ship my Pulce and see what everything looks like. Anxious to see this put together. Ordered an armory of parts from my man Viva Fett. My Fett is about to get a big quality upgrade in several areas.Holster came out great!

Slave1Pirate117
Active Hunter
I already started looking into mini 12v blowers. They got some pretty nice ones here: Digi-Key Yes that is exactly what I was thinking as well, under the flak and through the neck seal. I'll definitely post what I come up with. The vent on the bottom of the jetpack would serve well to pull air from!That actually sounds like a great idea! Like having it come up through the flak up the back of the neck seal or something. Looking forward to seeing what you come up with man. Your build is awesome! Having a metal Fett is sweet I bet. Especially the sound it will make when you knock on it. Like real armor.
")
Thanks for the kind words! I am also anxious to hear what it sounds like once I don it all on!
Edit: You could put an icepack in the jet pack and push cool air into the helmet! lol
Thanks Buda! Wasn't sure how it would cut but everything went smooth. That sheath was the scariest part. Got her done though. Waiting on Wasted Fett to ship my Pulce and see what everything looks like. Anxious to see this put together. Ordered an armory of parts from my man Viva Fett. My Fett is about to get a big quality upgrade in several areas.
I was very nervous cutting mine!
HawkFett
Active Hunter
After much consideration, I have decided to upgrade my armor. Just when I thought I was nearing the end my eyeballs got the better of me. That coupled with how awesome Viva Fetts armor looks. I think my plates looked pretty good. But the right shoulder and collar armor didn't meet my standards after closer inspection. I've been scouring the media archives, CRL's, and looking at several respected Fetts armor and I couldn't live with my current setup. I'm replacing it all. Chest plates, shoulders, collar, knees, cod, kidney, back, gauntlets, the works. Going forward my armor will be all Viva Fett. I can 100% vouch for the quality, communication, and hard work Viva does. If you're looking for a set of armor I have had nothing but the best of experiences with him. Highly recommend his products, and on top of that he's a great guy. With that said, I've been trimming armor like a madman lately. I got the chest done last night and plan to park the Slave 1 and get the rest trimmed and primed today on my day off. Still so much to do, but I think I'll be much more happy with the final product with this decision. My second go of the helmet was light years beyond my first attempt. I believe I can bring that same result to the armor. Here is a shot of the upper plates primed.

HawkFett
Active Hunter
Man what a day. Got everything cut, trimmed, and primered. Still need to putty the air holes in some of the dents but I got a ton of work done today. Took my time, shaped everything nicely and laid down the primer. Feels good to have gotten this done considering how far I took a step in the opposite direction with restarting the armor. Chest armor is a different color primer, but once I do spot putty, I'll shoot it again and it will all be uniform. Not that it will matter, but in case anyone is wondering.

Slave1Pirate117
Active Hunter
Looks amazing!Man what a day. Got everything cut, trimmed, and primered. Still need to putty the air holes in some of the dents but I got a ton of work done today. Took my time, shaped everything nicely and laid down the primer. Feels good to have gotten this done considering how far I took a step in the opposite direction with restarting the armor. Chest armor is a different color primer, but once I do spot putty, I'll shoot it again and it will all be uniform. Not that it will matter, but in case anyone is wondering. View attachment 231059
HawkFett
Active Hunter
Thanks S1P!!! Your metal working blows me away dude.Looks amazing!
HawkFett
Active Hunter
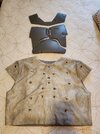
I punched the dreaded holes in my Arkady flak vest. The first two holes my heart was racing but after that it was smooth sailing. I started thinking of ideas to mark the armor properly for mounting and zing! Ear plugs came to mind. Not sure how others have done it, but ear plugs fit perfectly into the 10mm grommets. I plan to dab some paint on the tips and position the armor correctly and then touch it in place. That should roughly give me the right position on the back of my armor to place my bolts. From there I should be able to play with the position a little given the size of the grommets I used. About to start that process now. Will update soon Fetts.
Attachments
Slave1Pirate117
Active Hunter
Nice! The paint transfer method! That was a smart idea! Tough to push the armor evenly though and you kinda get one shot before you have to wipe off paint and try again.I punched the dreaded holes in my Arkady flak vest. The first two holes my heart was racing but after that it was smooth sailing. I started thinking of ideas to mark the armor properly for mounting and zing! Ear plugs came to mind. Not sure how others have done it, but ear plugs fit perfectly into the 10mm grommets. I plan to dab some paint on the tips and position the armor correctly and then touch it in place. That should roughly give me the right position on the back of my armor to place my bolts. From there I should be able to play with the position a little given the size of the grommets I used. About to start that process now. Will update soon Fetts.
How did you know where to punch the holes in the flight vest?
HawkFett
Active Hunter
Thanks! For sure. I plan to hot glue until I get the position right then superglue/epoxy them permanent once finalized. So for the holes, I fitted the armor in position with velcro and weathered the flak with Tamiya modeling pigment. Tedious process, but it was enough to give an outline of where the armor should be. Then I roughly marked holes according to the CRL databank flak. Tried to measure equal distance from the seams best I could. Luckily the 10mm grommets will allow for error. Especially depending on what size bolts you use. Smaller the bolt, the more play for position. At least I'm hoping! So far so goodNice! The paint transfer method! That was a smart idea! Tough to push the armor evenly though and you kinda get one shot before you have to wipe off paint and try again.
How did you know where to punch the holes in the flight vest?
Last edited:
Slave1Pirate117
Active Hunter
Gotcha! I hope it all lines up! Should look goodThanks! For sure. I plan to hot glue until I get the position right then superglue/epoxy them permanent once finalized. So for the holes, I fitted the armor in position with velcro and weathered the flak with Tamiya modeling pigment. Tedious process, but it was enough to give an outline of where the armor should be. Then I roughly marked holes according to the CRL databank flak. Tried to measure equal distance from the seams best I could. Luckily the 10mm grommets will allow for error. Especially depending on what size bolts you use. Smaller the bolt, the more play for position. At least I'm hoping! So far so good
HawkFett
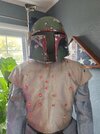
Active Hunter
Got my Viva Fett chest and collar armor mounted to the flak today. Have to pick up a few more bolts for the shoulders as they were out of the size I needed. Pleased so far. The ear plug method worked to some degree for positioning, but there were several re-adjustments needed to get everything equally spaced. Even the center piece pictured here looks a little high, but when it's on me and not the mannequin it's centered. It's a strange thing to align hard parts on soft parts. Movement, the way the vest forms to the body, how it rests, ect. Spent a few hours adjusting before I was happy with it. I'm afraid trial and error is the best advice I can give. Glad I'm done with the velcro. Feels much better mounted this way. Shoulders are next!
