Hawk_Fett_ ESB Build

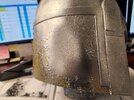
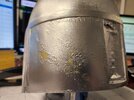
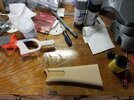
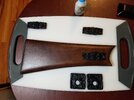
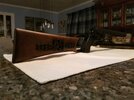
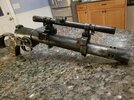
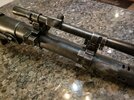
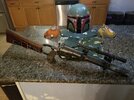
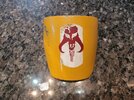
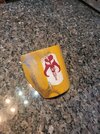
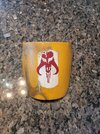
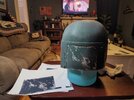
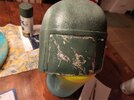
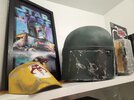
Here is the start of my Rattle Can ESB Wasted Fett Fugly paint up using Rafal Fetts stencils and Superjedis tracing method. I traced the first layer and eyeballed the rest based on the scale of the first layer. It was suggested to me to give it an acetone bath and a bubble bath. This is valuable info as the paint may not adhere if not prepped properly. Trimming was done carefully with a Dremel as suggested by the legend BudaFett. :) 
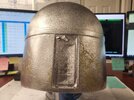
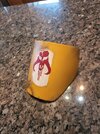
All imperfections in the cast were filled with spot putty from an auto parts store. It comes in a tube, not the big can like you would use for bigger sections on 3D armor. I left the bridge between the visor as it was also suggested to keep the shape and to avoid warping of any kind in the visor area. I just wanted to provide this info because this is my first cast helmet paint job and I didn't know any of this before starting.
Awesome!
 
Bright silver/chome aluminum layer complete. That was tough. I remember trying to do this last time without the exact scale needed to make shapes match. Having the stencil for the base layer is paramount. At a minimum, I can't say that enough. It truly sets the tone for the rear panels which are the toughest part of the helmet in my opinion. On to the next layer!
20220512_132103.jpg
 

Attachments

  • 20220512_132106.jpg
    20220512_132106.jpg
    3.4 MB · Views: 94
  • 20220512_152900.jpg
    20220512_152900.jpg
    3 MB · Views: 88
  • 20220512_153547.jpg
    20220512_153547.jpg
    3.6 MB · Views: 96
While we are waiting....(elevator music) I figured I would upload my EE-3 build. This is a 3D printed model from Woodtech armory. I worked on this for so long. So many lines and corrections. Had to re-stain the barrel after affixing the greeblies incorrectly the first time. Battled with it for a while. Got it to where I wanted it and I'm actually pretty happy with it. Still need to put the correct scope hardware down on the bottom and also get a sling and swivels but it's on its way. I far surpassed my expectation for a 3d print. Very happy with the stock stain. The Tamiya modelling rub really brought the rifle to life. It made it look like cold steel. That's also plastic. Still need to give it the famous "67" or "69" signature but the majority of the work is done. Threw it up on the wall mount for now. Will get back to it for the finishing touches. Let me know what you think.
 

Attachments

  • EE-3(1).jpg
    EE-3(1).jpg
    3.7 MB · Views: 118
  • EE-3(2).jpg
    EE-3(2).jpg
    3.9 MB · Views: 103
  • EE-3(3).jpg
    EE-3(3).jpg
    3.8 MB · Views: 103
  • EE-3(4).jpg
    EE-3(4).jpg
    4 MB · Views: 98
  • EE-3(5).jpg
    EE-3(5).jpg
    3.3 MB · Views: 102
  • EE-3(6).jpg
    EE-3(6).jpg
    2.9 MB · Views: 103
  • EE-3(7).jpg
    EE-3(7).jpg
    3.2 MB · Views: 105
  • EE-3(8).jpg
    EE-3(8).jpg
    2.7 MB · Views: 101
  • EE-3(9).jpg
    EE-3(9).jpg
    5.5 MB · Views: 100
  • EE-3(10).jpg
    EE-3(10).jpg
    3.1 MB · Views: 109
  • EE-3(11).jpg
    EE-3(11).jpg
    3.8 MB · Views: 115
  • EE-3 POSE(12).jpg
    EE-3 POSE(12).jpg
    2.2 MB · Views: 127
  • EE-3(13).jpg
    EE-3(13).jpg
    3.2 MB · Views: 107
  • EE-3(14).jpg
    EE-3(14).jpg
    3.3 MB · Views: 100
  • EE-3(15).jpg
    EE-3(15).jpg
    3.2 MB · Views: 94
  • EE-3(16).jpg
    EE-3(16).jpg
    3.8 MB · Views: 91
  • EE-3(17).jpg
    EE-3(17).jpg
    4.4 MB · Views: 95
  • EE-3(18).jpg
    EE-3(18).jpg
    3.7 MB · Views: 96
  • EE-3(19).jpg
    EE-3(19).jpg
    3.7 MB · Views: 102
  • EE-3((20.jpg
    EE-3((20.jpg
    3.8 MB · Views: 119
  • EE-3(21).jpg
    EE-3(21).jpg
    3.6 MB · Views: 119
  • EE-3 MOUNTED(22).jpg
    EE-3 MOUNTED(22).jpg
    2.9 MB · Views: 122
Last edited:
Re-working both shoulder bells since my armor damage was off. Starting with the left one first. I definitely feel better about it now that I have it back to this point on the left shoulder. Will attempt to finish it up tonight. Was painful to sand away the work that was done but if it's not right I don't want it there. I'm sure many of you can relate. Before and after a fresh paint base. Still a largely incomplete piece but making progress.
 

Attachments

  • mythosaurbefore.jpg
    mythosaurbefore.jpg
    1.5 MB · Views: 110
  • mythosaurreworking.jpg
    mythosaurreworking.jpg
    3.2 MB · Views: 109
Put the finishing "re-touches" on my left shoulder bell. See previous post on progression. Going to touch up the bright silver but used Jurassic_Fett 's master piece armor shoulder bells as reference to get mine more accurate. AlphaCloneFett RafalFett Does this look more in line with actual weathering? I feel this looks light years better.
 

Attachments

  • 20220516_181931.jpg
    20220516_181931.jpg
    2.1 MB · Views: 126
  • 20220516_181928.jpg
    20220516_181928.jpg
    2.3 MB · Views: 127
  • 20220516_181941.jpg
    20220516_181941.jpg
    2.2 MB · Views: 130
Last edited:
Did a full peel reveal on the rear panels. For the most part it went well but had to do some touching up as a few details were lost in the mix. The reefer grey/slate really makes the back of the helmet pop. Some steel wool and matte clear coat will be applied so the finish is entirely a rough draft at this point. Scratches and smaller details on the way!


rearpanel1roughdraft.jpg
 

Attachments

  • rearpanel2roughdraft.jpg
    rearpanel2roughdraft.jpg
    2.6 MB · Views: 81
Added the scratches on the left rear panel. Eyeballed it. Had to correct it a few times. Surprised myself when I held the stencil up to it. Almost ready to matte clear it. Gotta re-mask the chrome/aluminum. Also included a pic of my little nerd shrine. It's the only place I get in the house until I put a fully dressed ESB Boba Fett statue in the living room like a Christmas tree but year round. My wife will be thrilled. ⚰️
 

Attachments

  • 20220524_202922.jpg
    20220524_202922.jpg
    3.7 MB · Views: 98
  • 20220524_201648.jpg
    20220524_201648.jpg
    2.9 MB · Views: 101
  • 20220524_204622.jpg
    20220524_204622.jpg
    2.9 MB · Views: 106
  • 20220524_204640.jpg
    20220524_204640.jpg
    2.8 MB · Views: 104
This thread is more than 10 months old.

Your message may be considered spam for the following reasons:

  1. This thread hasn't been active in some time. A new post in this thread might not contribute constructively to this discussion after so long.
If you wish to reply despite these issues, check the box below before replying.
Be aware that malicious compliance may result in more severe penalties.
Back
Top