ESB Fett by Dark Mavis

Looks good. How tall is your jet back, thrusters to rocket tip and how wide? I have never heard the prop's actual size. Thanks.
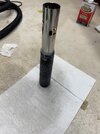
Thanks. I don’t have those dimensions yet as I’ve only printed out 3/4 of the main body.

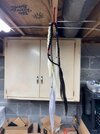
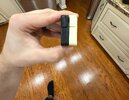
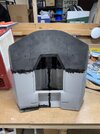
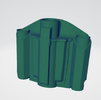
The main body is approximately 16.5” x 17.5”. Bottom to top and fuel tank to fuel tank. Thats without the rocket assembly. Given that it’s a MF file I’m sure it’s very accurate to the screen used one.

I did order a MOW pack as he decided to do a limited run of the raw kit days after I decided I was going to print the pack, so I’ll do a comparison once I have both fully assembled and choose which one I want to use.
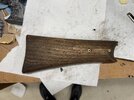
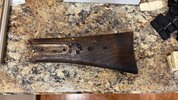
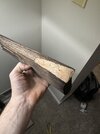
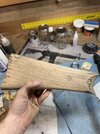
 

Attachments

  • unnamed.png
    unnamed.png
    54.6 KB · Views: 11
Looks good. How tall is your jet back, thrusters to rocket tip and how wide? I have never heard the prop's actual size. Thanks.
I'm ashamed that I didn't immediately think to just import the full assembly into my slicer and get the measurements DERP. 31.24" x 23.3" x 7.32"
Four years at the engineering academy wasted! You can reference the screenshot below to double check my hasty unit conversion from mm to inches.
 

Attachments

  • Screenshot 2026-02-19 234822.png
    Screenshot 2026-02-19 234822.png
    73.3 KB · Views: 12
That is huge compared to mine. Did anyone ever get to measure the real prop? Who/how/where did those dimensions come from?
That I can’t say. That might be a question to ask MF on boba fett builders. Assuming the lineage/photogrammetry of his other parts I would hope the jet pack is a similar story.
 
No, however I believe Neo Fett has the jetpack molds currently.
Well I'm always happy to send more business her way. I know she isn't actively selling jetpacks. Speaking of Neo...

I recieved in the replacement EE3 stock castings from her. They look great! still need to do more cleanup on them, but they look way better than the 3D printed ones that came on the rifle. Did some comparison photos. Notice the beautiful lack of layer lines :) I also seem to gotten an early start on weathering the stock while removing the 3D printed ones. I scraped off and sanded off the remaining glue and continued sanding down the stock because I'm not really happy with the color it came with. The stock is walnut, but I suspect they coated it with something that is darkening the hue. I'll probably sand it down some more and restain it once the damage is done. I've already taken some preliminary peeks at some great threads documenting the stock. So I'll get around to weathering it and trying to get the correct color.

I also recieved my braids from Tunafett and they look awesome.
 

Attachments

  • IMG_6784.jpg
    IMG_6784.jpg
    178.9 KB · Views: 15
  • IMG_6787.jpg
    IMG_6787.jpg
    417 KB · Views: 12
  • IMG_6780.jpg
    IMG_6780.jpg
    892.4 KB · Views: 15
  • IMG_6781.jpg
    IMG_6781.jpg
    635.5 KB · Views: 15
  • IMG_6783.jpg
    IMG_6783.jpg
    243.2 KB · Views: 16
Stock has been successfully ruined. Now that the major chunk is out I’ll move on to the scratches and general weathering.
 

Attachments

  • IMG_6793.jpeg
    IMG_6793.jpeg
    1.8 MB · Views: 15
  • IMG_6794.jpeg
    IMG_6794.jpeg
    1.4 MB · Views: 16
Stock is sanded back and did the first round of surface scratches/ damage. I think it'll look really cool once the wood is brought back to the right color and the blackwash fills in the scratches
 

Attachments

  • IMG_6800.jpeg
    IMG_6800.jpeg
    1.3 MB · Views: 17
  • IMG_6799.jpeg
    IMG_6799.jpeg
    1.3 MB · Views: 14
Last edited:
I recieved in the replacement EE3 stock castings from her. They look great! still need to do more cleanup on them, but they look way better than the 3D printed ones that came on the rifle.
The AM plugs have about 1/16" of extra resin on the base to grind down for the most accuracy. Adding the extra helps with the casting process and keep them sturdy for shipping. Looking at them from the side you should be able to see what is the extra bit.

No, however I believe Neo Fett has the jetpack molds currently.
I don't have the molds yet, but Lou should be wrapping up with what he needs to cast when the weather warms back up then he will be sending my way.
 
I finished the weathering achieved with sandpaper and files. Very pleased with it. It’s quite a luxury being able to wear a metal rifle like it would wear naturally. Now adding the painted on weathering next
 

Attachments

  • IMG_6808.jpeg
    IMG_6808.jpeg
    1.6 MB · Views: 10
  • IMG_6809.jpeg
    IMG_6809.jpeg
    2.4 MB · Views: 10
One of my favorite things about the dented helmet is stumbling onto an old thread that covers the exact subject I'm working on next:

I stumbled on to BudaFett thread about achieving the rusted/worn look on the field marshal by giving it a ferric acid bath. Since I decided to go all out on the full metal Webley it would be a missed opportunity to not weather it chemically. However since I got the full assembled rifle, it comes anodized from the blaster factory. Anodized metal will resist the rusting process caused by the acid bath. Thankfully removing the anodization isn't too tricky. I disassembled the rifle (Hopefully not losing any bolts) and got a can of easy off oven cleaner and applied it to the barrel. After leaving it sit for at least 10 minutes a coat I used a scotch brite pad to sand off the anodization coat. It worked like a charm. I will repeat this process on the receiver and trigger guard. It seems like the consensus is not to do this process on the hammer and trigger assembly as this would affect the fit up.

One issue I'm having is the flash tube seems to be glued into the barrel and not easy to remove. I'm not sure if the flash tube should be put in the bath. My assumption is that the acid bath will not give it the correct look. If I can't remove the flash tube I figure I can just put the barrel in the bath vertically and make sure the flash tube isn't submerged.
 

Attachments

  • IMG_6820.jpeg
    IMG_6820.jpeg
    962.4 KB · Views: 10
  • IMG_6819.jpeg
    IMG_6819.jpeg
    907.6 KB · Views: 11
  • IMG_6817.jpeg
    IMG_6817.jpeg
    1.3 MB · Views: 11
Yes! This definitely seems like the way to go.

Like you said, I would avoid the acid bath with the chrome flash tube. If it’s just polished stainless, the worst it will do is dull it (would just have to polish it). If it’s chrome it could remove some of the plating.
 
Yes! This definitely seems like the way to go.

Like you said, I would avoid the acid bath with the chrome flash tube. If it’s just polished stainless, the worst it will do is dull it (would just have to polish it). If it’s chrome it could remove some of the plating.
I thought one of the threads said using a blowtorch can help get the heat distortion effect. Of course this could be achieved with paint, but if I’m going down the realistic weathering path it’d be cool to do 95% of the weathering with real processes.
 
IMG_6837.jpeg
I finished welding the jetpack together today. I know there’s been conversation about the scale of the MF files on my thread, but I did a little comparison shot and I think it’s actually pretty dead on. Minute told me it matched very closely to the Anovos Jetpack when he compared them. I’m not sure what his process was to make it, but I think I believe him that it’s the most accurate Jetpack file available. It also has fit all my metal parts perfectly so far.
 

Attachments

  • IMG_6824.jpeg
    IMG_6824.jpeg
    2.9 MB · Views: 2
  • IMG_6829.jpeg
    IMG_6829.jpeg
    1.4 MB · Views: 1
  • IMG_6830.jpeg
    IMG_6830.jpeg
    1.2 MB · Views: 2
  • IMG_6835.jpeg
    IMG_6835.jpeg
    3 MB · Views: 3
Back
Top