Boushh Build WIP - Iron's Daughter

So, as stated in the post right above this one, I've been getting some items these past few weeks! I engaged a vendor known as alvomedia and found that she has a bunch of stuff for the Boushh costume! After reviewing the pictures of those items, I fully intend to get everything she has to offer - which again is listed above! For those interested Avlomedia - who also goes by Boushh Build, has a Facebook Page dedicated for the sales of her products and services. As of right now, I know that she is very busy and gets tons of requests for helmet commissions. Her work, from what I've seen is nothing short of amazing! Alvomedia has consistently knocked out helmet commissions within 10-14 days. However, I've elected to do my daughters helmet build myself. I fear that my build will not be that quick.

Here is the Leather Kit from Alvomedia, which is pre-cut and pre-fitted specifically for a Sandman helmet and for the snout area of the helmet (Pictured with Sandman's resin pieces)...
View attachment 219594

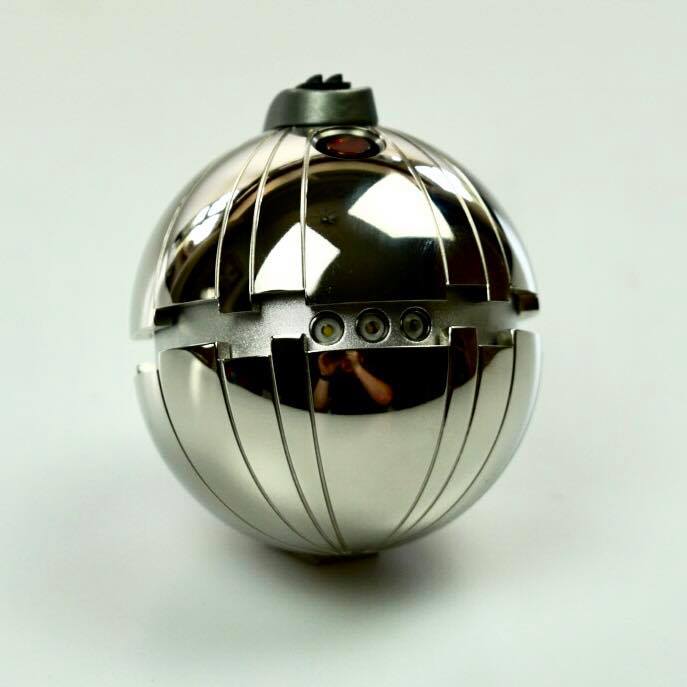
I don't think Fettronics needs any introduction as he's a well respected vendor of Fett Chest LED's here on TDH. I'm a proud owner of a Fettronics LED Kit in my ROTJ Fett Chest Armor! After a great experience with Fettronics, I decided to become a repeat customer as he also offers up a Boushh Helmet LED Kit. And here is that kit...
View attachment 219595
Fettronics offers a few different sizes to this kit and the one that I got that I feel that fits the Sandman helmet perfectly is his 124mm size. The other cool thing about this kit is that it comes with a dial so you can speed up or slow down the cadence of the blinking between the two rows of LED's.
(y)

Also received were the Spats/Boot Covers from Alvomedia (Pictured here with the Sandman Resin Boot Greeblies)...
View attachment 219596

I also got the Cloak from Alvomedia (I had to spread it out on my foosball table)...
View attachment 219597

I also picked up a set of children's gloves (Size: Kids Large) from Amazon...
View attachment 219598
I'm not concerned about that company logo Handlandy on there as it'll get covered up by the sleeves and fist spikes!

I also started to prep the helmet by getting my rough cuts in place on the Visor, LED Window and on the back side of the helmet.
View attachment 219599
View attachment 219600
View attachment 219601

Another concern is that I was told that the Sandman helmet is notoriously small and a tight fit on larger noggins. I'm 6'2" and my head measured around just above my eyebrow measured at 23.25 inches. My daughter who is presently growing like crazy, her head size is 22 inches (And she's 10 YEARS OLD!!) I imagine her head is probably close to fully grown (I hope). But after my rough cuts I tested it on myself.....turns out, I was able to get it on.....just barely - Hahaha!
View attachment 219602

When my daughter got home from school that day she had NO issues in getting it on/off! <Whew>
View attachment 219603

In short, I feel like I'm making some decent progress....but there is much left to do!

Cheers,
-Iron
I can't wait to see the final result. It's coming on great so far.
 
So the very first post of this thread back in Mid-October of 2021, my daughter stood at 5'1". We went to the doctors office yesterday because she has an ear ache. As usual, the doctors office likes to get height and weight before the appointment. They took her measurements again and she is now at 5'3"!!! Just crazy how fast she's growing! And this is why I'm waiting a bit to get the other items as I fear she may grow out of what I would get her for Halloween.

I did manage to find some time today to get the insides of the helmet dremeled out with the sanding drum so that the visor and LED visor will fit nicely. I also got the middle vertical piece of the snout dremeled out as well - this is so that you can breathe in this helmet.
Dremel - Pic 1.jpg

Dremel - Pic 2.jpg

Dremel - Pic 3.jpg


I gotta say I really had to take my time with this part as there was some fine dremel work involved. In watching some of Alvomedia's YouTube videos, I seen that she uses an orbital sander for some of the greeblie pieces and on the helmet in some areas. I always wanted a palm sander myself so I thought why not, and ended up getting myself a DeWalt DWE6411K from Home Depot today!
New DeWalt Sander.jpg


I hope it'll make short work of the greeblies pre-sanding.

Cheers,
-Iron
 
Last edited:
Clean sanding/cutting!! Looking forward to the wrapping. There's something about leather mixing with props. Looking forward to the result!!
 
Hey gang,
A little update. Not being all that familiar with resin (and resin casting), but it seems to me that when Sandman makes the Boushh Helmets he makes two halves and then somehow fuses them together. I've seen some that are a little better than others. Mine, while a great cast, looked to be off a little when he fused them together - some things off center and a little crooked from one halve to the other. No worries, I used my Dremel and a piece of sandpaper to fix those imperfections. See below as I've outlined them in my picture in RED Circles.
1644120985738.png


Again not terrible, and I'm sure it is a common thing and I was able to fix em'. In addition, I've seen folks use a bondo putty to hide the seam that may show up when painting I'm by no means an expert at applying Bondo and may have made a little mess. Also today, I was able to put in the dent in Boushh's helmet and got the little helmet topper piece grinded out....

Bondo Added.jpg

1644120310904.png


I hope to finish the sanding as well as the ear pieces tomorrow and begin the gouges/scratches. It's coming along though!
:cool:(y)

Hoping painting to commence next weekend!

-Iron
 
Last edited:
So yesterday and today I found some time in getting the Ear Greeblies sanded, filed and assembled.

Here are the pieces and a new mini file kit I bought.....
Ear Greeblies and Mini FIle Set.jpg


I trimmed out two pieces (as per Sandman's specifications on his instructions), these are meant to be used as a platforms for the Ear Greeblies....
1644280953539.png


Get em' all mounted on the platform I also trimmed the tubes a little bit. The other two greeblies I'm gonna leave loose for now, but they will get attached when done. And here they are attached to the helmet - just dry fitted for now - All held on by just the stem, but I will permanently have these attached by tomorrow....
1644281897911.png


I also just wanna say that my new DeWalt Electric Sander made very short work on those greeblies edges' as well as that mini file kit I picked up, worked great in getting access to those tight spots! More to follow!

-Iron
 

Attachments

  • 1644282306813.png
    1644282306813.png
    3 MB · Views: 121
ShortFuse
The kit was rather raw, but it’s a great kit nonetheless. For that dent, I opt’d to sand it down as that’s what others have done and no issue.

To achieve that fused look I’ll be using some JB Welds “PlasticWeld”. It has a decent working time which is good cause I’ll need to sculpt it a bit. More on this tomorrow!

-Iron
 
Update Time!

I got the ear greeblies in place and putty'd up with JB Welds PlasticWeld for that fused look....
Ear Greeblies.jpg


I also got the little Ferrari hat piece fitted as well as the two small stems and using JB Weld Plastic Bonder got em' set in place....
Ferrari Hat Piece and Stems.jpg


With these pieces now set in place I can begin giving the helmet some battle scratches and gouges with the ole Dremel.
:cool:(y)

Also, I made a little bit of progress with my Disney Parks Hot Potato Thermal Detonator too...
1. Apply JB Weld PlasticWeld to holes and shape.
2. Allow to cure and then sand smooth.
3. Clean and apply primer.
4. Spray on Alclad II's ALC -304 Gloss Black Base to the outer shells & spray on Tamiya's XF-16 Flat Aluminum on the inner ring pieces.
5. Spay on Alclad's II's ALC-107 Chrome to the outer shells.
Thermal Detonator Painting.jpg


I was pretty blown away from the results of the Alclad II products. I wasn't too sure that I'd get a mirror finish. However much to my surprise this has exceeded my expectations! They are drying right now but once done I'll be applying Alclad II's ALC-310 Gloss Klear Kote to the outer shells! After that, apply some magnets to the stems and get it all reinstalled!

In doing some research I came across this little beaut.....
Much less than the MasterReplicas version.

Adam Savage did one of his "One Day Builds" that he sometimes does on YouTube. If you stick with it till the end he's got a funny story concerning his Thermal Detonator, made me chuckle. Enjoy!

More to follow!

Cheers,
-Iron
 
Last edited:
So a little bummed.....

The Alclad II's Gloss Klear Kote did seem to dull down that mirror effect I was after. Grrrrr! :mad:
Gloss Klear Kote - 1st Attempt.jpg


I've reapplied the Gloss Black Base and will spray on the chrome again tomorrow. In doing a bit more research on the matter online, I've read that many folks said this is common and it is usually best practice to wait a few days to a week before you apply the Alclad II Gloss Klear Kote. This ain't over yet, more to come on this.

In the mean time I setup my makeshift Dremel workstation to include arming myself with a selection of cutting/inscribing Dremel tips. This is so that I may begin cutting in that battle damage and scratches on the helmet....
Dremel Makeshift Workstation.jpg


I actually had a blast doing this and caught myself wondering just what in thee hell Leia or this Boushh character got themselves into. But I'm very pleased with how it all came out......
All Scratches.jpg


A couple more things to take care of on this helmet, then it'll be time for some primer!
(y)

-Iron
 
Last edited:
At long last.......the lower snout section has been taped off so that it won't interfere with the adherence of the leather. And the other section has been primed!
Boushh Helmet - Primed.jpg


Tomorrow morning I'll get the Tamiya X-11 (Chrome/Silver) applied and then begin to humbrol mask it up! I'm glad to have kicked off this paint job!

-Iron
 
....And just like that, I got the Tamiya X-11 (Chrome/Silver) applied this morning, next step.....Humbrol Maskol.
Boushh Helmet - Silvered Up.jpg


From what I’ve seen, many opt to topically apply the silver to their Boushh Helmets. While it still looks good, I just like the added depth that Humbrols Maskol provides.

-Iron
 
This thread is more than 1 year old.

Your message may be considered spam for the following reasons:

  1. This thread hasn't been active in some time. A new post in this thread might not contribute constructively to this discussion after so long.
If you wish to reply despite these issues, check the box below before replying.
Be aware that malicious compliance may result in more severe penalties.
Back
Top