3D Print advice?

MinaFett

Active Hunter
Hello all

I’ve been slowly working on my ROTJ build starting with shin tools. I was wondering if those in the community that do 3D printing have any finishing tips to share?

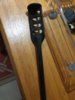
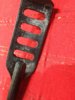
My best finished piece which is ready for painting took me roughly 12 or more hours to get to this point. The close up picture was part way through the process. The full length shot is ready to paint. Didn’t want it too smooth or the paint won’t stick. :)

Not afraid of hard work (I have drawn blood already) but was hoping others out there have thoughts or suggestions to share.
 

Attachments

  • 614D9EBA-BB65-4CFA-A930-E4FF2A68CDB0.jpeg
    614D9EBA-BB65-4CFA-A930-E4FF2A68CDB0.jpeg
    1.5 MB · Views: 453
  • BB113097-C8CF-4D48-8007-8F76E5544A33.jpeg
    BB113097-C8CF-4D48-8007-8F76E5544A33.jpeg
    1.8 MB · Views: 450
I usually do some light sanding on my raw 3D prints then hit it with a coat of 3M glazing putty to fill in any low areas. Once dry, more sanding to a smooth even finish, then a rattle can Primer/Filler coat, more sanding (and another Primer/Filler coat depending on imperfections, then sand again), then paint coat. I would guess on a print the size of that shin tool that all this could be completed in 1/3 of the time you have spend already, depending on weather conditions for primer and paint application that is.

Larger pieces you could probably use bondo instead of the 3M glazing putty. Either would work.
 
Hi

Thanks very much for the response these are things I’m keen to try the putty you mention
3M glazing putty
I’ve found a few things over here which appear to be similar but not the same. Can I trouble you to take a picture of what you normally use so I can be sure what I’m getting is the match I believe it is? I should mention that I’m in Australia, sometimes the wonderful products that are mentioned in the forums are not readily available.
 
Last edited:
Hi

Thanks very much for the response these are things I’m keen to try the putty you mention

I’ve found a few things over here which aller to be similar but not the same. Can I trouble you to take a picture of what you normally use so I can be sure what I’m getting is the match I believe it is? I should mention that I’m in Australia, sometimes the wonderful products that are mentioned in the forums are not readily available.

Sure no problem. It is this stuff.
907-j.jpg

I do believe Amazon ships internationally but hopefully you can find this product locally and save the wait and shipping costs.
 
Thank you so much. Sadly Bunnings (homedepot equivalent) don’t sell this, beats me why. I was looking to buy from Amazon but shall also look at other vendors. I look forward to trying this method.

I and my tired fingers wholeheartedly thank you for the suggestions/tips. :)
 
No problem. There are other products out there that would be an option to try as well. I know of 1 called XTC-3D. It's a 2 part coating specifically made for smoothing 3D prints. You mix part A and part B together and then brush it on. Then it cures to a gloss and is supposed to be sandable and accepting of paint/primer.
 
What resolution are you printing at?

If you go to home depot and get the 2X Clear Gloss spray paint and give your parts 2 coats of that it does a lot of the heavy lifting as far as filling gaps in your print.

2 coats of that plus a light sand then Filler Primer will do 95% of the smoothing work without having to mix chemicals.
 
This a bit more work, but I like to coat with a 2 part epoxy...basically a clear casting resin. It gives a nice hard sandable finish. Tabletop epoxy may work, but might be too thick. If you end up trying this, be careful to mix really well or it will be a mess that won't harden...mix 3 minutes...pour in a new cup mix 3 minutes.
 
Thanks for the additional advice chaps. Very much appreciated. :)

In response to the query on resolution. My printer is a kit unit and the instructions are not in English. The resolution options provided are low, medium and high. It doesn’t really specify beyond that. Sorry that’s not helpful. Essentially I print at highest quality possible with good quality materials.

I trim as much excess from the print supports and then sand with the different sand paper grades.
 
Hey MinaFett,

I have 3d Printed my Jetpack, EE-3 Blaster, All Shin Tools, helmet interior and starting the Sidearm now. I have printed all in ABS plastic.

When the print is done and in a raw format this is my process:
  • Sand the piece with a low grit just to knock down the grooves then follow with a higher grit
  • I will then brush on some acetone to smooth out some of the grooves
  • If I am bonding pcs together I bond with JB weld. When the JBWeld dries, I brush on acetone to really weld/melt the 2 pcs together
  • I use the Bondo Glazing putty to smooth the joints as needed
  • I use several coats of a filler primer, this really creates a nice smooth finish, but since I am really wanting my Boba Fett ESB build to take on more of a weathered/damaged look, I don't mind leaving some of the ridges or inconsistency's that may be left if not all of it is smooth, makes nice damage marks
Definitely a multi step time consuming process
 
A couple of Aussie alternative products to the 3M Bondo Glazing and Spot Putty are; Septone Car Filler, Body Filler (aka BOG), or builders fill. Those products should be in automotive sections. Some googling lists a couple Aussie businesses called "Super Cheap Auto" or "Repco" should carry those products.
 
This thread is more than 5 years old.

Your message may be considered spam for the following reasons:

  1. This thread hasn't been active in some time. A new post in this thread might not contribute constructively to this discussion after so long.
If you wish to reply despite these issues, check the box below before replying.
Be aware that malicious compliance may result in more severe penalties.
Back
Top