Nordicman97
New Hunter
Here's my little part Fett.
I have decided that this wil not be a super accurate helmet but something that somewhat looks like the original.
My deadline is at the premier of one of the new Star Wars movies.
On the inside I will add 1 or maybe 2 fans to make it a little better to wear over longer periodes of time.")
This kit was bought of ebay for a fair price but if I had found out you could get a very good one from here, I wouldn't have bought this. But I will stick to this one and think of it as practice for future projects.
Thing's that has been done to it:
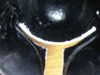
Sanded, a bit of bondo has been applayed (still needs a little more), spray putty, visor cut out and started shaping out the inside to get a smooth surface to glue the visor into place.
What I would like to do:
Put in a better looking MQ-1 circuit board, lights in the rangefinder and replace the ears with better ones. But since how the helmet is cast at the back of the ears it means I can't just grind them down. :angry
Humbrol products will be used for painting (A few items has been purchased already thanks to a visual paint guide that I found here. Thank you to all that helped put that guide together!)
I do have an airbrush that I can use or maybe even an automotive paint gun.
Anyway, here's some pictures of said helmet! (pictures where taken by my phone so they dont show that much detail. But if anyone wants some better ones, I will borrow my dad's camera.)


This needs to be cut out and replaced...


Hot glued piece of resin for strength during sanding, filing and painting.


This will be filled in and re drilled.

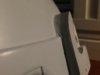
I don't know if it has been scratch built or casted from another helmet. On the rangefinder ear it looks like it had been screwed on the original. It looks very uneven as well.


The left ear is also a bit to narrow (at least I think so :wacko) The caliper shows the width of the right ear versus the left ear.


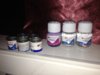
My so far collection of Humbrol products.

It looks a bit tall in the pictures but looks alright in person. (If anyone wants any measurements I will gladly provide them.)
I need all the help I can get when it comes to weathering this thing and thinning of the Humbrol paint for an airbrush. I have never weathered anything before...
And also what needs doing to make it a bit more accurate to the screen used helmet.
Any critique or tips is always very welcome.
Thanks for looking.
I have decided that this wil not be a super accurate helmet but something that somewhat looks like the original.
My deadline is at the premier of one of the new Star Wars movies.
On the inside I will add 1 or maybe 2 fans to make it a little better to wear over longer periodes of time.
This kit was bought of ebay for a fair price but if I had found out you could get a very good one from here, I wouldn't have bought this. But I will stick to this one and think of it as practice for future projects.
Thing's that has been done to it:
Sanded, a bit of bondo has been applayed (still needs a little more), spray putty, visor cut out and started shaping out the inside to get a smooth surface to glue the visor into place.
What I would like to do:
Put in a better looking MQ-1 circuit board, lights in the rangefinder and replace the ears with better ones. But since how the helmet is cast at the back of the ears it means I can't just grind them down. :angry
Humbrol products will be used for painting (A few items has been purchased already thanks to a visual paint guide that I found here. Thank you to all that helped put that guide together!)
I do have an airbrush that I can use or maybe even an automotive paint gun.
Anyway, here's some pictures of said helmet! (pictures where taken by my phone so they dont show that much detail. But if anyone wants some better ones, I will borrow my dad's camera.)
This needs to be cut out and replaced...
Hot glued piece of resin for strength during sanding, filing and painting.
This will be filled in and re drilled.
I don't know if it has been scratch built or casted from another helmet. On the rangefinder ear it looks like it had been screwed on the original. It looks very uneven as well.
The left ear is also a bit to narrow (at least I think so :wacko) The caliper shows the width of the right ear versus the left ear.
My so far collection of Humbrol products.
It looks a bit tall in the pictures but looks alright in person. (If anyone wants any measurements I will gladly provide them.)
I need all the help I can get when it comes to weathering this thing and thinning of the Humbrol paint for an airbrush. I have never weathered anything before...
And also what needs doing to make it a bit more accurate to the screen used helmet.
Any critique or tips is always very welcome.
Thanks for looking.
Attachments
-
 26.03.2016%20519_zpstqpdmiod.gif6.4 KB · Views: 115
 -
 26.03.2016%20518_zpspqsg1qyh.jpg100.8 KB · Views: 120
 -
 26.03.2016%20517_zpsddsb575v.gif6.4 KB · Views: 113
 -
 26.03.2016%20516_zpsqjgitw2u.jpg115.2 KB · Views: 110
 -
 26.03.2016%20515_zpsbny7fls8.gif6.4 KB · Views: 118
 -
 26.03.2016%20525_zpsdwcsm9pl.gif6.4 KB · Views: 120
 -
 26.03.2016%20524_zpsrjkxrpoa.jpg215.2 KB · Views: 119
 -
 26.03.2016%20526_zpsjbcos896.jpg104 KB · Views: 108
 -
 26.03.2016%20527_zpsszbkxylb.gif6.4 KB · Views: 117
 -
 26.03.2016%20528_zpsbygooj7f.jpg168.4 KB · Views: 116
 -
 26.03.2016%20521_zpswmdqb208.gif6.4 KB · Views: 118
 -
 26.03.2016%20529_zpsubmnltkt.gif6.4 KB · Views: 119
 -
 26.03.2016%20530_zpst2u086fk.gif6.4 KB · Views: 126
 -
 IMG_0946_zpsfp1r5dv3.jpg212.1 KB · Views: 124