Ord Mantell's ESB build

The jetpack in the Selfridges photo is the ESB one
I agree it certainly does look like the ESB jetpack, but I'd like to verify beyond any reasonable doubt it's not some sort of backup. If it >is< the ESB, it's quite a paradox why that white underpaint doesn't show across the entire backside on-screen the way it does in the Selfridges display with the very clearly defined green border on the edge on the right side. Hopefully we can get a better copy of that Selfridges picture.
 
I couldn't make it through the week without completely revising my interpretation of the paint job on the back of the ESB jetpack. I now think it's quite different than I ever thought. Sometimes when you have seen something one way for so long, it's hard to see it another way, or as one obscure old sage put it, "you must unlearn what you have learned." What happened this week is I saw the back of the ESB jetpack another way. I always thought it was all green in back, the same as the front. I no longer believe that. Thanks to RafalFett.

This might not prove to be popular, but I feel confident this is actually what the back of the ESB jetpack looked like, or something close to this:

IMG_2498.jpeg


So yes, I think the whole back was white and the green on it was simply from overspray from the rush paint job. It was also probably a lot more messy than I have done it here.

I can already sense some folks saying 'no way, that's dumb', so I'll try my best to make a case for it. If you still disagree, it's okay with me.

First, it started with the problem presented by the Selfridges photo. I decided to assume the jetpack in the photo is actually the hero ESB jetpack and not a backup. We have no evidence of a backup. Also, the rest of the costume we can see in the photo all seems to be the ESB hero costume.

Screen Shot 2021-09-26 at 9.42.53 AM.png


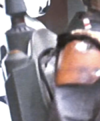
With that assumption, there's an obvious problem that needs an explanation. The photo was taken well after the filming was complete. Yet it's very clear in the photo that the back of the jetpack has a much lighter area with a darker border than it seems in the film. The back is not the same color as the rest.

Screen Shot 2021-09-26 at 9.44.58 AM.png


But why doesn't it look this way in the movie or production photos? If it's all the same green in back like the rest of the pack, why does it look so light back there? Like it's almost white?

I looked carefully at a UHD copy of the film to see if I could find an answer. And I think I did. If you look at scene 371 with fresh eyes (the scene with the best looks at the back of the jetpack thanks to Morton's wardrobe malfunction) along with a couple supporting shots from other scenes, the problem posed by the Selfridges photo seems to resolve itself.

Take a look at the back of the jetpack in this sequence of frames....

whiteback.gif


Look at it long enough to let your eyes adjust their white balance and you should start to see the back of the jetpack is white with green overspray. Like the infamous blue dress vs. gold dress photo controversy that swept the interwebs many years ago, the ability to see it one way or the other depends on how your brain interprets the white balance in the image. You will either see the back of the jetpack as either highlighted green or as white. It's one way or the other. Once you see it as white, it's hard to unsee it.

If you are having a hard time seeing it, focus here:
Screen Shot 2021-09-26 at 10.35.58 AM.png


what causes the illusion that the whole back is just highlighted green is this overspray (arrow below) where it really is green, but at an angle your brain expects would be darker anyway:
Screen Shot 2021-09-26 at 10.38.25 AM.png


when your brain sees that, it makes an adjustment to the lighter areas at different angles and reports those areas as the same green color that are simply getting hit with brighter light. But that's an illusion. The lighter areas are actually white underpaint with green overspray, not solid green paint getting hit with brighter light.

this highlighted area on the top of the tank also adds to the illusion because it actually >is< highlighted green paint with a gradient depending on angle:
Screen Shot 2021-09-26 at 10.45.37 AM.png

this tends to calibrate your brain to judge the area on the back in the same way, though the surface of the back is at a significantly different angle to the light than the top of the tank.

Instead, you tend to ignore this because it's further away:
Screen Shot 2021-09-26 at 9.22.24 AM.png


Additionally:
Screen Shot 2021-09-26 at 9.25.13 AM.png


Going back to the Selfridges photo for a moment, I started to understand it a bit better after seeing it this way in the screen caps. What I thought was pure shadow on the middle of the back was actually a combination of the overspray and shadow:

Screen Shot 2021-09-26 at 8.53.24 AM.png


So there is a very heavy spot of green overspray in sort of a 'V' shape at the top:
Screen Shot 2021-09-26 at 11.23.16 AM.png
jpbackcontrasty.jpg


Screen Shot 2021-09-24 at 6.01.47 PM.png


Unfortunately, there aren't a lot of production photos that really give us a good look at the jetpack back area. I've not combed through many of them for this yet, but will. However there are two more stills from the film that give credence to the white backing with green border.

this shot from the carbonite scene, you can clearly see the white with green border on the top right corner if you adjust the image:
Screen Shot 2021-09-26 at 10.03.37 AM.png

jetpackevidence5.jpg


Screen Shot 2021-09-26 at 10.14.24 AM.png


seems to verify the Selfridges photo is giving us reliable info, the same area highlighted below:
Screen Shot 2021-09-26 at 11.37.51 AM.png


This shot also seems to offer support, arrows pointing to the white around the green overspray spot:
Screen Shot 2021-09-26 at 10.07.39 AM.png


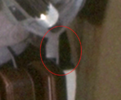
*EDIT: Additionally, after dredging through the media pictures for ESB here on TDH, I found several more shots that show the upper left corner is definitely whitish with the green border. But the evidence is already strong for that. I was looking for evidence of the white elsewhere on the back. I did see something in this photo that does not seem to rule out there is white all the way to the bottom:

Boba-Fett-Costume-Empire-Strikes-Back-Jetpackplacement2 copy.jpg


what is that back there?

Screen Shot 2021-09-26 at 6.26.25 PM.png


Is it the bottom back of the jetpack? I don't know...

*EDIT: nevermind on this last bit. I agree with Levi that must be the back armor plate.


That's all I got right now. I plan to do lighting tests with my jetpack to put it to the test. And look at more photos. Anyway, this is all Levi's fault. :lol:

Finally I leave you with something else I stumbled on while looking at this problem: Luke's snot laser. :lol: I never noticed that before either. Enjoy.

Screen Shot 2021-09-26 at 10.07.23 AM.png
 

Attachments

  • Screen Shot 2021-09-24 at 6.03.18 PM.png
    Screen Shot 2021-09-24 at 6.03.18 PM.png
    382.8 KB · Views: 173
  • jetpack_outline1.jpg
    jetpack_outline1.jpg
    5.4 MB · Views: 238
  • aligned.jpg
    aligned.jpg
    4.1 MB · Views: 204
  • jetpack_outline2.jpg
    jetpack_outline2.jpg
    2.3 MB · Views: 205
  • Screen Shot 2021-09-26 at 6.26.25 PM.png
    Screen Shot 2021-09-26 at 6.26.25 PM.png
    499.1 KB · Views: 204
Last edited:
I’m 100% convinced that the pack in the Selfridges photo is as you say. As to the hero pack filmed in ESB, I have no idea.

But I don’t think there’s a wrong answer here, and I applaud your work regardless. :)
 
As I am about to paint my ESB jetpack, I thank you for the investigative work on this. I will continue to ponder whether to do the back white with green overspray or just go with the all green and pretend I never saw this. Mine is going on a display mannequin so no movement and limited visibility to those parts of the jetpack. I continue to scour this thread for tips on my own build. Awesome!
 
Based on the visual evidence provided, the back was definitely white with green overspray, you
can even see it here

1632754269667.png

if you want hyper accuracy this is the way to go, but if you want 'ideal movie accuracy', then it's all green
 
The following information has been rendered inaccurate by new information and will be corrected soon:

The helmet chin straps have been in progress from the day I figured out JojoFett95 's mystery motorbike helmet was an Everoak brand helmet. It was 9 months of searching for the correct model and endless hours of poring over photos after that to finally get to the point of installing them today. Phew! This is a major part of the puzzle that is the ESB helmet interior, which in itself has been quite a demanding project. But I'm very pleased how it's turning out.

Obviously it starts with removing the straps from the Everoak where they are attached at the top. You want to make sure you have enough length, so cut as high as you can.

IMG_2212.jpeg
IMG_2199.jpeg


Then you'll need to get the leather guards from the part of the leather that wraps around the back of the head.

IMG_2209.jpeg


this is where I think the leather guard comes from for the left side:

ESB left leather strap source.jpg


The right side is taken from the other side and is cut as a rectangle.

IMG_2251.jpg


You'll need to measure the lengths for the placement of the grommet holes according to your helmet.

I have determined with 100% certainty the accurate grommets are size #1 rolled rim with spurs solid brass grommets. For now, you'll just have to trust me that I'm correct. Proof is under lock and key. Size #1 is 13/32" interior hole width. You will also want to get a brand with the size number stamped into the flange on both sides. They look like this:

IMG_2544.jpg
IMG_2444.jpg


If you get C.S. Osborne grommets, you are guaranteed to have the number stamped in and the correct exterior flange diameter as well (which is just a hair wider than the dacron chin strap). In fact, I believe C.S. Osborne may also be the correct brand for these, the same as in the ESB helmet, but I have not determined that for certain yet. I have a hunch these are also the same as the grommets installed on the flak vest. Anyway, you can find these on Amazon and eBay. Unfortunately, the setter tool for these is not exactly cheap. Maybe you can buy a used one if you're lucky.


The left side needs added stitching to mate the dacron strap to the leather guard. This is a pre-viz of where the stitching goes:
leftstrapthreads1.jpg


IMG_2431.jpg
IMG_2432.jpg


stitching and grommets in place:
IMG_2506.jpg
IMG_2507.jpg


IMG_2508.jpg
IMG_2519.jpg


You'll need some simple washers and a z-clip to complete the ensemble. Then simply attach to the interior using the available screws holding the ears in place and voila. Here they are in my w.i.p. interior:

IMG_2542.jpg


I think the z-clip is too tall. I have a 1/4" installed here but I also tried 1/8" and it seems too short. I've not found a 3/16" clip yet to try. I'll keep looking.

IMG_2532.jpg


Unfortunately my everoak straps were made while the machine which burns the ends of the straps was apparently malfunctioning and made extra burn marks further up the strap near the button. Bother.
IMG_2533.jpg


This is maybe what the interior might have looked like when the chin cup was still attached:
IMG_2546.jpg
IMG_2543.jpg


Still plenty of work left to do on the electronics and other tidbits. I'll probably finish the electronics as the very last part of the whole build.
IMG_2545.jpg
 
Last edited:
Finally... will start painting armor, although the final armor set is not ready, I have some test armor to play with. This is the last shot of the armor in all primer.

IMG_2595.jpg


changing the thread​

It feels pretty dead at this forum these days. I've been updating this thread on two separate forums for a long while and it's really a chore. Plus, most of the people who seem to really be reading this and making great contributions to the build are already following on the other Fett-focused forum, so it seems pretty ridiculous to keep doing it in both places.

I've decided not to update here anymore and instead focus my future updates on the other forum. Or maybe I'll change this one here to a simpler format: the IG format where you post a pic and a short lazy blurb. Like the first part of this post above. lol. I don't really like that format but it might work better for the TL;DR masses, and I'll leave the more in-depth, greater detail and thorough info posts/insightful discussions on the other forum. It's just too much of a hassle otherwise.

So if anyone wants to see posts for this build it'll be over on the BFB. Some big new things still in store before it's done. Otherwise, I'll maybe post some general progress pics here along the way as the build is now entering the final stages. Thanks for reading everyone.
 
Last edited:

A summary update​

I redid my shin tools to make them more accurate. The main take-away is the "anti-security blade" got upgraded with visor material for the black rectangle, as this is what was used on the original.

visormaterial.jpg


Also there was an update to the right gauntlet. After you get your recently revealed piezoelectric charge source for your right gauntlet you'll want to take it to the next level with this change to how you do the tip:

Screen Shot 2021-10-16 at 6.41.03 PM.png


Screen Shot 2021-10-16 at 6.44.29 PM.png


I go into greater detail in my thread over at BFB. You can read more there.
 
In a follow up on my more accurate girth belt post, I completed a new homemade girth that is more accurate than any currently commercially available product. It wasn't that hard.

Screen Shot 2021-10-21 at 9.51.29 AM.png
Untitled.jpg


Also, thank goodness, Grue (Grul666) of Handmade Horror Shop on Etsy (and a member here on TDH), replaced the ammo belt my dog destroyed in February. I began working with Grue in the summer of 2020 to put together a more accurate ammo belt. The results are stellar. I think it's currently the most accurate ammo belt you can find. I can't recommend it enough.

Screen Shot 2021-10-21 at 10.04.34 AM.png


Again, more details on my build thread on BFB.
 
In a follow up on my more accurate girth belt post, I completed a new homemade girth that is more accurate than any currently commercially available product. It wasn't that hard.

View attachment 216513View attachment 216514

Also, thank goodness, Grue (Grul666) of Handmade Horror Shop on Etsy (and a member here on TDH), replaced the ammo belt my dog destroyed in February. I began working with Grue in the summer of 2020 to put together a more accurate ammo belt. The results are stellar. I think it's currently the most accurate ammo belt you can find. I can't recommend it enough.

View attachment 216515

Again, more details on my build thread on BFB.
woodman did a old run on vintage vinyl he found. Those belts were damn awesome. And painted correctly Are stellar !
 
I guess the cat got out of the bag before I could write about it in my build thread. No problem. But, in case you missed it. I spotted this last week while I was examining the new footage in the 'Under the Helmet' special...

!!!Screen Shot 2022-02-13 at 4.39.16 PM.png


That's pretty much the best frame. I made an enhanced clip of the video but haven't put it up anywhere yet. I added the spot to my gauntlet, too, but I'll post about that later.
 
Thanks Levi for those extra pictures of the gauntlet bottom scar. Shows us for sure we can see pretty much everything that needs to be seen in the newly released footage. I have more about the gauntlet, but will dig into that later. Here's a quick update on a new helmet for my build.

I commissioned a very thin shell helmet with the correct fiberglassing as the original ESB helmet to maybe replace my current G2. Then proceeded to paint it based on my hypothesis the base primer is the baby blue of the right ear platform, and that same blue is what gives the interior it's lighter blues near the bottom due to overspray.

1645558645122.png


1645558726210.png


1645558768759.png

IMG_3699.jpg

1645558814558.png
IMG_3678.jpg


I go into more detail over on BFB.
 
Last edited:

Your message may be considered spam for the following reasons:

If you wish to reply despite these issues, check the box below before replying.
Be aware that malicious compliance may result in more severe penalties.
Back
Top