DavidF
New Hunter
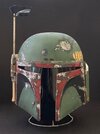
I've been lurking quietly here for a long time, but this year I finally bit the bullet and challenged myself to build and paint a Boba Fett helmet. Here is the final result:


I started back in January with a pile of cardboard and a set of Rafal Fett's plans. I built the cardboard helmet, and started applying resin (bought from Halfords). It stank to high heaven and the shed was freezing, so I paused until warmer weather.

By June I had sculpted a beautiful thick mess of cardboard, resin, fibreglass, filler, cross bracing, more filler, primer, more filler and more primer: with lots of sanding and yet more filler & primer. It was so thick and heavy that it was unwearable, not to mention having a chunk of metal inside it to keep it's shape: so I made a mould and cast a copy.


.jpg")


I then reinforced the cast copy with fibreglass and resin.
At about this time I noticed all the pictures of lineage helmet casts which had started appearing on this forum.
By September I was finally happy with the shape, so I started painting with a mixture of airbrushed and topical paint.


I make it sound so easy, don't I? It wasn't! I've never made anything this big or complex before. I've never moulded or cast something, or done a paint job this insane, or even picked up an airbrush. It took me ten months from start to finish and honestly, it's only NEARLY right. But it's all mine and damn, I am proud of this. Having it on the shelf as we watched the first episode of The Mandalorian was great.
Some thanks:
I bought a metal upper right ear and ear stalk from Dan Saunders (bucketheadprops on this forum), and rangefinder parts from Chris Stallard (CStallardDes). Thank you both: you helped speed my build along, and as you can see the parts look great.
I would never even have started this project without the guides, worked examples, hints and tips on this forum: and I could never have made it look as good as it does without all the reference photos and the wealth of information here on The Dented Helmet. Thank you all!
Finally:
Like I said, I know that it's only nearly right. I can imagine myself making another one (I've already been asked by a family member) and I'd like to improve my next attempt. I would therefore welcome feedback from the experts on this forum, but please be gentle if you must point out glaring errors.
Thanks once again!
-- David F.
I started back in January with a pile of cardboard and a set of Rafal Fett's plans. I built the cardboard helmet, and started applying resin (bought from Halfords). It stank to high heaven and the shed was freezing, so I paused until warmer weather.
By June I had sculpted a beautiful thick mess of cardboard, resin, fibreglass, filler, cross bracing, more filler, primer, more filler and more primer: with lots of sanding and yet more filler & primer. It was so thick and heavy that it was unwearable, not to mention having a chunk of metal inside it to keep it's shape: so I made a mould and cast a copy.
I then reinforced the cast copy with fibreglass and resin.
At about this time I noticed all the pictures of lineage helmet casts which had started appearing on this forum.
- High quality pictures.
- Showing EVERY detail of the raw cast.
- With no paint in the way.
- In neutral lighting.
By September I was finally happy with the shape, so I started painting with a mixture of airbrushed and topical paint.
I make it sound so easy, don't I? It wasn't! I've never made anything this big or complex before. I've never moulded or cast something, or done a paint job this insane, or even picked up an airbrush. It took me ten months from start to finish and honestly, it's only NEARLY right. But it's all mine and damn, I am proud of this. Having it on the shelf as we watched the first episode of The Mandalorian was great.
Some thanks:
I bought a metal upper right ear and ear stalk from Dan Saunders (bucketheadprops on this forum), and rangefinder parts from Chris Stallard (CStallardDes). Thank you both: you helped speed my build along, and as you can see the parts look great.
I would never even have started this project without the guides, worked examples, hints and tips on this forum: and I could never have made it look as good as it does without all the reference photos and the wealth of information here on The Dented Helmet. Thank you all!
Finally:
Like I said, I know that it's only nearly right. I can imagine myself making another one (I've already been asked by a family member) and I'd like to improve my next attempt. I would therefore welcome feedback from the experts on this forum, but please be gentle if you must point out glaring errors.
Thanks once again!
-- David F.
Attachments
Last edited:
")
")


 ! Thank you once again for taking the time to comment.