My DIY budget Han build

KrakFox

New Hunter
Hi folks, on a budget and not got the set up, space, budget or tools for a top-quality full box build. I'm just doing the front for now.

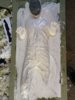
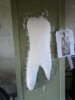
Got the face from eBay for £30 and really happy with it - very very good likeness and perfect scale.

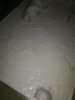
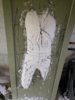
9mm MDF backboard and sides all cut from one board and only cost £20, cutting was free (nice people)
Couple of 2.5m trusses for back support were £11 the pair.

About £50 spent so far on clamps, glues, saws etc (things most people may already have)

Scaled up and measured a full size tiled print of the front section - which fitted perfectly after building the panel (thank god! my inch to mm conversions were spot on!) Used the usual plan diagram that has been on these forums for ages as my base for the size of the parts and the printout.

IMG_20190812_145543_resized_20190813_010558656.jpg
IMG_20190812_135923_resized_20190813_010559029.jpg
IMG_20190812_190140_resized_20190813_010600512.jpg
IMG_20190812_190721_resized_20190813_010559755.jpg


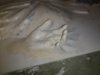
Edges were glued with 'No More Nails' (not sure of the US equivalent) and there's a trussed frame behind in attached with NMNs and nails to give it strength.

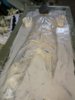
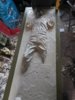
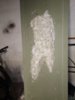
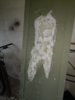
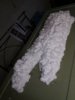
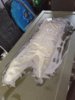
So next will be to outline the form of Han, and build up a mass of expanding foam. Next, I'll carve the general shape into this, and then either carve the creases directly (depending on how workable I'm finding it) or approximate the form, then use something like paper mache on top to form the accurate shape of the creases and features.

The body of Han is recessed 9mm, so when I think about it, I'll need have 9mm of foam at the base BEFORE I start to carve the features - otherwise when I fill the recess with wood glue, it would sink some of the body edges thus losing correct outline.

Would anyone recommend what I cover the foam/paper mâché shape in to give it decent strength - some kind of fibreglass resin or just PVA glue?

Once the body is done, I'll go down the methane of soaking old trousers and shirt in wood glue and laying it over.

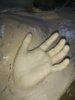
Hands will be alginate/plaster casts

Carbonite effect will be poured wood glue, probably, or some kind of filler. not sure yet.

Tips for what to use for the blended parts like behind the fingers would be appreciated (where Han is 'stretching' the carbonate as his hands reach forward). Obviously I read a lot about Bondo, I understand any kind of UK body-filler should be ok - as in it's accurate to work with and strong afterwards, plus easy to sand and paint.

Painting, will get to that when (if) I get to that stage!

Any tips, comments would be appreciated - or just encouragement - I think the tricky parts are yet to come!

Cheers
 
It sounds like you have a pretty solid plan moving forward. I'm just following this thread hoping to learn some more low budget ways to build one.
 
Cheers gk. Will try and keep regular updates.
IMG_20190814_072301.jpg


As you can see I've applied the expanding foam. Looks a mess at the moment but actually really happy with it - it will be formed into a very decent base for the entire torso and was quick and easy to apply (even though I lost the nozzle to the can and had to use pliers to activate the spray. I would not recommend doin the same!) But all's well that ends well.

The key part now is doing a decent and accurate carve - even if I can't get great definition out of the foam (but from research in ex foam props, it seems I should be able to). Paper mache will help in the trickier areas or to repair gaps/mistakes.

Then I'm planing on covering it in wood filler now rather than wood glue. Same with the carbonite effect - thinking the wood filler route will allow me to get accurate to the film texture.

Carving starts tonight...
 
So the beige foam is uncarveable - completely uneven and full if huge air pockets. Probably due to poor application or poor product. I bought a better brand to plug the main holes and, after coming back to it this morning, it's a far better and consistant foam.

So, going to remove as much of the beige and pretty much start again withe the white foam that is very very carveable.

Bit of a hiccup but better sort it properly now than literally paper over it...
 

Attachments

  • IMG_20190814_205601.jpg
    IMG_20190814_205601.jpg
    5.6 MB · Views: 422
  • IMG_20190815_072109.jpg
    IMG_20190815_072109.jpg
    6.6 MB · Views: 405
So removed all the old foam. Sprayed new. Much much better density. Carved outlines and depth. To get good depth contours, I screen grabbed frames from ESB where he's being loaded into Slave 1 and composited them in Photoshop. Ended up with a perfect side on view of the prop's contours. Carved folds and features very roughly. Covered in masking tape and now soaked with thinned down PVA.

Starting to take form

May paper mache or may put fabric on. But to be honest, it looks 90% there already in person. Will decide when the glue is dry.
 

Attachments

  • IMG_20190816_192249.jpg
    IMG_20190816_192249.jpg
    8.1 MB · Views: 455
  • IMG_20190817_181105.jpg
    IMG_20190817_181105.jpg
    8 MB · Views: 446
  • IMG_20190818_154835.jpg
    IMG_20190818_154835.jpg
    10.9 MB · Views: 473
  • IMG_20190818_133652.jpg
    IMG_20190818_133652.jpg
    10.1 MB · Views: 409
This is the most interesting way I've ever seen someone create a HIC sculpt. Looking forward to seeing how this develops!
 
Thanks Buda - definitely a noob at this and actually spent more money than if I'd bought a ready done casting. BUT i'm having a hell of a lot of fun! and It's my creation rather than a bought piece too.

After covering it in masking tape and PVA (a LOT of PVA) it was still soft and spongy.

So cut an old duvet cover to a rough shape, dipped it in a plaster/PVA glue mix and moulded it to the foam-carved creases.

As is became a little tacky i could mould it and adjust it pretty nicely and smother the mix all over it.

Had to wait a couple days for it to cure but some parts were still a little mushy - not sure why but the moisture seemed trapped under the fabric in some areas. Added another layer of PVA to try and add strength. But even when dry - as PVA is a bit flexible - there was still a lot of give in areas, but i left it alone as i moved on to the hands.

Made some OK moulds of my hands from alginate, had a few too many air bubbles but hey first timer and all that, used plaster of paris to cast but even after curing for 72 hours it was so so brittle so i smashed em in rage and started again. This time i used polyurethane resin and WOW what a difference - love that stuff! SO easy to use and rock solid results! Never used alginate or plaster or poly before (total noob) but learnt a few things and had fun so all's well that ends well as they say.

And as a bonus, as i had about a pint of resin left after casting the hands so i poured it over the entire body - now its FINALLY solid as hell! Wish i'd used this stuff first instead of PVA - 3 min cure time instead of 3 days for PVA. Attached hands with No More Nails.

Things i need to do are:
Add the carbonite 'surface tension' around the fingers with wood filler
Sort out the Adam's apple part of the neck which is sitting too proud in relation to the exposed neck/chest
Carve/shape neck chest area out of wood filler
Feet (probably alignate and poly cast of my own boots)
Need more wrist area adding (didn't cast my wrists at the proper angle due to not enough space in the containers i had)
Sanding/repairing/filling/perfecting details as much as i have patience for :)
Carbonite panel effect: Going to buy a few litres of polyurethane and pour it into the panel - making a very strong and even finish. Then i can cover it with a layer of wood filler to get the carbonite effect. I was going to use PVA layers but it takes so long for each layer to dry - the 3mins set time of the poly is a godsend (sounds scary but it works for me)
Then final sanding (especially the frame) and priming and painting.

Taking longer than expected, and had a fair few bumps along the way, but it's taking really good shape and I'm very very happy with where it's at. OK it's not perfectly accurate at all - BUT its MY work and it's looking pretty respectable i reckon (I'm actually very chuffed with the decent accuracy because i had NO idea whether i possessed any skills to even get close).

Hopefully now things will move along nicely and can't wait to get it primed and painted!!

check ya later!
 

Attachments

  • IMG_20190826_120709_resized_20190826_122012392.jpg
    IMG_20190826_120709_resized_20190826_122012392.jpg
    5.6 MB · Views: 504
  • IMG_20190826_120748_resized_20190826_122010343.jpg
    IMG_20190826_120748_resized_20190826_122010343.jpg
    5.2 MB · Views: 491
  • IMG_20190826_120758_resized_20190826_122008054.jpg
    IMG_20190826_120758_resized_20190826_122008054.jpg
    5.1 MB · Views: 502
I'm really impressed with your torso sculpt!
Looks great! It's rather impressive.

Hey thanks guys! Really appreciate the encouragment! It's not perfect and some crease are a little off or missing but I can maybe use filler at the end to fine tune.

Hands didn't stick with the No More Nails - besides I think his right hand was a little off anyway.

Lots of polyurethane is arriving today so plan to stick hands with correct glue, then fill as much of the panel with poly to get a nice strong and even layer. Then onto final sculpting and detailing. Sanding. painting. Then done. Maybe another weekends worth of work. Fingers crossed!
 
So bought 2kg of polyurethane resin. Poured 3/4 over everything, put the hands in place, making sure to hold them in place a few mins and build up around the contact points as the resin got tackier.

Secured the hands perfectly. Filled 80% of the recess. So used the last bit to fill up some more.

I now have a very very solid plastic Han upon which I can sort the things that need sorting (see above post).

Link to a Facebook vid below (yes, I did punch Han in the crotch there)

IMG_20190828_202747.jpg
 
Ok so late update.

Things gone a bit weird.

Used a layer of PVA glue to get some really nice Carbonite and to seal the fillered parts of the neck and hands/wrist. All went well (took sooooo long to dry 3-4 days) and was ready to sand paint. I was really happy with the carbonite effect. But I then wanted to add some more definition to some of the creases.

Long story short, when the fine tuning fillered parts got sanded, the PVA lifted off. And I accidentally placed my palm on a not very dry part. This left a gaping mess of a splodge.

Sooo I went out a n bought more PVA glue, a different brand this time. I then coated the whole model with it. And for some reason it's set all cracked and curdled. Some parts STILL aren't firm and have the consistancy of grilled haloumi. But I'm sure these will cure soon enough. I hope.

So as you may see from a couple of the pics, these some cottage cheese like texture on two pics. It's actually tempting to prime and see it in grey - just cuz it's so interesting and unique

Or I could cover the lot in more poly resin and have all the cracks filled in, and try and 'sculpt' a few of the key features of the carbonite in the 5mins it takes to set.

You live and you learn I guess...
 

Attachments

  • IMG_20190911_192121.jpg
    IMG_20190911_192121.jpg
    6.6 MB · Views: 413
  • IMG_20190911_192056.jpg
    IMG_20190911_192056.jpg
    4.9 MB · Views: 359
  • IMG_20190902_194224.jpg
    IMG_20190902_194224.jpg
    5.3 MB · Views: 351
It's nearly done. Lots of very rough bits which I aim to sort - mainly due to the polyurethane being over cured at one point when I pour it over. Also some bubbles from it too. Annoying but fixable. Also need to make the frame smooth. but for now I couldn't resist painting at this stage to take a look
IMG_20190920_201351.jpg
IMG_20190920_202250.jpg
IMG_20190921_103944.jpg
IMG_20190922_155953.jpg
 
This thread is more than 3 years old.

Your message may be considered spam for the following reasons:

  1. This thread hasn't been active in some time. A new post in this thread might not contribute constructively to this discussion after so long.
If you wish to reply despite these issues, check the box below before replying.
Be aware that malicious compliance may result in more severe penalties.
Back
Top