You might as well be speaking Greek as I don’t know what either of those mean. I’m just not versed in the nuances of the history of these different prop versions. This is just a “I’m doing what I like build”.
You might as well be speaking Greek as I don’t know what either of those mean. I’m just not versed in the nuances of the history of these different prop versions. This is just a “I’m doing what I like build”.
So I couldn’t leave well enough alone, after letting the cabinet sit overnight I just wasn’t 100% on the color. It was close, but I wanted to try something else. So I went with the Rustoleum Gloss Dark Gray. I’ve used something similar on previous builds, and it does the job.
After a several month hiatus due to an extensive home remodel, work, and life in general, I'm glad to be working on this again. Started work on the side panels with a coat of aluminum.......
Then I used some thin sintra / styrene sheets, cut out squares, sprayed them metallic silver, and used those as inlay pieces. It gives it a nice contrast.
I'm printing some of the greeblies myself, but for some I'm sourcing them from existing materials. For the ring greeblies I am using some 3/4" CPVC pipe. I used my mini saw and cut out several pieces, then hit them with the same metallic silver.
Here's how the panels look with the inlay pieces in and the first wave of greeblies. I'm not going for screen accuracy, so these won't be exact. I also opted not to inlay the larger square on the left side of each panel.
Little more progress today.....printed, painted, and attached a few more greeblies. Next I'll be working on the LEDs, sound module, and adding some highlights to the front carbonite panel.
Heading into the home stretch, worked on the panels yesterday and today. I had some left over white acrylic and cut several pieces for the translucent inlay details.
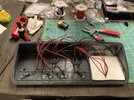
It's not pretty on the inside, but it works. I'm going with some budget electronics on this, so not at all screen accurate. I'm also adding some other LEDs, a bit of my own personal preferences. For the main panel I went with a breathing green LED.
I also found some audio online and mixed a sound file for this module I have. I re-wired this to a push button on the panel and mounted it underneath, adds a little extra to the project.
Got all the panels mounted and ran all the wiring for the LEDs, pretty happy with how it's coming along. I still have some greeblies to add, some alien symbols to put on, still need to add some detail with black acrylic paint to the front panel, and a few other minor touches.
I think I'm going to call this done for now, added some more greeblies and symbols to the side panels. I really love how this came out. I've never seen anyone do anything to simulate something like this with the internal mechanisms, but I think it looks great. Now just have to move him inside and mount to the wall!
Hi there azheat01 love the build! I'm currently working on a build and was wondering how you got the green LED behind the translucent window on the hero panel to stay in the right place? I think it seems to work best if it's not quite touching the window itself. Appreciate any tips!
Hi there azheat01 love the build! I'm currently working on a build and was wondering how you got the green LED behind the translucent window on the hero panel to stay in the right place? I think it seems to work best if it's not quite touching the window itself. Appreciate any tips!
Hey there. I just used some foam board and made a strip, put a hole in it for the LED, and then mounted it back off the panel by building the ends up with more foam strip pieces. I should have taken a photo, but never did.
Hey there. I just used some foam board and made a strip, put a hole in it for the LED, and then mounted it back off the panel by building the ends up with more foam strip pieces. I should have taken a photo, but never did.