azheat
Active Hunter
I wanted to try my hand at one final HIC, making this version my ideal version and better than the previous two I attempted. I'm going to take a creative liberty with this one, something I wanted to try for some time, and will share more on that later.
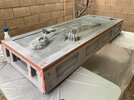
I started off with a zenix box, probably the best prop investment you can make. I scratch built my previous two boxes, so this was a joy to work with.
I did this build a little differently, I sandwiched a piece of thin plywood between some 5/8 MDF trim I bought and the trim pieces that came with the box. This will make mounting the Han pieces easier, gave me a little extra depth when I pour the glue, I won't have to mess with finishing the seam in the middle of the trim pieces, and they have an edge that is already slightly rounded.


I wanted to do something with the bottom and top holes, and when I was walking around the store I saw these ice cube bins and thought I would give them a try. With a little trimming, they're a pretty great fit for the center hole. Not bad for $1.98.

Before trimming..........

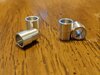
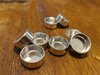
Then I decided to design some boxes for the left and right holes and 3D printed a set.


They required a tiny bit of sanding on one corner but fit like a glove. I just need to finish the inside with a little sanding. Once that's done I can install these and add a little filler to the gaps. I also trimmed the ice cube tray and test fit it into place.

Moving right along..........
I started off with a zenix box, probably the best prop investment you can make. I scratch built my previous two boxes, so this was a joy to work with.
I did this build a little differently, I sandwiched a piece of thin plywood between some 5/8 MDF trim I bought and the trim pieces that came with the box. This will make mounting the Han pieces easier, gave me a little extra depth when I pour the glue, I won't have to mess with finishing the seam in the middle of the trim pieces, and they have an edge that is already slightly rounded.
I wanted to do something with the bottom and top holes, and when I was walking around the store I saw these ice cube bins and thought I would give them a try. With a little trimming, they're a pretty great fit for the center hole. Not bad for $1.98.
Before trimming..........
Then I decided to design some boxes for the left and right holes and 3D printed a set.
They required a tiny bit of sanding on one corner but fit like a glove. I just need to finish the inside with a little sanding. Once that's done I can install these and add a little filler to the gaps. I also trimmed the ice cube tray and test fit it into place.
Moving right along..........


") ).........
).........")