jakotadones
New Hunter
I would like to express my heartfelt gratitude to everyone who contributed to my earlier thread about my newbie journey with the ESB Boba Fett costume. Your collective advice has been invaluable, and after careful consideration, I've decided to take the initial steps toward assembling my costume.
Having absorbed the wisdom shared by everyone, I realized that I lack the confidence to tackle certain highly visible elements of the costume right away. Thus, I've chosen to begin by honing my skills on a component that can remain at home—the EE3. This decision allows me to delve into converting 3D prints into realistic materials while practicing techniques such as painting, sanding, and refining, which I believe will pave the way for more complex tasks down the line.
I'm excited to share my progress on this ESB build thread and would greatly appreciate your thoughts and feedback. Constructive criticism is welcome, so please feel free to point out both the positives and the areas where improvement is needed. Furthermore, I hope this endeavor not only leads to a new costume but also to new friendships within this amazing community.
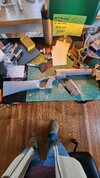
Without further adu, please see my progress this far. I opted for the base of the gun on recommendations other Fett's on the forums, choosing a cost-effective option from Traywick Designs—a one-to-one replica Wembley Mark 1 flare gun. I must say, the quality of the print is truly impressive. It feels like I could break stones with the damn thing. Assembly and transformation have been relatively smooth, with minimal challenges apart from some edge rounding.

To achieve a more authentic feel, I chose not to merely smooth out the 3D print but instead added texture around the metal parts to replicate the imperfections of a century-old rifle. Employing a rub and buff method using spot putty resulted in intricate detailing, giving the gun a weathered appearance. After achieving the desired effect, I applied primer filler and wet-sanded it for a worn yet refined finish.


I am currently preparing for the paint job, contemplating a sequence involving various layers and finishes. However, I'd appreciate your insights and opinions on the proposed painting strategy. My plan entails using multiple layers, including a base coat of a bronze color. Then cast iron, followed by Vallejo's pigments to impart rust textures before applying matte clear coats. And then a matte black wash.
Your thoughts on the airbrushing process and suggestions based on your experiences with similar projects would be immensely helpful.
QUESTION FOR THE FORUM:
I have not yet acquired the greeblies and the MPP for the barrel extensions. I'm eager to learn about your preferred sources for these components—preferably authentic yet cost-effective options. I am open to 3d prints as well.
Thank you for taking the time to read my initial post. Please share your thoughts below.
Then for the love Boba, go spend some time with your families you nerds. It's Christmas afterall haha.
Having absorbed the wisdom shared by everyone, I realized that I lack the confidence to tackle certain highly visible elements of the costume right away. Thus, I've chosen to begin by honing my skills on a component that can remain at home—the EE3. This decision allows me to delve into converting 3D prints into realistic materials while practicing techniques such as painting, sanding, and refining, which I believe will pave the way for more complex tasks down the line.
I'm excited to share my progress on this ESB build thread and would greatly appreciate your thoughts and feedback. Constructive criticism is welcome, so please feel free to point out both the positives and the areas where improvement is needed. Furthermore, I hope this endeavor not only leads to a new costume but also to new friendships within this amazing community.
Without further adu, please see my progress this far. I opted for the base of the gun on recommendations other Fett's on the forums, choosing a cost-effective option from Traywick Designs—a one-to-one replica Wembley Mark 1 flare gun. I must say, the quality of the print is truly impressive. It feels like I could break stones with the damn thing. Assembly and transformation have been relatively smooth, with minimal challenges apart from some edge rounding.
To achieve a more authentic feel, I chose not to merely smooth out the 3D print but instead added texture around the metal parts to replicate the imperfections of a century-old rifle. Employing a rub and buff method using spot putty resulted in intricate detailing, giving the gun a weathered appearance. After achieving the desired effect, I applied primer filler and wet-sanded it for a worn yet refined finish.
I am currently preparing for the paint job, contemplating a sequence involving various layers and finishes. However, I'd appreciate your insights and opinions on the proposed painting strategy. My plan entails using multiple layers, including a base coat of a bronze color. Then cast iron, followed by Vallejo's pigments to impart rust textures before applying matte clear coats. And then a matte black wash.
Your thoughts on the airbrushing process and suggestions based on your experiences with similar projects would be immensely helpful.
QUESTION FOR THE FORUM:
I have not yet acquired the greeblies and the MPP for the barrel extensions. I'm eager to learn about your preferred sources for these components—preferably authentic yet cost-effective options. I am open to 3d prints as well.
Thank you for taking the time to read my initial post. Please share your thoughts below.
Then for the love Boba, go spend some time with your families you nerds. It's Christmas afterall haha.

")