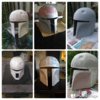
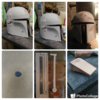
my first bucket

ive completed all the ear pieces now, and experimented with how to protect the balsa wood. my best solution was found when i went to the local hobby store and talked to the guys there (since they work with balsa aircraft all the time). I picked up some 2 part finishing epoxy that has a 20 cure time. the stuff has no smell, and is a dream to work with. once fully cured, it sands well and is drillable and tappable. nice hard shell, after 2 thin coats, and i cannont mark the balsa with a finger nail. i'll post some pics soon
 
so I finally finished my build....along with paint and I can say that I truly learned what patience really is. Especially with painting the helmet! Learned a lot during the build and through experimentation, learned some tricks!
 
boba 2.jpgUsing Rafal Fett's v1 templates, I printed on cardstock and put it together using a hot glue gun. Went and bought some Resin and gave it a coat to firm up the cardstock enough to hold up to the fibreglass. Only had to do a second coat of resin on pieces that still felt a tad flimsy. Once dry, about a day later, I started on the fibreglassing. Didn't get too messy...took a couple of days to get complete coverage. (by a couple days...I mean the small window when I get home from work until dinnertime).
I feel I rushed a few spots as the fibreglass dried I found some areas that were super sharp and would rip my face apart , so I had to grind them down with my dremel.
Bought some bondo and started applying...sanding....applying...sanding. ended up getting tennis elbow from all the manual sanding.

TIP** When using resin or bondo outside, and it's warm out....be prepared for it to set up super fast! I learned the hard way, as it was 35 degrees C outside, my bondo set up so fast, I could hardly get it on my bucket before it got all firmed up.
 
Once I was happy with the dome, and all the sanding was done...it was time to work on the peripherals. I didn't have a borden connector, and because I wanted this to be a completely scratch build...I decided to build my own using a 2 part high strength epoxy. I mixed it up and poured it into a small plastic cap that I measured to be the same dimension as the borden connector. Once it set up, I pulled it out, sanded it down and drilled the 3 holes to dimension. Drilled into the helmet cheek, and bonded it in place. It was tempting to just order a 3D printed one....but it had to be scratch!

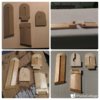
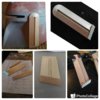
started the build on the range stalk and persplex block. Went to the local hobby store where they sell all kinds of wood for R/C aircraft. Picked up some 3/16" spruce plywood and built the persplex block to Rafal Fett's V2 template dimensions. The wood is great to work with, and being a plywood, it has a high strength to weight ratio.

boba 3.jpg
 
I built the ears from balsa wood from the same hobby store. Again using Rafal Fett's v2 template dimensions, I was able to find some airfoil shapes that fit the dimensions. I put the ears together and had to sand some areas into dimension....the beauty of balsa wood is that it sands really easy. I was worried that the earpieces would damage easy, so I gave them a few coats of a 2 part finishing epoxy which dried hard as rock. After reading some tips on the forums here, I added some rare earth magnets to the rangefinder ear and stalk to make replacement easier in case of breakage.

ears were epoxied into place and the gaps between ear and helmet were filled in with epoxy. Everything given a light sanding and primed with a light grey auto high fill primer. 2 coats of the high fill primer helped to fill in some minor scratches in the bondo.

boba 4.jpgboba 5.jpg
 
So hard to decide when to paint. Admittedly nervous about painting after reading posts about how accurate the paint jobs are, but I finally remembered who I'm doing this for...me! Of course I did the best I could, using tips and templates from many members.
Found a place near me that carries the humbrol paints, so I scooped up a bunch. Also experimented with Micro Mask (as they didn't have Maskrol). I found the Micro Mask very hard to work with. Once it dried on the helmet, it was murder trying to peel it off once a layer of paint was airbrushed on.
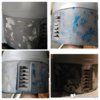
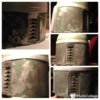
You can see in the photo below, when experimenting with the masking on the back panels. I used Micro Mask on one side (blue) and regular liquid latex from my Halloween makeup kit on the other side. When the paint dried, the liquid latex rubbed off so easy....it was a dream!!! I highly recommend it!! Even with the paint left to dry over 2 days, the liquid latex rubbed off with little to no pressure. I used a small paint brush and a coarse sponge to apply the liquid latex which gave a very good effect.
boba 6.jpgboba 7.jpg
 
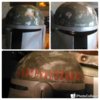
when I was happy with the back panels, moved onto the dome. Probably the toughest part if you want to maintain accuracy. I really like how the kill stripes turned out with the masking. Kill stripes were very time consuming but worth it in the end.
boba 8.jpg
 
Finally finished the cheeks, mandibles and ears. Again, tricky when trying to make it somewhat accurate. I found it hard knowing when to say enough is enough....a tweak here...a tweak there.
Had ordered a visor from amazon, green welder's shield tint #5. Cost me $7....win! A little tricky making a template to transfer to the shield as the inside of my helmet was a bit of a mess....but I was able to muscle through it. Trimmed up the visor, and mounted it with Chicago screws and some rubber washers to absorb any stresses that may happen on the helmet and prevent cracking.
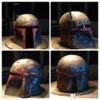
Below is the completed build. I have a few tweaks and minor things to do, but it's mostly inside the helmet. Also have to add the interior of the range finder.
boba 9.jpg
 
Definitely impressed! Scratch building can be frustrating and time consuming, but there's nothing like it when you finish the project and it's 100% yours!
 
This thread is more than 7 years old.

Your message may be considered spam for the following reasons:

  1. This thread hasn't been active in some time. A new post in this thread might not contribute constructively to this discussion after so long.
If you wish to reply despite these issues, check the box below before replying.
Be aware that malicious compliance may result in more severe penalties.
Back
Top