While we wait for the main helmet to be completed and because people have made mention that they want to know about the techniques I use, I thought that I would show you the simplest method for molding with silicone. Now, this has been done with extensive research into the process, so I know that that I won't be steering you wrong.
I call this method the "Drip" method and here it is step by step:
Type of objects you should mold with this method
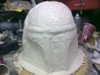
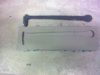
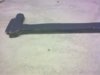
You should only use this method if your item has a large flat area you can use as your base, so I will be using this method for the RF stalk.
1. You need a smooth base.
A flat bit of glass or large tile is best, but you can use plastics, anything that won't allow the silicone to get under it and get caught in crevaces. Trust me, it's pretty persistent stuff and if there is a hole, it will find its way in there.
2. Making the container.
Silicone needs an area with which to work in, if that area is thick enough then you can mold straight into a silicone mold without the need of a hard jacket. So you have to be generous with it. The problem is that with a variety of shape your containing box needs to vary too. depending on the size of the object you can use cups and boxes, but I found an ingenious method to make custom containing boxes.... LEGO!
I can't remember the name of the guy who put this method out there, but serious props to him and if he's here thanks mate!
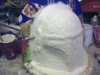
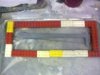
Yes, Lego is probably the most diverse box making material you can use as in the picture above, you can size the box to the model. You can see that I have given it a lot of room at the sides and top, this is the level of thickness you want to be looking for.
Of course a mold is 3d, so I have put another layer of bricks to sturdy the model and have some depth to the mold. Ideally, you'll be wanting to fill this to the brim with silicone.
4. Seal off the model
This is an important step, I can't quite emphasise enough how pervasive Silicone is in its liquid form, if there is a micro fracture in your model, it will find it, that isn't too much of a problem as you can trim the model afterwards, but to ensure that you don't have to, you will need to seal off the model.
I use re-usable modelling putty or paste, it's sometimes known as plasticine.
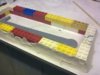
The important part with this is to keep the lines of the model, but get the plasticine in underneath the model where the cracks are, if the putty is in there, then the silicone won't be and that will prevent skinning (Where a fine layer of silicone covers the part you are supposed to pour into).
You can be pretty rough when applying the silicone, I tend to use a coffee stirrer to push the putty under the model, use a craft knife to cut off the excess to the line and fill in and use the stirrer again to smooth off.
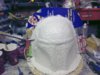
Till you get the above picture.
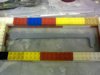
You will also need to seal off the box because, believe it or not, the silicone will seep under the lego and through the gaps in the bricks. No, I am not kidding! If you look at the white brick to the right, it still has the remains of the silicone after it managed to sneak through the gaps.
You can be rough with this on the outside as it won't affect the model on the inside, be sure to cover all the gaps between the bricks.
5. Preparing the drip method
So what is the drip method all about?
When you mix up silicone you create air bubbles between the mixture, which, if caught up against the model will produce flaws in your final model, imagine if an airbubble settled down next to the model, it would leave a hole next to the object and anything cast would have a bubble attached.
The pro method is to buy a silicone vaccuum tank, but they cost a fortune, so the cheaper method is to use gravity to remove the air trapped in the silicone.
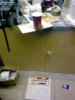
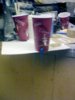
First, cut a hole into the cup with a screwdriver or some sharp implement. Put some tape over the hole, but make sure you are able to take the tape off.
Put the model below and get the cup in a position so the hole will be able to drip silicone into the hole.
6. The drip
This method uses gravity to stretch out the silicone as it slowly drips onto the model, because the stream is so fine, the air bubbles trapped in it pop and you get pure silicone dripping into the model case.
You will need to mix up some silicone in one cup and then pour it into the second cup with the hole. If you want to try be conservative with your silicone (as it costs a fortune!!!) then you can use rice to fill the model to the brim, then empty the rice into a cup and mark off the height, this is the rough amount you'll need. Though I usually have another project that I can use the silicone for.
Also do not use thickners or quick cure agents with the gel or it will clog up and harden long before you have used it all. It needs to be pure drip. I've never used thinning agents, so I couldn't tell you if that would speed up the time from cup to mold.
Take off the tape and watch in wonder as the silicone slowly pours out and becomes a fine stream of liquid. Make sure you manouever the model so that the drips do not touch the model as this could trap air between the two, you want it to hit the space around it and allow the silicone to slew over the model.
You will also have some useable bi product in the other cup, I tend to hang over the model with the mixer cup upside down, you usually get quite a bit dripping out into the model.
You may get little bits on the model while you are adjusting but they should be ok.
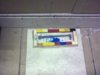
Note also how I have positioned the model on the tile, so it's closer to the edge, this will prevent you having to invent ways of getting the drip cup as far away from the edge as possible, if it's closer to the edge then you don't have to put the cup out so far and thus prevent family members and/or pets knocking it over.
Oh and make sure you do it in a room without a breeze, the drip is affected by the slightest breath let alone a breeze!
")
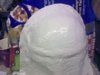
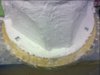
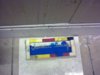
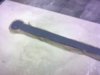
Finally here you see the silicone beginning to slew around the model, you want to fill this to the brim. In my case I didn't have enough and had to abort the process.
Once it is done LEAVE IT ALONE on the floor for about 3-4 hours, then move it to higher ground.
That's about it, I will try again with the new silicone when I have it and will show you the end result.
Hope that's help you in your modding needs


")
 ) as I am using the flat drip method shown above and I hope to work it back out of the silicone without breaking it!