My Contribution to TDH

Right, we are nearly done with the model, the back plates are nearly done (when I say nearly I would say 98%, there are a couple of dinks I need to sort out).

Most of the work, as you will see is needed straightening up the key slots to make them look neater and symmetrical.

I spent about 5 hours today getting it this far, but I must say I am proud of the fact that the left rear quadrant is so shiny, you can see reflections in it :D hehe

anyhoo, here it is... so close I can smell it!

rear.jpg
 

Attachments

  • rear.jpg
    rear.jpg
    20.7 KB · Views: 153
Still sorting out the fine detail, but I have managed to buy myself a Lazy Susan, which is short for a turntable, I've also bought some modelling clay to help me seal off the model for casting.

I'm going to post pictures of the fine detail soon so hopefully you can all help me see if I have made any errors.
 
My dad's had a little go at me about my perfectionist streak, he pointed out to me that if I am selling it as not movie accurate I shouldn't be spending my time trying to make it movie accurate.

He's got a point. Once I am happy with the key slots (nearly done now) and a couple of dinks that need filling I am going to cast.

Finally...
 
Hey EVERYONE who is watching this, I got SAZ's first "DEMO" bucket, and the quality is EXCEPTIONAL!!!, and that was a "dinked up" bucket, so I KNOW when SAZ puts these up for sale you WILL WANT ONE TRUST ME!!
 
Just a quickie for anyone who's experienced with Silicone molding, if I put mold release onto the model prior to putting the gunk on, will it not stick properly to the model and cause the detail to be lost?
 
Ok picture time and be honest.

Is this Keyslot ok? If not, where does it need improvement?

Keyslot.jpg


Ta
 

Attachments

  • Keyslot.jpg
    Keyslot.jpg
    12.8 KB · Views: 128
I took a look at the picture myself and spotted a few things that needed changing/straightening.

Guess what?

Stick a fork in me, I am done!

Yes! After a long hard slog of repairing the original model, I will be preparing the thing for making the mold.

Mold making will start on Monday and I will progress it for you, so peeps who want to experiment with silicone can do it themselves.

A part of me knows that it is all done, another part of me wants to continue until it's "perfect" but as it was pointed out to me, I'm not supplying movie accuracy!

I will probably spray mold release into the keyslots and the left ear piece to prevent damage like what was seen last time, but I think the model is pretty much sorted for ripping the mold off again.

I'm quite excited as I can begin to look into the other artistic pieces I had in my mind that I will be able to create from this master mold.

With all that's happened whilst I have been repairing and literally reconstructing the back plates from scratch, I think it may have been easier to start from scratch again, but perseverance is a Godly trait, or so they say...

Anyhoo, I shall be back with you on Monday with the first shots of the molding.
 
I've been watching your progress through this, and I think you've done a great job! My friend is looking into doing a custom Mando, and I know who to refer him to once you get these things rolling!
 
Looking good mate!!! Glad to hear that you are gonna mold it!!! (ahem...FINALLY!!! perfectionist...:p jk vod. this is the best bucket I have ever seen that isnt movie accurate.)

Keep the pics coming!!! Id love to see the molding and casting process.

Great work AS ALWAYS vod!!!
:cheers
A'den
 
Thanks mate.

Anyhoo, just so you can all see how done I am :)

Here are all the pieces, spent most of this morning finishing off the extra parts. They are due a final coat of primer.

Pieces1.jpg


All the pieces, the rangefinder is in two halves so you can put in any electronics and keep it nice and light so it doesn't bend the stalk. I haven't put the screen on as there are different types, so it allows you to custom it to your own specs.

Pieces2.jpg


The RF is put together.

Side.jpg


rear-1.jpg


rside.jpg


Wholelot.jpg


The whole caboodle :)

Phew! Now, off to a barbeque I go!!!! :D
 

Attachments

  • Pieces1.jpg
    Pieces1.jpg
    16.8 KB · Views: 132
  • Pieces2.jpg
    Pieces2.jpg
    18.6 KB · Views: 142
  • Wholelot.jpg
    Wholelot.jpg
    32.5 KB · Views: 139
  • rside.jpg
    rside.jpg
    17.3 KB · Views: 143
  • rear-1.jpg
    rear-1.jpg
    12.6 KB · Views: 135
  • Side.jpg
    Side.jpg
    16.7 KB · Views: 139
I really like it, I hope you take LOTS of pics if the moulding process, I want to see how to do it so I can cast my customs I have in mind.

XLNT WORK VOD!!
 
Ok, so I've started to seal off the bottom of the model ready for coating it in silicone goop.

First of all I took a plastic sandwich tray cover (the big display ones) and cut off the sides, placed it on the lazy susan (which is a turntable).

This will allow me to rotate the model without touching it.

Lazysusan.jpg


Then I roughly put the modelling putty (Plasticine) on the bottom edge.

Putty1.jpg


I used my finger to smooth it in and then I cut an angle from a coffee stirrer and used that to smooth it out to the line. The important part here is not to allow any gaps, get it as smooth as you can so it looks like it is part of the model, it will give you that extra bit for cutting down when you cast your models from the mold.

putty2.jpg


And that's it so far, the great thing is that once you let the modelling putty cool down it becomes a harder surface and becomes quite sturdy.

Without this process the silicone will seep under your model, which causes a few casting problems and usually means you have to cut it away afterwards. Plus it looks a lot neater too :)
 

Attachments

  • putty2.jpg
    putty2.jpg
    31.2 KB · Views: 152
  • Putty1.jpg
    Putty1.jpg
    24 KB · Views: 133
  • Lazysusan.jpg
    Lazysusan.jpg
    39.7 KB · Views: 138
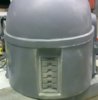
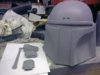
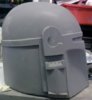
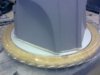
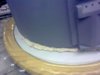
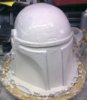
As you'll see in the next shots, the first coat of silicone RTV has been painted onto the model.

Goopfront.jpg


gooprear.jpg


The RTV I am using is condensation cure, which I believe means that it cures via evaporation as opposed to Additive cure, which I believe is a chemical reaction.

First things first though, some technical terms.

Cure: The process where the liquid silicone becomes a solid rubber.
Pot life: How long it takes before the silicone has cured too much to put on the model without gunking it up.

To make the RTV paste, you need to mix two ingredients, usually the main form and the catalyst, sometimes the catalyst is dyed a colour to help you mix the two together.

There is usually a ratio of how this is mixed, this is very important to get right as they add to the confusion by changing the way the mix should be handled.

There are two main ways.

1. By weight.
2. By volume.

1 needs to be measured on the scales, 2 needs to have a measuring cup, painters' mixing cups are great for this.

The ratio is usually around 20 parts silicone to 1 part catalyst but can go all the way up to a 1:1 ratio.

So you need to ensure that you measure out the silicone and use a calculator to find whatever weight or volume of the catalyst you need.

The silicone should give you an idea of when it should totally cure, but with the painting part, you need to have it still partially cured so the next layer will bond to the one underneath it.

Most layers should cure within 24 hours, so you can spread layers over a 2 day period.

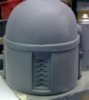
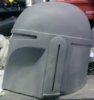
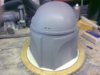
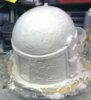
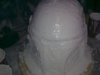
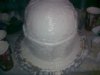
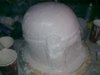
I will be following Stormtrooperguy's advice and go for 2 thin layers, then add the thickening agent for 2 layers and finally going over with 1 smooth layer.

2 things you should note about silicone, it will run, so, give it a once over so the area is covered, but also ensure that there is more silicone at the top of your model, after the 24 hours, it will be at the bottom of it unless you use a booster, but I've found that they are unpredictable. The second thing is keep a note of your potlife and aim to get an even spread quickly, the last thing you want is your silicone beginning to harden on you and it not getting into the right crevaces.

I'll be giving that silicone 5 hours and will go for the next coat.
 

Attachments

  • gooprear.jpg
    gooprear.jpg
    18.7 KB · Views: 132
  • Goopfront.jpg
    Goopfront.jpg
    26.5 KB · Views: 155
Right, first load of thickened goop has been added.

The best way I found is to add the thickner a part at a time until you are happy with the consistency.

I might have to do three layers of thickened goop to ensure that the dome part is covered with a thick enough area of rubber, as that was where it went wrong last time!

Hardgoop1.jpg


Hardgoop2.jpg


Hardgoop3.jpg
 

Attachments

  • Hardgoop2.jpg
    Hardgoop2.jpg
    25.9 KB · Views: 142
  • Hardgoop3.jpg
    Hardgoop3.jpg
    28.2 KB · Views: 141
  • Hardgoop1.jpg
    Hardgoop1.jpg
    36.8 KB · Views: 142
This thread is more than 14 years old.

Your message may be considered spam for the following reasons:

  1. This thread hasn't been active in some time. A new post in this thread might not contribute constructively to this discussion after so long.
If you wish to reply despite these issues, check the box below before replying.
Be aware that malicious compliance may result in more severe penalties.
Back
Top