Rook's Book of Boba Daimyo build.

Vambrace hoses done last night. Went faster than I thought it would. Silicone hoses with the mesh sheathing. The quick disconnect fittings I think came from Amazon. Couldn't find ones with big and little knurling. My set came with 3 connectors, so one is attached to a cut off bolt that will be glued into the gauntlet. The second is connected to the end of the quick release. I pushed the silicone hose on top of the fitting, then zip tied it in place. Wrapped it with electrical tape, then put the mesh cover over that. Then used heat shrink tubing over all of that. I probably should have used less electrical tape, but other than that I think it turned out decent still need to paint the part that goes into the vambrace a brass or copper color.

20240415_101910.jpg
 
Sorta made some headway last night. Sorta. Finally got my knee darts and trim installed. My armor had cover plates for that area, and the prints were kinda warped, so I used hot water to flatten them. It worked. Sorta. :)

Also got the majority of my greeblies installed on the vambraces. Managed to crack one of the hose nozzle housings on the right side (doh!), but got them all epoxied in place.

What wasted a freaking hour of my life was the panel and push buttons on the left vambrace. I could NOT get that plate to sit flush for nothing, so it took a while with a knife and Dremel to finally get it in place.

Still too much to do...

20240416_012050.jpg

20240416_012102.jpg

20240416_012107.jpg
 
Does anyone know what that push button on the back right side of the left arm rocket vambrace really is? I think In the future if I redo these, I'd like to have a real button in there.
 
Three days worth of work, maybe a little more. Next time... Spend the money and buy one from the fine Cosmaker in Italy! :)

20240430_182558.jpg

20240430_182412.jpg
 
Last edited:
Finished the vambraces over a week ago and got my shoulder and chest emblems painted. Still need to blackwash the chest emblem.

20240428_234444.jpg

20240426_012249.jpg

20240418_192736.jpg

20240428_200522.jpg
This part was evil. And so is my sewing machine... I suspect it's a Sith.
It's hard to make out, but this was a major snarl of the thread because I made a tactical error. Doh.
 
Last edited:
In honor of May the 4th... My first full suit up! I've test fitted parts of this, but have never worn everything together until now.

Discovered a few things that need tweaking, like adding additional magnets to my vambraces to keep them closed, and maybe shortening the hoses but overall it worked pretty well. And I was able to suit up completely by myself with no additional help!

I was sick all week from work so I wasn't able to get my weathering done but it is what it is.

20240504_204303.jpg 20240504_202300.jpg

20240504_202238.jpg 20240504_170242.jpg
 
Awesome! For May the fourth, I worked on mine a lot but didn't wear anything heh. Finally got the back plate and jetpack all figured out but just have to paint the back plate and finish sewing the straps for it. I'm also still trying to solve the "spur" problem with my new boots. I had a suit that worked perfectly well then got a new belt, new boot covers and boots, and went with the BOBF jetpack and backplate. So I have to rethink a few parts and definitely envy that your's is pretty much ready to go. I haven't been able to suit up by myself since 2001 though heh.
 
They key to my solo suit up, is the vest. My back plate is attached to the vest with the shoulder strap/tabs, waist velcro tabs and 2 HUGE velcro plates in the center of the back, with matching plates on the armor itself. That bad boy ain't goin' nowhere without help!

Now the real key to this whole thing, is the fact I sliced the side open along the seam, and added two big velcro plates to the side. You separate the plates, slip it over your head like a non-zipper hoodie or t-shirt, then grope around until the velcro plates match up, and then squish it together.

Sometimes it takes a couple tries to align the velcro, but it usually works okay. If not, you can ask somebody to align it for you. Takes 2 seconds. :)

I finally got my jetpack/backplate issue squared away after months of yelling at it and saying "Why won't you work???"
Turned out that the bottom mount bracket was about 1/8" too low. So no matter how much I forced, twisted, turned or cursed, it would never come close to locking in. I moved it up that small amount after redrilling the mount holes in my armor, and now it fits perfectly. Since I don't have one of the real locks on this set, I set round neodymium magnets at the lock point. Making sure to put a thin washer of foam and a round circle of plastic in the hole. If that barrier wasn't there... I'd never get the armor and jetpack apart again.

Things left to do for V1.0 ...
  • Finish detail painting. There's black areas on my jetpack near the top and bottom side cones that need accent painting, under the cone edges. Plus, the silver lines on the ammo "cartridges" on the pistol belt.
  • Figure out how to add my vambrace darts. Drilling those holes... not working. I need like an 6 inch long drill bit to reach...
  • Figure out the jetpack beacon and... that other thing. I have nice metal ones, but I'm not sure I want to mount them on V1.0. Might need to go resin or other 3D printed versions this time around.
  • Shorten Vambrace hoses. They're really too long
  • Weather the armor/jetpack. Been dreading this for soooo long because of the work involved.
  • Replace the knee pads. On the screen used suits you can see like 7 rows of pads. On mine, 4. *shrugs*
  • "Weather" the soft goods. One person suggested it and I'm not sure how I feel about doing that. I could do a few light passes with some sand paper, rather than dragging it down a dirt road behind the car as was suggested. :) The vest on the show looks more weathered than the undersuit, but I don't know. I'll have to look into it a bit more.
  • Figure out how in the h#!! to get the voice modulator to work. I spent waaaay too much money on this one and it just doesn't work right. There's some sort of power interference issue which results in a feedback hum and the high capacity power banks I've purchased power off after a few minutes because there not a constant draw of power to keep it "awake." Plus, the speaker box is huuuge, so I have to figure a solution for that as well.
 
Last edited:
My suit up path is...

  • Swap shirt for Under Armor Heat Gear compression shirt. Seriously, compared to a cotton T-shirt, these are a lifesaver.
  • Put on Boba pants.
  • Compression socks. These SERIOUSLY save my legs and feet. Been wearing them for a few years whenever I have to be on my feet for extended periods of time. Found a thick pair 2 pack at Target for like... $12?
  • Slide on spats, leave them open so you can...
  • Put on boots. After those are secured, slide down the spats and seal them up.
  • Add knee armor, assuming you don't already have them on your pants.
  • Add shirt. Mine has a front Velcro closure, but I just slide it over my head like a t-shirt. A long, shoulder armored, t-shirt. (^_^)
  • Slip on vest/armor/jetpack assembly.
  • Pistol belt.
  • Vambraces. Connect quick detach hoses. I LOVE those connectors!
  • Gloves.
  • Hamlet. Prince of Denmark. No, sorry, I mean HELMET. :)
 
Thanks for detailing that! On my old version, I was able to do everything myself except the jetpack. I have still yet to finish that (I basically just have to do the straps for the backplate), so we'll see if I can do it on my own.

With weathering the armor, that's probably my favorite part. It's like playing guitar with a wah-wah pedal where it turns some mistakes into something people see as cool.

I've repainted my chest armor several times just to get the weathering right. I was wondering though, didn't you paint everything silver then grey then green? Why didn't you mask each layer to have it show through the next layer? I'd never tried that before, always painting the main color then doing the silver etc topically, but I just used masking fluid for the first time on a PP1 helmet and the only reason I would go back to topical is if I'm feeling lazy. The BOBF armor shouldn't be too bad though with wear, though again mine is a medley of different suits so my torso armor and gauntlets are ROTJ style. And I'll probably repaint them using masking fluid because that was definitely a process but a fun one.

Either way, your suit looks FANTASTIC. Yeah, some weathering would add to it. I really don't think this suit needs a lot, so I would absolutely not drag it on the road. Maybe a little sand paper, maybe a little dusting with fabric paint. Having silver showing on the edges and along some of the dings will help a lot too.
 
heh heh heh... I DID paint every layer. Why didn't I mask it in advance? Uh, umm... because... er... reasons? Okay, you caught me, I admit it, I didn't plan that far ahead. And when I initially painted everything it was early in the spring, in the north central USA and temps were borderline for painting anyway. I was in a rush. *shrugs*

Historically in my props and costume work, I'm a subtractive weatherer. I use steel wool and the like to cut through the surface layers of paint to reveal the "metal" underneath.

Now, Boba has impact damage weathering and not just edge weathering, so that's a special kind of hell for me with my usual method. I'm going to try using a plastic brush wheel on the Dremel to cut down to the grey/silver layers and then touch up with spot painting. I LIKE doing weapon weathering, but the props I make are usually cold cast, so subtractive weathering is super easy.

My armor weathering experience is limited to an ODST and Aliens USCM armor set. And my last USCM set... was real metal. So I didn't have to cheat on that one. Just stopped when I hit silver. ;)

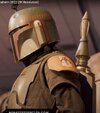
The BOBF armor has much more subdued weathering compared to ESB or ROTJ, but it IS there and in a specific pattern. And I'm a bit anal about getting it in that 90%+ close accuracy range. Marking that pattern out has been a PITA because half of the HD screenshots I've gotten from the series are all out of focus, which is reeeeallly annoying. I want to slap Robert Rodriguez' cameraman sometimes. :)

If you want pictures of the vest back Velcro pattern I did, I can do that for you if it would help.
 
Thank you for offering, but I've got the vest all done. Just gotta attach the straps. I definitely hear you on the out of focus shots of the armor. There are some pics in the gallery here on TDH from Celebration at least, but I also do look at Hot Toys and Gentle Giant statues to compare against screenshots as well. I try not to base anything entirely off collectibles, but sometimes it's all I'm left with.

And I hear you on the specific pattern of the wear as well. I really liked how on his helmet and on the chest armor, it almost looks like he got peppered by a shotgun. And the subtractive weathering is awesome. I did that only once, and by accident, by sanding on my old jetpack and loved how it looked with the under layers showing through. I never tried it again though, but definitely see how well it can work if you know what you're doing.
 

Attachments

  • 309373725_444535517638231_3562566772519351288_n.jpg
    309373725_444535517638231_3562566772519351288_n.jpg
    459.7 KB · Views: 5
  • Boba Fett 01.jpg
    Boba Fett 01.jpg
    2.2 MB · Views: 5
  • Boba Fett 37.jpeg
    Boba Fett 37.jpeg
    1.1 MB · Views: 4
  • celebration2022-3.JPG
    celebration2022-3.JPG
    95.9 KB · Views: 3
  • celebration2022-5.JPG
    celebration2022-5.JPG
    90.6 KB · Views: 3
  • celebration2022-12.JPG
    celebration2022-12.JPG
    37.4 KB · Views: 5
The vest side access is a gamechanger. What's funny is I came up with the concept and then like a week later a Bo Katan cosplayer on YouTube posted a video doing the exact same thing. Great minds must think alike I guess. :)

One thing though on my vest. My vest and soft goods were made by an Etsy/India/Pakistan seller. The vest measurements were about 2+ inches too long, so I had to shorten it. When I was doing so I somehow messed up the spacing on the side and didn't discover until all was said and done, that there was like a 1/2" difference between the front and back panels. The Velcro allows you to adjust however and nobody I hope is going to be studying your underarms... because, that's just weird.

The show suits used a different top strap material that I'm not familiar with. I just used black Velcro. I actually split the seam at the shoulder, inserted the Velcro to the proper placement and re-sewed it in place. It's pretty solid. the lower L/R Velcro I also aligned with the back plate and test fit placement, using a white fabric pencil to make the tail locations. then used the sewing machine to lock it down. I placed two 4" wide Velcro panels in the middle of the back/upper back, them used industrial self adhesive hook Velcro on the inside of the back armor plate. Rock solid!

The Velcro at the 4 corners is attached in a reverse pattern so you only see the "smooth" side facing out at all 4 points. On the bottom mounts, I loop the hook side over the vertical "supports" and then fold the fuzzy side over that and around the corner. Looks good and is very secure.

I'll post closer detail pics later after work.
 
Yeah, I've learned (at least in my case) there's a ton of trial and error with putting things together. Every time I wear the costume, there's something I need to tighten, reinforce, or just replace. But yeah, a LOT of velcro on mine as well. I want everything staying put.

I did get some magnets for the jetpack. I had clips on my old one because I always imagine someone just bumping into me the right way, or flat out lifting the jetpack off me, so this new method with the mounting guys on the backplate freaks me out.
 
After I get my new printer up and running, I'll be doing Mysterymakers latest build, which uses the "screen used" mount pattern and hardware which I reeeeally like. It seems VERY secure. My current pack though... it would take a pretty good yank on it to pull it free. The bottom magnet helps a lot, but it's not foolproof... because we know how fools can be with costuming.

A friend had a "fool" at Dragoncon one year put that to the test, when they got punched from behind while wearing their USCM armor... which is metal like mine. The girl who punched him was holding her hand in pain because she thought it was plastic armor and it would be funny. Served her right. (^_^)
 
Of course. :)

I'll likely recycle my vambraces and shoulder/knee armor since they're not too shabby. Jetpack and back plate I want to redo as I want a more hollow design for electronics and snacks, er, I mean accessories. ;) . Maaaybe the chest armor as I think mine might be slightly under sized. Or maybe not. It took a lot of work to get it as good as it is. :) The jetpack though, good starter pack, but it has some accuracy/personality issues that bother me. I bought metal jet nozzle greeblies and couldn't mount them in this one because the mount points are way undersized. The electronics access bay is also way undersized. There's no way I'd fit my beacon pack in there at all. Little things like that.

I definitely want to do a new helmet though. Right now I have the Hasbro Black Series. I've blackwashed it 2 or 3 times and done some initial "damage" to it, plus I swapped out the visor for a darker one from Germany. It looks "good" but would never be approvable without a ton more work I'm not willing to do, such as texture and a full repaint. Plus ear mods. Better to start from scratch and add metal. :)
 
I look at new gauntlets probably weekly, but I just can't justify it. Some things I've replaced like the collar armor because it was noticeably inaccurate, the knees because one broke, and now the back armor for the jetpack mounting, but most of my armor is still the same Sean Bradley kit I got in the late 90's. So part of me hangs on to it because it's my armor.
 

Your message may be considered spam for the following reasons:

If you wish to reply despite these issues, check the box below before replying.
Be aware that malicious compliance may result in more severe penalties.
Back
Top