Eli Jinn's 3D Printed & Spray Painted ESB Build

Looking really good so far! Just be sure to reinforce the areas around the pegs and holes and you should be fine. Getting the holes and slots to line up is a little tricky but it's not too bad. I plan on having those pegs mounted to some kind of strapping/harness and slide the backplate over them. That way the weight of the JP isn't pulling the backplate off. Unless you find a way to securely attach the backplate to your costume.
Yeah, I was planning to have a kind of harness under the vest with clips or something connecting to the underside of the backplate.
 
After an entire month of back to back trips and personal events, I finally got back to writing on TDH. Those of you who follow my Instagram have received much more frequent updates. Anyways, let's just get on with it.
First, I printed and painted the jetpack beacon.
20230702_202121.jpg

I also got a 12v light to fit inside, but I haven't wired it up yet. I also repainted the top of the beacon so it's less copper and more brass looking.
Then, a guy on Instagram was selling some parts, so I managed to buy a Westaby Electronics chest display from him.
20230708_144913~2.jpg

It's one of his earlier models, but I'm not very concerned about the accuracy of the sequence.
Finally, I went ahead and made the shoulder cape. It took about 4 hours of total work, and I am so happy with how it turned out.
20230711_200050~2.jpg

There are a lot of things that I improved with this cape compared to the last one.
1. The first cape I made was a tan fleece blanket that I found at a thrift store.
20230711_203049~2.jpg

The pros were that it was $2 and super cozy. The con was that it was dead wrong. This time, I sacrificed my fuzzy blanket for some correctly khaki colored canvas fabric.
20230710_202406.jpg

This material is my best approximation at the moment of the WII US Army half shelter. The canvas fabric I got is a little too light and thin, but is way better in terms of drape and the way it tatters and frays.
2. The stitching this time around is far superior. The hems on my old cape were literally the first time I had ever touched a sewing machine, so they were pretty awful.
3. This is still a 3D printed and Spray Painted Build, so I sprayed the stripe on with Rustic Orange.
20230711_121655.jpg

I have been told though that my stripe color is in the ballpark of the actual rust paint, which was all I needed to hear. The accuracy in color probably comes from the fact that I did it in pretty transparent coats over the khaki colored cape.
4. I'm really proud of this tip I figured out. After the paint dries, it's gonna be crunchy and not fit in with the rest of the cape, but I gave my stripe a light sanding to soften it up and give it some really nice patina around the edges.
20230711_183508.jpg

The end product seriously FEELS straight out of Star Wars. Or maybe just a boring Earth War.
5. Keeping on the topic of stripes, last time I decided to be a little anarchist and not put a stripe on the other side of my cape.
20230711_203125~2.jpg

This time I did, but I made the stripe blurry and faded. This is because we have theorized that the stripe on the ESB shoulder cape was painted with a roller, bleeding to the other side of the cape.
20230711_202937~2.jpg

The way I did this was by taping the stripe on the other side like I had lost the will to live (which I was naturally very good at) and even folding the tape upwards to make sure the edge was blurry. Then I sprayed the stripe cautiously to make sure it was lighter than on the other side. I didn't do that good of a job, but the effect is there.
6. Finally, the tattering is more true to the one and only template by Rafal Fett, and the frayed edges are actually there.
Okay that's enough about my new cape. Sorry, this just has to be my favorite part of the whole suit, and I'm so proud of how it came out.
I'm even considering buying a bunch more canvas and doing a run of shoulder capes. Would y'all be interested in that?
 
Big news!
I recently saw my 16th birthday, still don't have my driver's license but I do have a credit card now!
What's obviously way more important than those however was this late birthday gift from my dad...
20230719_174924~2.jpg

I am now the proud owner of an Iwata HC-PS airbrush! I've heard this one is very nice, so I'll be careful with it! So yeah, this might not be a 3D printed and SPRAY PAINTED build for much longer! I still swear by a can's ability to cover so much area, which is nice for base coating stuff like the helmet and jetpack, but I will be experimenting with some airbrush weathering in the very near future!
As for news regarding the costume, I used PLA welding to turn the jetpack body from 4 pieces into 1.
20230720_160038.jpg

This thing is really durable. Feeling it all over, there's no flexing in any part of it, and I've... already dropped it a couple of times...
Anyways... I went ahead and put a layer of filler primer on there, just so I can see what I need to work on. As suspected, I need to work on the entire thing. I used up very nearly the whole can doing that, as well as about 10 minutes.
20230720_172530.jpg

It looks so much better as one color, doesn't it?
I also got the finishing coat on three pieces! The right shoulder, right chest plate, and ab plate are all ready for paint, and of course I got a classy photo with that shoulder cape backdrop.
20230720_195131-01.jpeg

The "deal" with 3D printing is that, if you already have a printer, it is ridiculously cheap to make the armor. All it takes is a one time purchase of MinuteFett's .STLs on Etsy, about $20 to $30 worth of material, and a week or two of printing time. What you're left with after that though, is days of manual labor to make them look halfway decent before you can even begin to think about paint. At that point, I might have to charge the same amount as a vacuum formed set just for the cost of labor. I don't know, what do y'all think?
 
Uhh... kinda forgot to update this thread
No dilly dallying this time...
First thing was that I tried painting the right chestplate which failed miserably. Bad paint reaction between the green and the silver under it.
Then, I started work on the flak vest, which I do have something interesting to say about.
20230827_174001~2.jpg

Spoilers in the bottom left corner...
Anyways, my last flak vest was simply double layered so it didn't look stupid, but afterwards, it still looked stupid. What I didn't know was that you're supposed to QUILT your flak vest. That means not only dual layering it, but also putting batting on the inside. This mostly just makes your vest hot and heavy, but you have to look past that and admit it looks SO MUCH BETTER.
Then, the 1 year anniversary of my first progress photo passed, so I took this photo of the new suit to commemorate that!
20230828_162442.jpg

And the original...
20220828_163256.jpg

No idea how I managed to make a mostly finished costume in 90 days. I'm stressing about this suit and I'm way farther in the same amount of time!
I should also mention that ALL of the armor is printed. The only parts left are greeblies on the gauntlets and jetpack and the shin tools. Progress is being made!
Then, I started post production on the jetpack. This took so long and its maybe halfway there in this photo...
20230828_205838~2.jpg

Then I did some MORE work on the jetpack, using Dupli-Color's filler primer this time instead of the Rustoleum that I usually use.
20230831_211023.jpg

I can see the light!
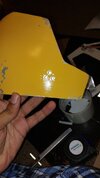
Today, I cracked out the beta test files Jurassic_Fett sent me a few months ago , and put down the yellow on the ab plate.
20230902_164110~2.jpg

I also installed a piece of retro-reflective tape instead of a dental mirror because I liked the effect it had when you took a picture of it with the flash on.
20230902_163427~2.jpg

I quickly realized that, first off, nobody takes photo or video with the flash on, and second, I still need to paint the green on over this... it looks cool with the flash on though!
Finally, after a month and a half of owning an airbrush, I finally completed my airbrush setup, figured out how to use the thing, and actually painted something with an airbrush.
20230902_212551.jpg

It looks like just white with gray overspray in the pic but it's just silver.

--Boring story you can skip if you'd like--

Anyway, the reason this took so long is because we already had an air compressor, but it's this humongous, deafening thing that my dad uses to fill bike tires. I didn't want to listen to it go while I was painting, let alone be tethered to that giant thing, and my dad didn't want to get a separate air compressor. The solution was to get a portable air tank that I could fill up when I needed to and then I could have a while of perfectly silent painting before the tank ran out. The only problem was that the threads were different or something like that so we needed to buy an adapter. When the adapters came in, everything worked but I had no equipment so I'd just be sitting there spraying raw air out of the brush. I ordered a bunch of accessories, painting supplies, whatnot, and when they came in, I tried out the stuff, and I noticed that the portable air tank was not regulated. The valve was either on or off, and when it's on, it puts out all its got, which is a huge no no for painting. So we needed to get a regulator. No problem. The regulator comes in, lo and behold, everything is the wrong size. Also we put a bunch of the equipment on the wrong way I think? Anyways, we spent like two hours fiddling with the setup, including the multiple times my dad left to buy one thing, only to find it didn't work or we needed something else on top of it. Pneumatics!

--Okay story time is over--

I thought I said there would be no dilly dallying this time around?
You may be wondering why I waited so long to finally get an airbrush, and that's because I wanted this build thread to be an inspiration to up and coming costumers like myself. I can't express enough how thankful I am to be a part of this community and how welcoming it is. I know that somewhere out there is another aspiring kid who wants to make something like this, and they can't afford Archive-X paints or fiberglass helmets. That was where I was a year ago, and I feel like I have the responsibility to show people in that position that you can make incredible stuff with limited resources. Maybe it's not all that fair since I've been honing in an artist's hand ever since I could hold a pencil, and I have knowledge of color theory and paint mixing, and I only recently found out that not everybody knows to hold a spray can 8-12 inches from the surface you're painting, and to spray in light, sweeping coats... Anyways, I wish the best for you, aspiring costumer. I can't wait to see what you build. It would also be nice to have some people in this community that also happen to be in my age group. Out with the old and in with the new, amirite? Get outta here, BOOMERS.
 

Attachments

  • 20230902_163419.jpg
    20230902_163419.jpg
    1.1 MB · Views: 58
  • 20230902_164110.jpg
    20230902_164110.jpg
    2.3 MB · Views: 60
Nice. Starts off by saying how thankful he is to be in this community and then tells the older generation to get out of here. Typical.

I guess you have it all figured out then.

BTW, I doubt there are many actual Boomers here.
 
Last edited:
Nice. Starts off by saying how thankful he is to be in this community and then tells the older generation to get out of here. Typical.

I guess you have it all figured out then.

BTW, I doubt there are many actual Boomers here.
Gotta keep y'all guessing! :lol:
 
Update time
As usual all of these updates are quite outdated but it's fine.
I finished the ab plate, here's the before and after weathering. I did a little bit of weathering with just spray cans but everything else was acrylic washes and paper towels, in my attempt to use the same materials and methods as my low-budget costume from last year.
20230903_202141.jpg

20230903_212136.jpg

One thing about the Jurassic_Fett stencils is that they include the weathering on the stencils, so it was way easier to get much more accurate results because no reference images are required. Of course, referencing is always encouraged. Here's a photo with a bit more accurate colors.
20230909_193144.jpg

I also got a few pieces for the jetpack printed. The thrusters, top and bottom tank caps, and the piano keys are all printed. Sorry you can't get a good look at the details because of the shiny plastic.
20230914_193633~2.jpg

Finally, I got some work done on the flak vest. I finished the back panel and installed a zipper. For the love of all that is holy, put in your zipper before you finish the edges of the panel! We had to compromise the seams because the whole thing was so thick trying to fold the seams. I also stitched the shoulders of the two panels together so it's somewhat wearable now. The seam work is very... awful... but it works.
20230917_214347~2.jpg

20230917_214517~2.jpg

(Don't mention the fact that the edges don't line up, I'll cover it with the shoulder caps)
Next I'm gonna attach the collar plate to the vest so I can figure out the placement of the rest of the armor, then I'll hem the vest and stitch the sides together, as well as the shoulder caps. I also need to do the hole on the front for the chest display and the holes on the back for the jetpack straps. This seemed a lot easier in my head...
 
Pretty much the definition of missing the mark. For some reason I thought it would be a good idea to punch the holes from the back.
20230918_211934.jpg
 
I got a notification a couple days ago that I've officially been on TDH for 1 year, so I'm back again after another long wait with another post containing a whole novel of info. I'm down to the wire on time, but I've been getting a lot done. I also post all of my progress on my Instagram stories.
Since the calamity with the flak vest grommets, I went ahead and fixed the hole in the vest and started over. This time they went much better, but not perfect.
20231007_224924.jpg

I mounted the chest armor a little low.
20231008_162239~2.jpg

I then put the shoulder tabs on and mounted the shoulders.
20231010_230006~2.jpg

Heres a better look at my wookie braids.
20230925_200155.jpg

these are made of doll hair, because I couldn't find anywhere else where I could get synthetic hair that long. Even then, the dark brown braid had to be cut short. The ends of the braids were stuck through with a safety pin and then attached to the vest with another safety pin.
By now, I have very nearly finished my flightsuit. I sewed the shin pockets on as well as the ankle ties.
20230923_234050.jpg

The boots that I'm wearing in this pic are also gonna be the boots I wear at Halloween. There's no way I'll have time to make my own boots, and these can pass as Boba boots since they're chelseas. Maybe I can even find a way to temporarily attach the toe spikes on?
After that I added the thigh pouches and made the hip pouches.
20230924_224613.jpg

-Accuracy Tip-
You may notice that the strip at the top of the wearer's right hip pouch is shorter than the left. This is intentional and is done to replicate this detail on the ESB costume where the right pouch is stuffed under the ammo belt.
20230617_134659.jpg

Most likely the original wasn't sewn shorter like mine and just had a shorter pouch stuffer. I only made mine shorter on the top so that it would stay scrunched into the belt and wouldn't fall out when I walk.
My dad put the double sleeves on the flightsuit while I tested dye colors. The test sheet in this pic was wet, so it's way darker than the flightsuit ended up being.
20231004_224358-01.jpeg

Here it is dyed and dried. I was going for a darker shade of blue this time around instead of the baby/powder blue I used last year.
20231006_163616.jpg

Then I weathered the flightsuit. I'm super happy with how this turned out. I used Liquitex spray paint, which is acrylic instead of the usual enamel. Since it's acrylic, I could beat it down with water and a large brush. Here it is wet...
20231009_011050.jpg

...And dry, although the bottom was in shadow so it's hard to get a good idea for the weathering near the bottom of the legs.
20231009_093923.jpg

As you can see, I decided to go nice and heavy with the weathering, which I thought was more accurate. I even looked at reference images for the weathering! Can you believe that?
I finished the chest plates, I really desperately need to finish the other armor pieces so I can paint them.
20231020_025536.jpg

Here's a closer look at the chest sigil that I made with the Jurassic_Fett stencils. The actual physical stencils, not just the printed ones.
20231019_192726.jpg

But the shoulders are going good also thanks to the Jurassic_Fett stencils!
20231023_064857.jpg

I finished the belt of the ammo... belt... and I started the gloves, neither of which I have pics of just yet. This was the first time I ever sewed gusseted gloves (gussets are the secondary planes in between the fingers that give the fingers their shape), and there were a lot of... let's call them... "learning experiences" which end up showing in the final product. I decided the approach of sewing the gussets over the top of the patches would take less time than hand stitching the patches after the gloves were built. The only downside is that the patches aren't as wide as I'd like, but that's also likely a product of my inexperience with making gloves. I have the right glove almost done, but the left will be better.
 

Attachments

  • 20231021_145021.jpg
    20231021_145021.jpg
    1.5 MB · Views: 43
Whew! I didn't get a chance to post on Halloween due to all of the festivities that went down, but here's some pics of my suit. I'll be honest, it got stressful by the end. I had to pull an all nighter the night before Halloween and cut a lot of corners to get it all done. Either way, I'm really proud of the outcome. Here's some photos that my mom took of me, but I'll be suiting up tommorow for a Halloween party that one of my photography friends will also be attending, so I hope to get some nice pics of the suit.
Resized_20231031_082530.jpg

Resized_20231031_082543(1).jpg

Resized_20231031_082537.jpg

Resized_20231031_082618.jpg

Resized_20231031_082641.jpg

And here's last year's suit for comparison...
Resized_20221031_061731.jpg

As you can see, my rangefinder did not want to stay up. I need some hardware and a metal stalk. You know, there's a lot of stuff that I need that I'll save for later in this thread. Hope you had a happy Halloween, I'll be taking a well deserved break from Boba Fett.
 
One of my photography friends from school took some pictures of my costume components. I'm waiting for her to edit them, but I've got extensive pics of the helmet, the flak vest with all the armor, and the jetpack. I'll hopefully be able to post them by tonight.
 
Your suit from last year was still FAR better than my first attempt I'd made when I was four years older than you, almost thirty years ago. And your new one is far and away more impressive than my first 'good' costume, so I am really in awe.
 
Your suit from last year was still FAR better than my first attempt I'd made when I was four years older than you, almost thirty years ago. And your new one is far and away more impressive than my first 'good' costume, so I am really in awe.
Aw, thank you so much!
 
Here's the helmet...
DSC_2344.jpg
DSC_2393.jpg
DSC_2375.jpg
DSC_2362.jpg

The vest...
DSC_2419.jpg
DSC_2436.jpg
DSC_2448.jpg
DSC_2461.jpg
DSC_2468.jpg

And the jetpack. No that definitely totally 100% is not a green thumbtack in place of a dental file...
DSC_2506.jpg
DSC_2514.jpg
DSC_2535.jpg

I wish I had the time to have painted details on the jetpack thrusters. Or to have put the lights in the beacon. Oh well. It's not like this suit is finished, and certainly not abandoned. There's still lots left to do. After I finish the helmet, I think the first things to redo would be the flak vest and gloves. The vest has this strange boxy shape, the armor placement needs some work, and I just made the whole thing wrong in terms of sewing. The gloves I also stitched wrong. They were destined to fall apart. Another thing on my mind are the boots. I planned to make my own boots for this costume, and I bought everything I needed before I realized that I wouldn't have time. Then I'd finish and paint my MinuteFett codpiece. I'm glad my old codpiece worked just fine, but boy was it uncomfortable. I'll think about printing a new collar and backplate. My current collar/backplate is too wide and the collar doesn't angle down as much as I see in references. My neck seal is too short up-and down, and my girth belt was a disaster. I for some reason bought a 40" long girth belt and was surprised to find it was too long... I had to cut it to length and when I dyed it, it didn't dye evenly, all the color washed out, and took like 3 days to dry. Anyways, I could go on and on. I need to get some rest from Boba Fett.
 
This thread is more than 5 months old.

Your message may be considered spam for the following reasons:

  1. This thread hasn't been active in some time. A new post in this thread might not contribute constructively to this discussion after so long.
If you wish to reply despite these issues, check the box below before replying.
Be aware that malicious compliance may result in more severe penalties.
Back
Top