ESB Mannequin Build w/ focus on Gauntlets and Jetpack

mstorer5

Hunter
Okay, I took the plunge two months ago and have made some decent progress. I’m setting up a mannequin build to go adjacent to my Han Solo in Carbonite (Illusive Concepts). I would love any feedback as I go along.

I have a great head start and was able to snag a decent portion of Matty Matt’s amazing build. His original thread is here: http://www.thedentedhelmet.com/f20/mattys-esb-display-build-thread-45453/
  • Bobamaker Flightsuit including side pockets and ankle ties
  • Flak jacket and neck seal
  • Mark cheng boots + MojoFett toe spikes
  • Woodman wookie braids
  • RKD armour
  • MachineCraft knee darts
  • Fetttronics chest lights
  • EE3 blaster
  • Dacor Dive Belt
  • Stormrider lightweight sidearm and resin holster

I also picked up some other items:
  • Bobamaker helmet already painted (needs a few tweaks)
  • Ammo belt from Delta13Mike
  • Girthbelt and cape from Woodman
  • Miscellaneous metal parts from MachineCraft
  • Shin tools: real Paterson parts from the shin tools + 3D printed
  • Gauntlets and Jetpack from MOW

I still have some things to get, but the main part of my build will be:
  • Get a suitable mannequin
  • Build the gauntlets and paint
  • Build the jetpack and paint
  • Build and paint the shin tools
  • Make a few adjustments to the helmet

One of the first things I did was choose a mannequin. I went with one that was a little more pricey. I wanted more of the "real" look, so I shopped around for one that was around the correct height and waist size that would be similar to Jeremy Bulloch. I found a fiberglass one (MD-BC8) which was 6 feet tall with a 32" waist. I also liked that the arms were flexible. I will still need to alter the hands to hold the blaster, but this will allow me to potentially change arm poses over time. It was around $185 shipped and can be found on eBay and Amazon.

More to come…

2016-08-19 001.JPG2016-08-19 002.JPGmannequin.jpg2016-10-22 001.JPG
 
Last edited by a moderator:
Here is first look with some of the stuff on the mannequin. I like how the ankle support on this particular mannequin is directly behind the left leg. It's hidden very well. Right now, I just have the arms coming directly out.
2016-10-22 002b.jpg
 
Last edited by a moderator:
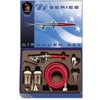
Next up was to figure out how to airbrush (which I've never done in my life) and get the equipment on order. I did a bunch of searching in the threads here and using google. Not an easy choice. In the end, I went simple and chose Paasche H-SET Single Action Siphon Feed Airbrush Set on Amazon. It was only $50. I read the pros and cons of single vs dual action. In the end, I wanted something simple. After using it a few times, I'm glad I went this route as it was much easier to clean.

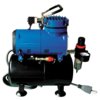
For the air compressor, I purchased the Paasche D3000R 1/8 HP Compressor with Tank, Regulator and Moisture Trap on Amazon for $150. I mainly chose this one due to the positive reviews and because it had the tank.

I've been pleased with both so far and haven't had any issues.

51MEv5agA+L.jpg51+mYvbAYTL.jpg
 
Last edited by a moderator:
Got my MOW gauntlets and began the build process following many of the great threads here. Made sure to clean them thoroughly with Simple Green and let them soak overnight. I used the hinges that came with the gauntlet kit and used Gorilla Glue 5 minute epoxy to attach them. I then used fiberglass to reinforce the insides as well as to have extra protection to hold the hinges in place. I also did a dry fit of the flamethrower. Lots of pieces to paint here!

2016-09-09 002.JPG 2016-09-10 001.JPG 2016-09-12 001.JPG 2016-09-18 007.JPG2016-09-18 006.JPG2016-09-18 009.JPG2016-09-18 008.JPG

I primed everything with Rustoleum self etching primer and then put on a coat of Silver 11. I played around with the color a bit using some advice from DVH. I ended up adding just a drop or two of white to a new tin of green 78 to help give it that faded look. Maskol was sold out everywhere, so I had to use something different to mask. I ended up trying Bob Dively which was good not great. For fine spots, I found it way too runny. It worked good enough for the spots on the gauntlets though. I realize I could have just done the damage topical, but I wanted to try it out here before attempting it on the jetpack. I then painted some of the other parts. I had started a separate thread on paint color questions for the gauntlets and jetpack. It is here if interested: http://www.thedentedhelmet.com/f20/...tailed-paint-guide-my-top-10-questions-55908/

2016-10-01 002.JPG2016-10-01 001.JPG2016-10-01 003.JPG2016-10-01 004.JPG2016-10-01 006.JPG

To attach the flamethrower, I used magnets from home depot. If I were trooping, I may have added a 3rd or 4th just to be safe, but even with two, these were strongly held together. Almost final product is below. I still need to add the switches, darts, and dental expander. More to come...

2016-10-04 003.JPG2016-10-04 007.JPG2016-10-04 004.JPG2016-10-04 002.JPG2016-10-04 005.JPG2016-10-04 006.JPG
 
Last edited by a moderator:
How are the joints on the mannequins arms? That was a concern I had with this model when I was shopping around with the weight of a blaster and gauntlets.
 
They are pretty sturdy... I haven't been concerned about the weight. I've had the gauntlets on them already with no issue. Regardless, I'll reinforce the blaster in some fashion (more because of the grip from the hands). I snapped a picture so you can see the hinge up close. It is metal material with a couple of hex screws. You loosen them for movement. When you have it in the right place, you can tighten to prevent it from moving. Seems to work pretty good. So far, I've left mine slightly loose, so I can move the arms around if I want.

IMG_5164.JPG
 
switched over to start working on the MOW Jetpack. I used Simple Green again and made sure it got a good scrubbing and wash. I epoxied the piano keys and tank caps. I drilled holes to try out a few of my MachineCraft metal parts. The base of the rocket will be removable. I used some of the techniques shown on the site.
2016-09-18 001b.jpg2016-09-18 002b.jpg2016-09-18 003b.jpg2016-09-18 004b.jpg2016-09-18 005b.jpg

I then primed and painted the whole thing Silver 11 similar to the gauntlets. Then started masking. I should have taken a lot more in-process pictures. The one in the middle below has a lot of the work done. As mentioned earlier, refer to this link on paints used: http://www.thedentedhelmet.com/f20/...tailed-paint-guide-my-top-10-questions-55908/

I also have to thank Fettastic. I used a lot of the same techniques highlighted in his paint-up thread (http://www.thedentedhelmet.com/f20/07-21-16-update-fettastics-boba-fett-esb-jetpack-paintup-55423/).

2016-10-06 002b.jpg2016-10-09 002b.jpg

The toughest part was the yellow. I'm not sure if I had a bad tin, but I just couldn't get it to cover right. Eventually it was good enough and after heavy weathering, you couldn't tell the difference.

2016-09-18 001.JPG


2016-09-18 002.JPG


2016-10-06 002.JPG
 
Here is Jetpack with some minor finishing touches. I went back over some of the damage to soften it and added more weathering. I waited until the very last minute to attach the thrusters. I had used the MOW reco using PVC, but I didn't want to cement them in place. In a stroke of luck, I came up a with a hybrid approach. I drilled a hole at the end of each piece and super glued in a dowel screw. I then drilled a hole in the pvc to fit the dowel screw. So I'm using the MOW PVC way to attach them, but a wing nut on the other side of the PVC holds them in place. Maybe overkill, but now I can move the thrusters around if I want and they aren't going anywhere.

I still need to add the dental file and attach the decal. I also need to do the white dot. I tried once and screwed it up and had to paint over it. Maybe I'm just not good at it, but tried a few approaches on sample material and could never get it to look sharp. I tried free-hand, using a stencil and airbrush, etc. In a holding pattern now. More to come!

2016-10-14 001b.jpg2016-10-20 001b.jpg2016-10-20 002.JPG2016-10-17 001b.jpg2016-10-17 002b.jpg
 
Got my Lucksy31 decal for the jetpack today. Will be putting that on shortly. In meantime, here is a pic of final shin tools again using advice/techniques from the site. First two made from real paterson parts. The two on the right were 3d printed. Yes, I realize jetpack adjustment tool was made up for the visual dictionary, but using it for now until I get a better looking steel pipe.

2016-10-04 008.JPG
 
I'm a bit in a holding pattern now. I have a few odds and ends to complete on the jetpack and gauntlets, but I really need to figure out the harness. I have hooks and clips coming from full metal fett. It looks like two major options out there are the MOW version and the one from Bigdane. I'm keeping a lookout for the next run from him. I was going to go that route to have the extra support from the lower cross bar given it's a mannequin build. Anyone else have suggestions, let me know.
 
Build your own harness. Its easily done in a day.

I'm a bit in a holding pattern now. I have a few odds and ends to complete on the jetpack and gauntlets, but I really need to figure out the harness. I have hooks and clips coming from full metal fett. It looks like two major options out there are the MOW version and the one from Bigdane. I'm keeping a lookout for the next run from him. I was going to go that route to have the extra support from the lower cross bar given it's a mannequin build. Anyone else have suggestions, let me know.
 
Here is Jetpack with some minor finishing touches. I went back over some of the damage to soften it and added more weathering. I waited until the very last minute to attach the thrusters. I had used the MOW reco using PVC, but I didn't want to cement them in place. In a stroke of luck, I came up a with a hybrid approach. I drilled a hole at the end of each piece and super glued in a dowel screw. I then drilled a hole in the pvc to fit the dowel screw. So I'm using the MOW PVC way to attach them, but a wing nut on the other side of the PVC holds them in place. Maybe overkill, but now I can move the thrusters around if I want and they aren't going anywhere.

I still need to add the dental file and attach the decal. I also need to do the white dot. I tried once and screwed it up and had to paint over it. Maybe I'm just not good at it, but tried a few approaches on sample material and could never get it to look sharp. I tried free-hand, using a stencil and airbrush, etc. In a holding pattern now. More to come!

View attachment 104251View attachment 104252View attachment 104253View attachment 104254View attachment 104255

Thanks for the shout out! Your JP is coming out great! Good idea on the hybrid PVC pipe attachment too. Regarding the white dot...I completely free handed mine. I drew a small mark with a sharpie to indicate the location based on reference photos and lining up with my stabilizer location. Then I just started inwards working out until I had a pretty perfect circle just under the complete size of the white dot. Then I tried to match the imperfectness of the referenced white circle. To make it easier I would find something small and round you could trace just under the size of the white circle then paint inside the lines and then detail it as best you can to match the reference photos. That should get you pretty dog-on close and almost fool proof if you have a steady hand.
 
Okay, got a nice surprise in the mail today... hooks and clips from full metal fett

I have a MOW jetpack. I remember reading somewhere that you have to do a little modification to attach the lower clips. Has anyone done this? Any recos? Thanks.
2016-11-16 001.JPG
 
Okay, got a nice surprise in the mail today... hooks and clips from full metal fett

I have a MOW jetpack. I remember reading somewhere that you have to do a little modification to attach the lower clips. Has anyone done this? Any recos? Thanks.
View attachment 105160

Its hard to mount the lower clips because the inside is not flat and so much uneven...
I used the dremel to get rid of some material. I didnt manage to use the plates that Fullmetallfett delivered for the inside, but the jetpack walls are so thick I dont think you need them.


Gesendet von iPhone mit Tapatalk
 
Coming along very nicely. Thanks for the mention of the airbrush kit you bought. I was thinking of getting one myself and didn't know which kind to choose. Your review is much appreciated.
 
This thread is more than 3 years old.

Your message may be considered spam for the following reasons:

  1. This thread hasn't been active in some time. A new post in this thread might not contribute constructively to this discussion after so long.
If you wish to reply despite these issues, check the box below before replying.
Be aware that malicious compliance may result in more severe penalties.
Back
Top