BoBF Gauntlet connectors - 3D printed

DarthVader1

Well-Known Hunter
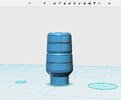
I found a source for the STL 3D files of the three smaller gauntlet connectors.

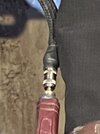
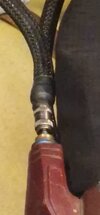
Note of early advice: I recommend making them able to pass a solid aluminum rod through them, DO NOT MAKE/CUSTOMIZE THEM SOLID WITH 3D RODS even if they're printed in resin, the hoses will snap them really quick, trust me, happened to me with a previous build.

They look OK, my only observations are that the "knurled" surfaces are not exactly accurate (I might be wrong on that one), and that the bigger black parts that actually connect to the hoses are not part of these 3D files, but this is a start. I will be designing those really soon, but before, I will find a proper rod diameter for them to then design the bigger black pieces. Then I will do my homework of finding the proper diameter hose for both inside and outside diameters to not just look properly but also fit and feel well. I already spent money on rods, pipes, and hoses way too big to this point, I don't want anyone to go through the same.

Here is the link to them.

boba2.jpg

boba1.jpg
 
Last edited:
I saw those. I've been looking at coax, pressure hose connectors, and various audio connectors trying to find an answer... Anybody currently taking orders for printed ones that you're aware of?
 
I saw those. I've been looking at coax, pressure hose connectors, and various audio connectors trying to find an answer... Anybody currently taking orders for printed ones that you're aware of?
I've been doing the same thing, trying to look for the proper sized and shaped connectors to make out of real metal.

That will be pretty much shaky ground about doing a run since different makers create the space for the rods or pipe connectors in different sizes.
I did my first FDM print of those I've posted, just to compare to the size of the MysteryMakers' Gauntlet set.

More likely, I will modify the files I've posted to make them look more accurate (namely the knurling), and I will design the big black parts soon, and depending on the situation, I "might" offerer them.
 
Excited and waiting for the results about the black parts.
I've read somewhere that they were metal pieces underneath and the black part is heat shrink tubing covering them, but I don't quite buy that.
 
The black piece is indeed just shrink wrap tubing to hide the connection from the Quick Disconnect to the hose. You can see it ok in this publicly available reference. Probably adhesive lined shrink wrap tubing but don’t quote me on that.
 

Attachments

  • 3D2AC98E-4571-4DFA-8CB7-2384F63FADF5.jpeg
    3D2AC98E-4571-4DFA-8CB7-2384F63FADF5.jpeg
    143.4 KB · Views: 121
  • D4AFCDD5-D519-4165-9282-B4C4C9E43CA7.jpeg
    D4AFCDD5-D519-4165-9282-B4C4C9E43CA7.jpeg
    118.6 KB · Views: 127
They are Iwata quick disconnects. The male end has its knurling turned down to expose the brass.
View attachment 237813
To me, it appears that the threaded end on the longer piece is where the shrinkwrap is attached.

I this photo is from Episode 1 of BoBF, the armoring up/putting on the helmet scene, so the smaller "nipple" end connector is attached to a threaded piece that's inside the vambrace connectors.

hose-barb-connectors (2).jpg

Setup would be like this...

Iwata-vambrace-connectors.png
 
My google-fu is not strong. :)
"Google-Fu". LMAO :D
Anyway, I've just received the correct sized hoses, not 100% accurate but they might be. Just needed them to design the black piece that goes attached to them just behind the Iwata connectors.

I forgot to mention, I've ordered the Iwata connectors, and they are accurate with the 3D STL file featured here, which I managed to alter the file to have a more knurled look. I will post both files together once I finish designing the black piece.
 
I picked up one set of Iwata connectors, but then ordered another set of "generic" ones off amazon that had double the male connectors. The plan is to work down the knurling on the "male" parts and then connect the spare male piece to the back of the quick detach connector, connect hoses, add fabric mesh and then shrink wrap it. That's the plan anyway.

For the gauntlet side, I picked up some 3/8-24 x 5/8 bolts. I'll be cutting the heads off of the bolts, then connecting the bolts to the vambraces with the male connectors. Should be solid when glued and not have to worry about breaking off.

Do we know for sure that the knurling on the male connectors is actually milled down, or was the silver finish just removed?

vambrace-connector2.jpg
 
I ended up using the standard Iwata QDs and filled the knurling on the female end with filler. It had ok results for what this outfit is. "semi accurate".
20231019_111557.jpg


the real issue is what keeps them attached to the gauntlet. Mine aren't 100% accurate so I couldn't fit a dowel of the proper diameter inside. Took me melting the parts into the 3d print resin to do it... hense the extra crispy/weathered look, which I consider more "realistic" anyway, under the character's circumstances.
 
This thread is more than 6 months old.

Your message may be considered spam for the following reasons:

  1. This thread hasn't been active in some time. A new post in this thread might not contribute constructively to this discussion after so long.
If you wish to reply despite these issues, check the box below before replying.
Be aware that malicious compliance may result in more severe penalties.
Back
Top