You are using an out of date browser. It may not display this or other websites correctly.
You should upgrade or use an alternative browser.
You should upgrade or use an alternative browser.
Superjedi's FPH-ESB for Grifter
- Thread starter superjedi
- Start date
Fett 4 Real
Sr Hunter
Thumb print tutorial lol.
I imagine Eric does what I do and paints the base area and builds it up since that oval is raised. I do smear the paint with a finger though. Not straight up smudge it but try to be precise
Sent from my iPhone
I imagine Eric does what I do and paints the base area and builds it up since that oval is raised. I do smear the paint with a finger though. Not straight up smudge it but try to be precise
Sent from my iPhone
mainst69
Active Hunter
Thumb print tutorial lol.
I imagine Eric does what I do and paints the base area and builds it up since that oval is raised. I do smear the paint with a finger though. Not straight up smudge it but try to be precise
Sent from my iPhone
Yeah, that's what I do too. Build it up, yeah, that's the ticket! Lol
superjedi
Sr Hunter
So now that the secret method is out, this will be rather anticlimactic. ")
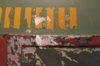
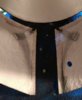
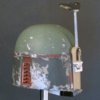
Effects painting, stage three--thumbprints.
Yet more strange markings on the ESB helmet. These do look quite a bit like thumbprints, hence the name.
Not sure about the story behind these, but they sure look like some white paint was spilled or flicked onto the
left side of the helmet and then quickly wiped off. They're visible on screen, so they're certainly a part of this
and all of my ESB commissions.
I've broken this down into 2 stages. The first is to apply some very thick and opaque flat white. I use a small
brush, I think a size 3/0, just to get some control over the shapes, but the paint is laid on pretty heavy. This
forms the outlines of the lower thumbprint, and the "internal" streaks in the upper thumbprint.

After it's dried thoroughly, I go back with more flat white and apply it so that it kind of streaks back. I then use a wide
stiff bristled brush to feather it out more. This layer is more transparent and diffuse. The transparency is more apparent
behind the lower thumbprint where you can see it sort of whitewashes the silver. But it's important to leave it see-through.

Not sure where I'll go from here. I'll either work on the ears or the "grease stains" on the back of the helmet. I save the pastel weathering until
just before I'm ready to spray the final protective clear coat. The spatter will go on top of the clear coat.
Effects painting, stage three--thumbprints.
Yet more strange markings on the ESB helmet. These do look quite a bit like thumbprints, hence the name.
Not sure about the story behind these, but they sure look like some white paint was spilled or flicked onto the
left side of the helmet and then quickly wiped off. They're visible on screen, so they're certainly a part of this
and all of my ESB commissions.
I've broken this down into 2 stages. The first is to apply some very thick and opaque flat white. I use a small
brush, I think a size 3/0, just to get some control over the shapes, but the paint is laid on pretty heavy. This
forms the outlines of the lower thumbprint, and the "internal" streaks in the upper thumbprint.
After it's dried thoroughly, I go back with more flat white and apply it so that it kind of streaks back. I then use a wide
stiff bristled brush to feather it out more. This layer is more transparent and diffuse. The transparency is more apparent
behind the lower thumbprint where you can see it sort of whitewashes the silver. But it's important to leave it see-through.
Not sure where I'll go from here. I'll either work on the ears or the "grease stains" on the back of the helmet. I save the pastel weathering until
just before I'm ready to spray the final protective clear coat. The spatter will go on top of the clear coat.
Attachments

Fett 4 Real
Sr Hunter
Good job
themrdaniel
New Hunter
Looks great.
Bounty1138
Active Hunter
Looking great as always and much like your kill stripe tutorial, is much easier than whatever I was going to try to do.
superjedi
Sr Hunter
Looking great as always and much like your kill stripe tutorial, is much easier than whatever I was going to try to do.
Given a choice of methods, I'll always take the easiest route. . . I'm lazy.
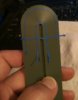
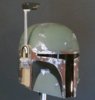
Here's a little step by step on painting the arch on the left ear.
1) I very lightly mark the shape of the arch and then cut super thin strips of blue tape to mark the boundaries. It's really finicky to use
such thin strips of tape, but it helps it to conform to the curves much better. I also fold the ends of the strips under so it makes a little
tab to grip it when it's time to remove it.
2) I apply liquid mask to the damaged areas using a Microbrush. Then I also apply the liquid mask all around the outside of those thin
strips of tape. I'm trying to limit the amount of contact surface between tape and paint as much as possible. Then I add some more small
pieces of tape around the curve of the ear, and I use some plastic wrap to mask off the rest of the ear.
3) I load the airbrush with Tamiya Flat White and shoot a couple of light coats at relatively low pressure. I generally avoid trying to "one coat"
light colors like white or yellow. . . it tends to want to run or drip if it's sprayed on too heavy, and that's bad news! Once it's dry and the masking
is removed, it looks like this. . .
All ready for gray and red detailing!
You might notice one tiny spot of overspray in between the legs of the arch,but this will be covered by the gray. I use this same method on the arches on the RF ear as well.
Attachments
superjedi
Sr Hunter
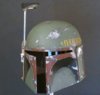
The left ear is finished. I added the small markings on the white arch using dry transfer letters, and I painted the gray
and red damage. Doing the bottom facet on the little extension on the bottom takes about as long as the rest of it combined!

The ear is screwed in place temporarily for these shots. I'll remove it when I do the final weathering passes on the helmet.

The lower part of the ear will get some tan spatter as well. The RF ear parts are up next.
and red damage. Doing the bottom facet on the little extension on the bottom takes about as long as the rest of it combined!
The ear is screwed in place temporarily for these shots. I'll remove it when I do the final weathering passes on the helmet.
The lower part of the ear will get some tan spatter as well. The RF ear parts are up next.
Attachments
superjedi
Sr Hunter
. . . now get in the soul food kitchen and get some grease on it!! Lol
Nah, my car has a slow oil leak. I'll just put the helmet under the engine for a couple of days.superjedi
Sr Hunter
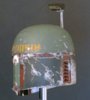
Got finished with the lower RF ear section. More gray and silver, and some more small markings. Here's a wide shot.

Along with a few close ups.


The RF ear parts will get dirtied up some with pastels just before the final clear coat. I'll work on the ear cap next.
Along with a few close ups.
The RF ear parts will get dirtied up some with pastels just before the final clear coat. I'll work on the ear cap next.
Attachments
superjedi
Sr Hunter
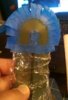
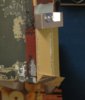
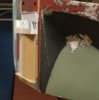
Been finding little bits of time over the past few days to work on the helmet. I finished the ear cap, and I've been
working on a couple of other small details as well. I built a mounting platform for the real MQ-1 circuit board and
it's ready to install at the end of the project. I also detailed the Borden connector, did the "rust" on the RF stalk,
and shot some primer on the RF toppers. I'm doing 2 RF toppers for Grifter. One is a static version (no lights), and
the second will be for him to install his light kit.
Here are a couple of shots of the RF ear temporarily installed.

The small markings are done with dry transfer letters that are carefully scraped and scratched once in place.

This weekend I'm hoping to get the final weathering passes done on the helmet (and ears), and paint the RF toppers. It's really close now.
working on a couple of other small details as well. I built a mounting platform for the real MQ-1 circuit board and
it's ready to install at the end of the project. I also detailed the Borden connector, did the "rust" on the RF stalk,
and shot some primer on the RF toppers. I'm doing 2 RF toppers for Grifter. One is a static version (no lights), and
the second will be for him to install his light kit.
Here are a couple of shots of the RF ear temporarily installed.
The small markings are done with dry transfer letters that are carefully scraped and scratched once in place.
This weekend I'm hoping to get the final weathering passes done on the helmet (and ears), and paint the RF toppers. It's really close now.
Attachments


superjedi
Sr Hunter
The helmet is weathered! No pics yet.. . I'm saving those for the final update.
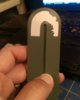
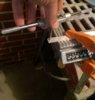
I'm working on some of the miscellaneous construction now. I've mentioned in several of my previous threads that I use two custom
aluminum tabs to secure the visor in place, but I haven't really gone into any detail on the process. I'll explain that now with pics.
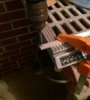
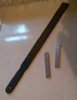
I begin with some thin aluminum bar stock. You can get this in any decent sized hardware store. I've gotten it at Lowe's and Ace before.
I clamp the bar down on my work surface. For all of my drilling and cutting steps, I use my table saw platform out in the garage.

I drill a hole close to the end of the bar. I size the hole to fit a particular type of knurled finishing screw that looks nice.

I thread the hole using the corresponding size tap.

I check the threading using the knurled screw mentioned above.

I cut the bar so it's 3 inches long.

I make a second bar, then use a coarse file to smooth the cut edges. Total time--20 minutes.

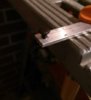
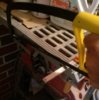
I bring the two tabs to my hobby space and use two pairs of vise grips to bend them to fit inside the helmet's cheeks.
Then I use 2-part epoxy to secure them in place. I use a 5 minute epoxy, but any type will do. When the tabs are
installed, they look like this.

The trimmed visor will slip right in between the tabs and the inner surface of the helmet. The knurled screws are tightened down to secure
the visor using pressure against the inner corners of the cutout. No adhesives at all. This allows some amount of airflow around the entire
perimeter of the visor. I've been using this method for several years on my own helmets as well as my commissions.
Next up, I'll be securing the Borden connector into the cheek, and attaching the MQ-1 circuit board with its platform into the back of the bucket.
Just some detailing left to do on the RF toppers and then it'll be ready for final pics!
I'm working on some of the miscellaneous construction now. I've mentioned in several of my previous threads that I use two custom
aluminum tabs to secure the visor in place, but I haven't really gone into any detail on the process. I'll explain that now with pics.
I begin with some thin aluminum bar stock. You can get this in any decent sized hardware store. I've gotten it at Lowe's and Ace before.
I clamp the bar down on my work surface. For all of my drilling and cutting steps, I use my table saw platform out in the garage.
I drill a hole close to the end of the bar. I size the hole to fit a particular type of knurled finishing screw that looks nice.
I thread the hole using the corresponding size tap.
I check the threading using the knurled screw mentioned above.
I cut the bar so it's 3 inches long.
I make a second bar, then use a coarse file to smooth the cut edges. Total time--20 minutes.
I bring the two tabs to my hobby space and use two pairs of vise grips to bend them to fit inside the helmet's cheeks.
Then I use 2-part epoxy to secure them in place. I use a 5 minute epoxy, but any type will do. When the tabs are
installed, they look like this.
The trimmed visor will slip right in between the tabs and the inner surface of the helmet. The knurled screws are tightened down to secure
the visor using pressure against the inner corners of the cutout. No adhesives at all. This allows some amount of airflow around the entire
perimeter of the visor. I've been using this method for several years on my own helmets as well as my commissions.
Next up, I'll be securing the Borden connector into the cheek, and attaching the MQ-1 circuit board with its platform into the back of the bucket.
Just some detailing left to do on the RF toppers and then it'll be ready for final pics!
Attachments
-
 IMAG2934_zpsncm9mgpj.jpg104.5 KB · Views: 137
 -
 IMAG2936_zpsaojrpat3.jpg94.3 KB · Views: 119
 -
 IMAG2935_zpskrr9xfdd.jpg96.9 KB · Views: 126
 -
 IMAG2938_zpsi7etqbe0.jpg84.1 KB · Views: 118
 -
 IMAG2939_zpslbpltwrv.jpg100.1 KB · Views: 119
 -
 IMAG2940_zpsoud1atib.jpg81.5 KB · Views: 128
 -
 IMAG2941_zpseubqokal.jpg99.9 KB · Views: 122
superjedi
Sr Hunter
68 days later. . .
COMPLETE! I got the last bit of work done to the helmet late yesterday evening. The RF is assembled, the Borden is installed, and
the MQ-1 with its custom platform is epoxied in place. The visor slipped in nicely and everything's ready to be sent to Grifter! I had
a lot of fun with this one, and I'll be sad to see it go. It's always hard to pack these things up and send them out into the world, but
I'm sure it will have a good home.
Here's a selection of final pics. There's a more complete gallery on my Facebook page, CounterFett Creations. You can see them here:
https://www.facebook.com/CounterFett-Creations-1454779188105078/
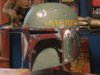
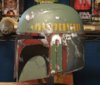
First, the standard front angles.


Now for the rear view.


A detail shot of the dent area.

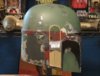
Detail of the right cheek. For the "crack," I tried to simulate that very subtle convex shape by varying the density of the spatter. It's a little
lighter on the right side (near the ear), and a little heavier on the left (toward the visor). I think it worked out nicely. Jbdubz. . . whaddya think???

So that's it! I'll remove the RF stalk and get the helmet packed for shipping and it should go out tomorrow. As I mentioned in the first post, this was
my 20th ESB lid and I'd like to thank Grifter for trusting me to do the work. It was fun working on an original FPH again! You don't see 'em much these days.
Thanks to everyone who followed along,
Eric
COMPLETE! I got the last bit of work done to the helmet late yesterday evening. The RF is assembled, the Borden is installed, and
the MQ-1 with its custom platform is epoxied in place. The visor slipped in nicely and everything's ready to be sent to Grifter! I had
a lot of fun with this one, and I'll be sad to see it go. It's always hard to pack these things up and send them out into the world, but
I'm sure it will have a good home.
Here's a selection of final pics. There's a more complete gallery on my Facebook page, CounterFett Creations. You can see them here:
https://www.facebook.com/CounterFett-Creations-1454779188105078/
First, the standard front angles.
Now for the rear view.
A detail shot of the dent area.
Detail of the right cheek. For the "crack," I tried to simulate that very subtle convex shape by varying the density of the spatter. It's a little
lighter on the right side (near the ear), and a little heavier on the left (toward the visor). I think it worked out nicely. Jbdubz. . . whaddya think???
So that's it! I'll remove the RF stalk and get the helmet packed for shipping and it should go out tomorrow. As I mentioned in the first post, this was
my 20th ESB lid and I'd like to thank Grifter for trusting me to do the work. It was fun working on an original FPH again! You don't see 'em much these days.
Thanks to everyone who followed along,
Eric
Attachments
Level3Fett
Hunter
Beautiful
jbdubz
Active Hunter
Detail of the right cheek. For the "crack," I tried to simulate that very subtle convex shape by varying the density of the spatter. It's a little
lighter on the right side (near the ear), and a little heavier on the left (toward the visor). I think it worked out nicely. Jbdubz. . . whaddya think???

absolutely nailed it bro.
Last edited by a moderator:
Similar threads
- Replies
- 7
- Views
- 851