You are using an out of date browser. It may not display this or other websites correctly.
You should upgrade or use an alternative browser.
You should upgrade or use an alternative browser.
Slave1Pirate's Aluminum ROTJ Hero Level 2 Build PIC HEAVY
- Thread starter Slave1Pirate117
- Start date
Slave1Pirate117
Hunter
Thanks Fuse!All your work looks simply amazing!
Echoing ShortFuse - Yes this work is pretty crazy - crazy good! Keep it up sir!All your work looks simply amazing!

-Iron
Slave1Pirate117
Hunter
Thanks! I will! So which leather do you think would work for the ammo pouches? A couple posts up ^^
Last edited:
Slave1Pirate117Thanks! I will! Which leather so you think would work for the ammo pouches? A couple post up ^^
When it comes to leather, my experience is very minimal. Sadly, I didn't make my belt I called upon the expertise of one Delta13Mike ! This man creates some of the best belts on the market. I'm still very pleased 2 years later how well they've held up! I just scratched em' up to weather them over the summer. As doing so when I first got them kinda sickened me - I found it quite difficult to do that to a $230.00 beautifully hand crafted item. If you're interested in his item and want to forego the headache here is a link:
Boba ROTJ Belt – Delta Leatherworks
BeFurniture| Best WordPress theme for furnitures
Again, I'm supper happy with my product as are most of his clients, and the fact that the pouches are functional are a pretty big plus, I love having a spot to store my keys and other goodies when I got to conventions.
These have been a hit with the kiddo's too.....I'll stash these in my pouches (which fits perfectly by the way). and hand them out to the really little ones who find me intimidating. After which they become my best friend!
But if you absolutely wanna torture yourself in making the ammo belt yourself, then your a better man than me. I know what entails in working with leather as I hand crafted a set of pouches and belt out of leather that I got from Hobby Lobby. The project last summer was a static Jawa Prop. The leather was $30.00 and I felt I did a good job on it.....but felt like such a pain. I couldn't fathom attempting that for a Boba Belt, especially since stitching is needed. But here was my Jawa Belt/Pouches....
I actually has enough leather that just this past weekend, I added to my Jawa and now he's got the bandolier on both shoulders in a X-Pattern. But I feel like I must hang my hat up on leather work - just isn't for me.
I know, I really didn't answer your question, but if you're after that movie accuracy, then leather isn't at all what you should be considering, but what you should look at is vinyl as per the 501st CRL....
Best,
-Iron
Slave1Pirate117
Hunter
I know.....but as a leather worker.....I can't use vinyl....I just can't lol. Check out my shop.Slave1Pirate117
When it comes to leather, my experience is very minimal. Sadly, I didn't make my belt I called upon the expertise of one Delta13Mike ! This man creates some of the best belts on the market. I'm still very pleased 2 years later how well they've held up! I just scratched em' up to weather them over the summer. As doing so when I first got them kinda sickened me - I found it quite difficult to do that to a $230.00 beautifully hand crafted item. If you're interested in his item and want to forego the headache here is a link:
Boba ROTJ Belt – Delta Leatherworks
BeFurniture| Best WordPress theme for furnituresdeltaleatherworks.com
Again, I'm supper happy with my product as are most of his clients, and the fact that the pouches are functional are a pretty big plus, I love having a spot to store my keys and other goodies when I got to conventions.View attachment 231082
These have been a hit with the kiddo's too.....I'll stash these in my pouches (which fits perfectly by the way). and hand them out to the really little ones who find me intimidating. After which they become my best friend!
View attachment 231083
But if you absolutely wanna torture yourself in making the ammo belt yourself, then your a better man than me. I know what entails in working with leather as I hand crafted a set of pouches and belt out of leather that I got from Hobby Lobby. The project last summer was a static Jawa Prop. The leather was $30.00 and I felt I did a good job on it.....but felt like such a pain. I couldn't fathom attempting that for a Boba Belt, especially since stitching is needed. But here was my Jawa Belt/Pouches....
View attachment 231084
View attachment 231085
I actually has enough leather that just this past weekend, I added to my Jawa and now he's got the bandolier on both shoulders in a X-Pattern. But I feel like I must hang my hat up on leather work - just isn't for me.
I know, I really didn't answer your question, but if you're after that movie accuracy, then leather isn't at all what you should be considering, but what you should look at is vinyl as per the 501st CRL....
View attachment 231086
Best,
-Iron
I enjoy doing things like this. But I'm going to blend real leather working with some pseudo leather work to make the pouches usable without having to do intense leather work. I've reached out to a few suppliers so we will see what I come up with!
PS: love that jawa!
Slave1Pirate117
Hunter
Slave1Pirate117
Hunter
Sneak peak into my ammo belt: Container Method. Considering providing these indestructible ammo pouches containers to those who want them.


Last edited:
Slave1Pirate117
Hunter
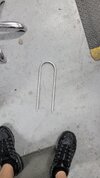
I began work today on the jetpack harness. I shaped the frame first out of .5" aluminum tubing. I used my drawings to cut out the gussets on the plasma cutter and I shaped 1 side of the upper gusset. I'll post more tomorrow.
Attachments

This is awesome. I love the fact this entire thing is durable. Being that your pouches are lined with metal this might also be good for creating spur sounds with bells or something inside them. Just an idea. I've been thinking ahead to the spur sound. No idea what I'm going to do yet.Sneak peak into my ammo belt: Container Method. Considering providing these indestructible ammo pouches containers to those who want them.
View attachment 231219View attachment 231220View attachment 231221View attachment 231222View attachment 231223View attachment 231224View attachment 231225View attachment 231226View attachment 231227View attachment 231228View attachment 231229View attachment 231230View attachment 231231View attachment 231232
ShortFuse
Well-Known Hunter
I made two small bags of jingle bells and put one in each thigh pocket.This is awesome. I love the fact this entire thing is durable. Being that your pouches are lined with metal this might also be good for creating spur sounds with bells or something inside them. Just an idea. I've been thinking ahead to the spur sound. No idea what I'm going to do yet.
Slave1Pirate117
Hunter
Tbh that's EXACTLY what I just told my wife I would do
Slave1Pirate117
Hunter
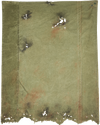
Last update of the night: Cape Shape-ology!
See cape?

Don't see cape....

Now I know what your thinking.....that's not the right shelter half. Don't worry, it will be. It's missing the wide hem on the right side. I will add this in. We pinned the hem into place doubling the fabric over. We had to take into account the amount we would be doubling over so the cape and seam would fall into place.


After sewing the hem in place, we had the wide hem installed onto the cape.

After this we began hemming the 3 edges to complete the sewing portion!


See cape?
Don't see cape....
Now I know what your thinking.....that's not the right shelter half. Don't worry, it will be. It's missing the wide hem on the right side. I will add this in. We pinned the hem into place doubling the fabric over. We had to take into account the amount we would be doubling over so the cape and seam would fall into place.
After sewing the hem in place, we had the wide hem installed onto the cape.
After this we began hemming the 3 edges to complete the sewing portion!
Slave1Pirate117
Hunter
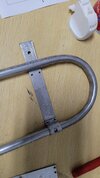
Well I began finishing the dive harness this morning.
Shaping the gussets.


Then the jetpack hook bar


All that's left is to weld everything up but not before I get the square rings in place on the bottom.
Shaping the gussets.
Then the jetpack hook bar
All that's left is to weld everything up but not before I get the square rings in place on the bottom.
Slave1Pirate117
Hunter
Look what I got! I bought ears from Shortfuse and some awesome stickers. I also grabbed up the wonderful cape greeble from Irongladiator! Cool package by the way!

Today I complained and thought and griped and thought about my helmet all day. There is a different post about that. But, when I got home from work, I went to work on the cape! Check it out.
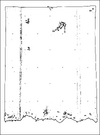
This is the state I left the cape in the other night. I trimmed the bottom to have the BASIC shape of the frayed edge.

Using a hammer against the fabric with the concrete behind it made for some really cool and fun results.


What was really fun was removing the cloth from the concrete. It was stuck to it. Soooo satisfying to pull it off haha. But I digress.
Following the printable template I made, I used a short metal rod about half inch in diameter at an angle and hit it with a hammer successfully smashing the paper and fabric into the concrete.


Lift the template now and again to check my work and lifting the fabric as well.


Wifey found this a fun and appealing process as well and wanted in. She began smashing holes in the bottom following the template. She also noticed from the CRL "pinholes that look like the start of new holes". So I got her a tapcon screw from the garage which she used for these pinholes.

*This is Maximus who wouldn't leave me alone as I wrote this post*

Here is the final result before being pulled off the concrete

And yes I included the satisfying part for your viewing pleasure!
Today I complained and thought and griped and thought about my helmet all day. There is a different post about that. But, when I got home from work, I went to work on the cape! Check it out.
This is the state I left the cape in the other night. I trimmed the bottom to have the BASIC shape of the frayed edge.
Using a hammer against the fabric with the concrete behind it made for some really cool and fun results.
What was really fun was removing the cloth from the concrete. It was stuck to it. Soooo satisfying to pull it off haha. But I digress.
Following the printable template I made, I used a short metal rod about half inch in diameter at an angle and hit it with a hammer successfully smashing the paper and fabric into the concrete.
Lift the template now and again to check my work and lifting the fabric as well.
Wifey found this a fun and appealing process as well and wanted in. She began smashing holes in the bottom following the template. She also noticed from the CRL "pinholes that look like the start of new holes". So I got her a tapcon screw from the garage which she used for these pinholes.
*This is Maximus who wouldn't leave me alone as I wrote this post*
Here is the final result before being pulled off the concrete
And yes I included the satisfying part for your viewing pleasure!
I dig it! Great jobLook what I got! I bought ears from Shortfuse and some awesome stickers. I also grabbed up the wonderful cape greeble from Irongladiator! Cool package by the way!
View attachment 231386
Today I complained and thought and griped and thought about my helmet all day. There is a different post about that. But, when I got home from work, I went to work on the cape! Check it out.
This is the state I left the cape in the other night. I trimmed the bottom to have the BASIC shape of the frayed edge.
View attachment 231371
Using a hammer against the fabric with the concrete behind it made for some really cool and fun results.
View attachment 231372
View attachment 231373View attachment 231374View attachment 231375View attachment 231376
What was really fun was removing the cloth from the concrete. It was stuck to it. Soooo satisfying to pull it off haha. But I digress.
Following the printable template I made, I used a short metal rod about half inch in diameter at an angle and hit it with a hammer successfully smashing the paper and fabric into the concrete.
View attachment 231377View attachment 231378
Lift the template now and again to check my work and lifting the fabric as well.
View attachment 231379View attachment 231380View attachment 231381
Wifey found this a fun and appealing process as well and wanted in. She began smashing holes in the bottom following the template. She also noticed from the CRL "pinholes that look like the start of new holes". So I got her a tapcon screw from the garage which she used for these pinholes.
View attachment 231382
View attachment 231383
*This is Maximus who wouldn't leave me alone as I wrote this post*
View attachment 231387
Here is the final result before being pulled off the concrete
View attachment 231384
And yes I included the satisfying part for your viewing pleasure!
View attachment 231385
Slave1Pirate117
Great job on the cape! I dig the little reveal video too. ShortFuse 's decals are really good too - He did my daughters Boushh stencils!
-Iron
Great job on the cape! I dig the little reveal video too. ShortFuse 's decals are really good too - He did my daughters Boushh stencils!
-Iron
Slave1Pirate117
Hunter
Indestructible pouch container construction. Lol say that 10 times fast.

Slave1Pirate117
Hunter
Oh! I forgot to add in the morning pictures of the cape after wash and hang dry!


Similar threads
- Replies
- 3
- Views
- 388