Custom Mandalorian Custom Mando - DarthFettious (working title / WIP)

Hey fellow Mandos...

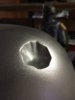
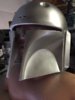
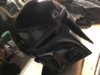
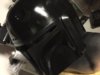
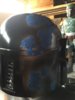
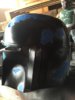
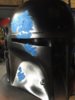
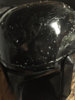
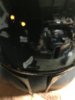
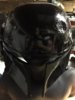
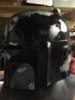
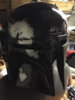
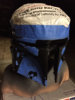
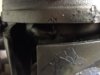
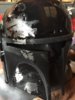
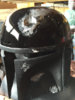
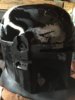
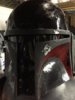
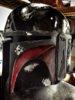
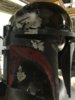
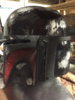
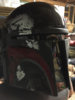
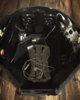
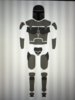
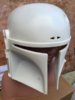
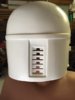
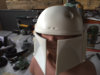
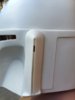
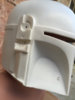
Began work on the helmet for a concept mando. Think if Vader was Mandalorian. (Strictly in regards to aesthetics not a Sith/Force using mando) This was more the inspiration and less meant as a mashup. Wanted to do something that was different and custom but still felt like it was in the SW universe (of that makes sense at all).

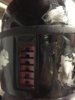
I'll keep a running thread of my progress. Some things will be familiar, experimental, resources what some have or have wanted to try and (hopefully) some new ideas.

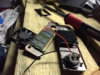
Feedback and advice welcomed and is greatly appreciated. I'll try include techniques used in the steps, but feel free to ask for clarifications. Ok... Let's get this thing started.

I've already got some work done, so the first few post/updates will be close to each other.

f07040438c032319af81a1a10b2d6a1d.jpg

ed708756c36f6dc32c7d6dbb664e8b58.jpg

4216ff0e7aff8293ffcd5d46b2aa1384.jpg

bb64e3c06914fbaaf363289103c63b3d.jpg
496ea19ac4ce2ceab89285e0704ea638.jpg
 

Attachments

  • 4216ff0e7aff8293ffcd5d46b2aa1384.jpg
    4216ff0e7aff8293ffcd5d46b2aa1384.jpg
    34.7 KB · Views: 266
  • ed708756c36f6dc32c7d6dbb664e8b58.jpg
    ed708756c36f6dc32c7d6dbb664e8b58.jpg
    31.4 KB · Views: 284
  • f07040438c032319af81a1a10b2d6a1d.jpg
    f07040438c032319af81a1a10b2d6a1d.jpg
    289.1 KB · Views: 284
  • 496ea19ac4ce2ceab89285e0704ea638.jpg
    496ea19ac4ce2ceab89285e0704ea638.jpg
    21.8 KB · Views: 270
  • bb64e3c06914fbaaf363289103c63b3d.jpg
    bb64e3c06914fbaaf363289103c63b3d.jpg
    244.9 KB · Views: 272
Last edited by a moderator:
Updated... Silver/metal layer applied. Mix of metallic and gray primer.

ab720475cec37ca6d8f7f11a8110b35c.jpg

7e0f80f1ce6c20ac13bc64d11483528c.jpg

9d48ed4424b1a21e569484f38e85f919.jpg

d06803f3ffa4e18c5ce6a186ff79d815.jpg
 

Attachments

  • 9d48ed4424b1a21e569484f38e85f919.jpg
    9d48ed4424b1a21e569484f38e85f919.jpg
    43.5 KB · Views: 296
  • 7e0f80f1ce6c20ac13bc64d11483528c.jpg
    7e0f80f1ce6c20ac13bc64d11483528c.jpg
    44 KB · Views: 274
  • ab720475cec37ca6d8f7f11a8110b35c.jpg
    ab720475cec37ca6d8f7f11a8110b35c.jpg
    39.8 KB · Views: 281
  • d06803f3ffa4e18c5ce6a186ff79d815.jpg
    d06803f3ffa4e18c5ce6a186ff79d815.jpg
    63 KB · Views: 267
Update... First layers of satin + gloss black
4f19a17dfc7705b6cedbd39cdc5494b8.jpg

5d0ddbbbbac483fb8a01a859ffd9eccb.jpg


Sent from my iPhone
 

Attachments

  • 4f19a17dfc7705b6cedbd39cdc5494b8.jpg
    4f19a17dfc7705b6cedbd39cdc5494b8.jpg
    282.3 KB · Views: 276
  • 5d0ddbbbbac483fb8a01a859ffd9eccb.jpg
    5d0ddbbbbac483fb8a01a859ffd9eccb.jpg
    35.9 KB · Views: 286
Update... Layered in some battle scars when I did the black satin

ecbd456284325b68ac895029ebcc20c4.jpg

ce110c48f3d1383257a782763224f944.jpg

2571b19e7a7000a81d7f4af74758d101.jpg


I like the tape method a bit better than liquid masking because it really sets a high edge on the paint layers. I wanted more of a paint chip from recent battle damage look rather than paint that looks weathered over time. Great effect, came out just right for what I'm shooting for. A little more time consuming... But you get out what you put in.

Then the "Vader" gloss. Got some wet sanding and polish in. Then a technique I like to do with clear coating:

Spray single layer of gloss black.
Flash for 2mins.
Spray second layer, think of gloss black.
Flash for 30seconds.
Then hit with clear coat. 1min. Flash, and another clear. Got the "Vader" finish I was shooting for with minimal polishing.

91996d86228b07adea967c89fde8966c.jpg
 

Attachments

  • 2571b19e7a7000a81d7f4af74758d101.jpg
    2571b19e7a7000a81d7f4af74758d101.jpg
    42.3 KB · Views: 277
  • ce110c48f3d1383257a782763224f944.jpg
    ce110c48f3d1383257a782763224f944.jpg
    47.3 KB · Views: 279
  • ecbd456284325b68ac895029ebcc20c4.jpg
    ecbd456284325b68ac895029ebcc20c4.jpg
    49.2 KB · Views: 255
  • 91996d86228b07adea967c89fde8966c.jpg
    91996d86228b07adea967c89fde8966c.jpg
    320.2 KB · Views: 264
A few finished (with this step/phase) shots...

b6aac10f8efeeba5ceaf1e1ad045d303.jpg

90ba977f80bb2d7d39e1d3093987e746.jpg


Yes... Mando 4 life. But I Utinni [emoji55]

b536d4b6493635d21437dfd15765d20c.jpg

9c69efd628f3ef3448099cedbbff43be.jpg

38c33c4f515bcf35d368157eda35c37e.jpg
 

Attachments

  • b536d4b6493635d21437dfd15765d20c.jpg
    b536d4b6493635d21437dfd15765d20c.jpg
    42.1 KB · Views: 432
  • 90ba977f80bb2d7d39e1d3093987e746.jpg
    90ba977f80bb2d7d39e1d3093987e746.jpg
    39.2 KB · Views: 282
  • b6aac10f8efeeba5ceaf1e1ad045d303.jpg
    b6aac10f8efeeba5ceaf1e1ad045d303.jpg
    45.4 KB · Views: 277
  • 38c33c4f515bcf35d368157eda35c37e.jpg
    38c33c4f515bcf35d368157eda35c37e.jpg
    41.9 KB · Views: 285
  • 9c69efd628f3ef3448099cedbbff43be.jpg
    9c69efd628f3ef3448099cedbbff43be.jpg
    288 KB · Views: 283
More wet sand and polish to knock out the orange peel. But once I hit again afterwards with another layer of the above mentioned technique... Came out smooth as can be.
 
As you can see in previous pics, I started the battle damage and build up the layers. Now more layering and detail to the damage

3229e8415bce2fa99aa6c061acc7ef29.jpg


After the build up and battle damage detail work, tapped and bagged for the satin black application

f014129d7a1e13051e68f54d61157d28.jpg


Satin black layers a more battle damage

427283242fb823cf626652ff728cc23d.jpg

1e9c4c2ce8f0c705a00ea8b7c8755718.jpg

d770043c9f9ca55701b17e77d4db5e8f.jpg
 

Attachments

  • f014129d7a1e13051e68f54d61157d28.jpg
    f014129d7a1e13051e68f54d61157d28.jpg
    322.3 KB · Views: 241
  • 3229e8415bce2fa99aa6c061acc7ef29.jpg
    3229e8415bce2fa99aa6c061acc7ef29.jpg
    44.9 KB · Views: 284
  • d770043c9f9ca55701b17e77d4db5e8f.jpg
    d770043c9f9ca55701b17e77d4db5e8f.jpg
    57.9 KB · Views: 265
  • 1e9c4c2ce8f0c705a00ea8b7c8755718.jpg
    1e9c4c2ce8f0c705a00ea8b7c8755718.jpg
    324 KB · Views: 272
  • 427283242fb823cf626652ff728cc23d.jpg
    427283242fb823cf626652ff728cc23d.jpg
    52.9 KB · Views: 275
After the satin black, battle damage detail, more detail to metal layer... My mando "Rohm Ikaydyc" began to show with the addition of the red highlight

1d0c32b06f1d92a3d6ea32646a1e7775.jpg

9d78b079dc3438d3c532734fda7bf993.jpg

f77a96c8e757ae248cb3e3a0e8686060.jpg

3859d77fdc171f12926c9600633cc31a.jpg


And then with lense installed,

29422a3235547c3805fe6a2a8bc733b3.jpg

29debc024fdc3199f78601a87b2fb14d.jpg
 

Attachments

  • 29422a3235547c3805fe6a2a8bc733b3.jpg
    29422a3235547c3805fe6a2a8bc733b3.jpg
    52 KB · Views: 273
  • 3859d77fdc171f12926c9600633cc31a.jpg
    3859d77fdc171f12926c9600633cc31a.jpg
    65.7 KB · Views: 278
  • f77a96c8e757ae248cb3e3a0e8686060.jpg
    f77a96c8e757ae248cb3e3a0e8686060.jpg
    43.9 KB · Views: 281
  • 9d78b079dc3438d3c532734fda7bf993.jpg
    9d78b079dc3438d3c532734fda7bf993.jpg
    49.5 KB · Views: 285
  • 1d0c32b06f1d92a3d6ea32646a1e7775.jpg
    1d0c32b06f1d92a3d6ea32646a1e7775.jpg
    321.3 KB · Views: 274
  • 29debc024fdc3199f78601a87b2fb14d.jpg
    29debc024fdc3199f78601a87b2fb14d.jpg
    293.6 KB · Views: 270
Looking good, been following this on your IG too.

Sent from my SM-G900P

Megasupercritic right?

Right on! Thanks for the support and feedback. Got a lot more coming. Just been gather more materials for the rest of the build and making sure everything I'm doin to the bucket is how and where I want it.

Lots of temporary placement and fittings but I think I got everything pinned down now.
 
Updates:

Adding some aesthetic (non functioning) pieces

cd35c0b0150f37dd40574dd3b354be1a.jpg


As well as starting on the functional electronics

a151721e61e67848519776555a64e892.jpg


8d65ac47c3dca305ba62ec5e1ac2279c.jpg


All test fitting now. Few test runs the. Permanent installation
 

Attachments

  • cd35c0b0150f37dd40574dd3b354be1a.jpg
    cd35c0b0150f37dd40574dd3b354be1a.jpg
    321.4 KB · Views: 262
  • a151721e61e67848519776555a64e892.jpg
    a151721e61e67848519776555a64e892.jpg
    378 KB · Views: 258
  • 8d65ac47c3dca305ba62ec5e1ac2279c.jpg
    8d65ac47c3dca305ba62ec5e1ac2279c.jpg
    352.6 KB · Views: 258
Update... I have a name for my mando that I would like to use. Welcome any/all feedback on it:

Rohm Iy'Kadaysh (Rom - Eye - KuhDay-Ish)

It derived from the Mandoa' term:

"Ramikadyc" - commando state of mind - an attitude that he/ she can do anything, endure anything, and achieve the objective. A blend of complete confidence and extreme tenacity instilled in special forces during training. Can also be used informally to describe a determined, focused individual.

Probably not the most original origin but hope i departed enough to give it some uniqueness.
 
Since I have to take a break from the bucket (outside is essentially complete and I need to order some items for the inside and no budget to do so) I started concepting the body armor.

I have the luxury of planning this out from a clear canvas up to full illustration. So this too will be a step by step account. First... The basic shape and styling

(I'll be exporting better pics after this first)
1f61e1d3aa3e839a8ed49b832c6d0320.jpg
 

Attachments

  • 1f61e1d3aa3e839a8ed49b832c6d0320.jpg
    1f61e1d3aa3e839a8ed49b832c6d0320.jpg
    30.7 KB · Views: 271
Also, you might notice (although dark pic) a variation on the visor/teeth on the bucket. I'm contemplating a bit more customized look. Feedback definitely welcome here as I don't know which I like best and/or if I'm totally sold.

Let me know which I like best, from left to right - 1 / 2 / 3 or none. Thanks!!

cd528053a2d087a31fd7328ee2c90d0e.jpg
 

Attachments

  • cd528053a2d087a31fd7328ee2c90d0e.jpg
    cd528053a2d087a31fd7328ee2c90d0e.jpg
    206.3 KB · Views: 247
This thread is more than 8 years old.

Your message may be considered spam for the following reasons:

  1. This thread hasn't been active in some time. A new post in this thread might not contribute constructively to this discussion after so long.
If you wish to reply despite these issues, check the box below before replying.
Be aware that malicious compliance may result in more severe penalties.
Back
Top