Stylized turned to Accurate Pre Pro 2 slow build

Fettacini

Hunter
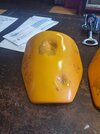
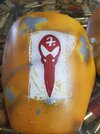
As stated in the new title, after getting mostly done with a stylized build I got deep into it. So I have started replacing parts and repainting things to reflect a more accurate version. So please welcome to my modified thread where I turn a stylized Prepro2 into a more accurate Prepro2. Huge thanks to Rafelfett, Brokk, NorCal Cap, FlamerFett, Hawk01, DennisFett, and OrdMantell for all the inspiration. I know I’m forgetting some so I apologize. As always please feel free to chime in with detail corrections and feedback!


Good afternoon everyone, I have started my concurrent Pre Pro 2 build( doing a ROTJ SE build along side it but have not posted anything due to it being the very first Fett costume I have built so I wanted to make sure I can produce some quality content and have someone get something out of it)

So, disclaimer, I am not going for complete accuracy, as an artist and having fond memories of the Kenner Promo photos and the Screaming 1/4 scale model kit and the life size stand up, I have this idea of what the Pre Pro 2 looks like in my head.

Needless to say, memories can be malleable and your brain is a funny thing. Well after seeing a set of cheap Chinese brown "pre pro" Boba Boots on ebay, I couldn't resist making my stylized PP2.

These boots are marketed as "space cowboy Beebop" boots lol. But they have this brownish tan scheme that I would have sworn the pre pro 2 boots had, until looking at references now.

I decided I want to build this suit for me and I will make it stylized. So I'll use my cheap ebay brown boots and run with things from there. It's funny how one item can start a whole costume.

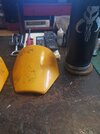
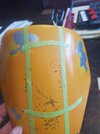
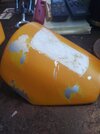
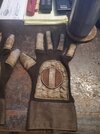
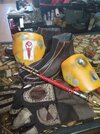
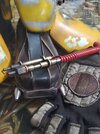
So without further ado, I will walk through my build. As of now I just have the boots, gloves, and working on the shoulders. So this will be a slowly evolving thread and I will update it as much as possible but there may be large gaps as I am building this in real time.

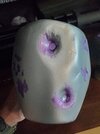
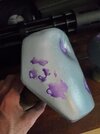
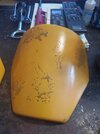
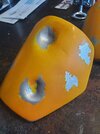
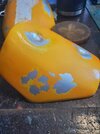
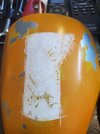
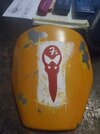
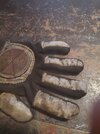
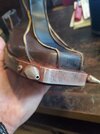
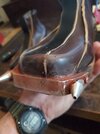
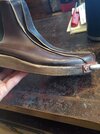
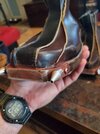
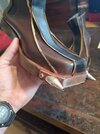
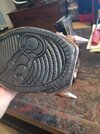
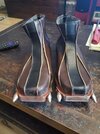
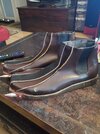
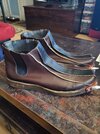
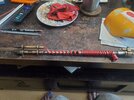
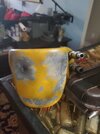
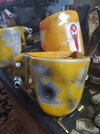
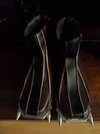
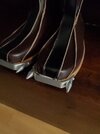
So here are those boots, pre weathering and having just attached Quest boot spikes. I will say, these boots are very comfortable and I ordered a size up thinking that like all things from China, the sizing would run small, however it does not with these. I just added some insoles to take up space and they work just fine. I will update you on the weathering and finishing of these as it happens
 

Attachments

  • 20210407_112629.jpg
    20210407_112629.jpg
    1.1 MB · Views: 241
  • 20210407_112632.jpg
    20210407_112632.jpg
    1.5 MB · Views: 230
Last edited:
Next up is the shoulder armor. I am once again using Quest brand esb shoulders and had to use a heat gun to "undent" and then re-dent the right shoulder. I also used some filler putty to fill the dents on the sides and used my palm sander to smooth everything out.
My base is Rustoleum filler primer and then Duplicolor universal silver( very smooth and tough base silver).

I am using Humbrol liquid mask applied with these little tiny pointy sponge brushes I got on amazon.
 

Attachments

  • 20210407_112603.jpg
    20210407_112603.jpg
    2.2 MB · Views: 212
  • 20210407_112606.jpg
    20210407_112606.jpg
    1.4 MB · Views: 211
  • 20210407_112601.jpg
    20210407_112601.jpg
    1.4 MB · Views: 208
  • 20210407_112556.jpg
    20210407_112556.jpg
    1.8 MB · Views: 208
  • 20210407_112554.jpg
    20210407_112554.jpg
    2 MB · Views: 207
  • 20210407_112552.jpg
    20210407_112552.jpg
    1.8 MB · Views: 207
So I am using these two Tamiya sprays to achieve my colors. The lighter yellow being sprayed first then masked then I spray the darker yellow.
I also used line striping orange misted over that final darker yellow to punch up the contrast a bit. This was done at a distance, basically creating a cloud of orange mist and dragging the plates through it.
 

Attachments

  • 20210407_112614.jpg
    20210407_112614.jpg
    1.2 MB · Views: 210
  • 20210408_105920.jpg
    20210408_105920.jpg
    1.9 MB · Views: 213
  • 20210408_105923.jpg
    20210408_105923.jpg
    2 MB · Views: 224
  • 20210408_105926.jpg
    20210408_105926.jpg
    2 MB · Views: 231
Here they are unmasked, and I have started the skull. I just taped it off and fused a sponge to dab the white paint on, then un taped it and used a fine brush and sponge to start working the overstay splatter and lining, still working on it now so this is where I am at with these.

Hugw shout out to Rafelfett for his amazing work on the templates!
 

Attachments

  • 20210408_110623.jpg
    20210408_110623.jpg
    1.6 MB · Views: 215
  • 20210408_121336.jpg
    20210408_121336.jpg
    1.7 MB · Views: 217
  • 20210408_121342.jpg
    20210408_121342.jpg
    1.3 MB · Views: 219
  • 20210408_121347.jpg
    20210408_121347.jpg
    1.9 MB · Views: 199
  • 20210408_121351.jpg
    20210408_121351.jpg
    1.4 MB · Views: 196
  • 20210408_121356.jpg
    20210408_121356.jpg
    1.8 MB · Views: 193
  • 20210408_121400.jpg
    20210408_121400.jpg
    1.6 MB · Views: 211
I started to hand paint the skull on the shoulder armor. This is a deceptively simple yet complex shape. It has taken many times to get it right, it's asymmetrical and looks to be hand painted on the real thing so trying to replicate the asymmetry was difficult ad I kept wanting to make it symmetrical.

I still need to tweak it but it's mostly there. I will lightly shade these shoulders with some airbrush work and call them done. The PP2 shoulders appear pretty clean and lack any scorching or blast marks and lack all of the cool "accidental" paint apps and damage that other shoulder have.

Ad stated, since it's "stylized" I may add some weathering to make it more interesting but I'm trying to not go overboard.
 

Attachments

  • 20210409_055022.jpg
    20210409_055022.jpg
    2 MB · Views: 217
  • 20210409_055025.jpg
    20210409_055025.jpg
    1.7 MB · Views: 208
  • 20210409_055029.jpg
    20210409_055029.jpg
    1.9 MB · Views: 219
While I work on the shoulders, let's show off the gloves! So I scored a set of ESB gloves and ROTJ gloves on Ebay ( maker unknown, although they appear to be Man of War gloves but they are second hand).

Well the RoTJ gloves are going with my SE suit and since the Pre Pro gloves appear to be ESB gloves dyed brown. I thought I would give it a go.

So I picked up the desert version of the 7th infantry patch and had to do a ton of searching bc no one talks about what the other patch is, its the Training Doctrine and Command Patch. They also have a desert version which I got for about 2 bucks on ebay.
Armed with some rit dye ( coco brown) for synthetic fibers I plunged both the gloves and the patches in for a looooooooong time. Man it took some time for them to soak up some color.

Anyways, here is the result!
 

Attachments

  • 20210409_060029.jpg
    20210409_060029.jpg
    1.7 MB · Views: 216
  • 20210409_060022.jpg
    20210409_060022.jpg
    1.2 MB · Views: 211
  • 20210409_060019.jpg
    20210409_060019.jpg
    1.7 MB · Views: 200
  • 20210409_060042.jpg
    20210409_060042.jpg
    1.4 MB · Views: 216
  • 20210409_060038.jpg
    20210409_060038.jpg
    1.4 MB · Views: 220
  • 20210409_060034.jpg
    20210409_060034.jpg
    1.6 MB · Views: 206
  • 20210409_060047.jpg
    20210409_060047.jpg
    1.2 MB · Views: 207
So now I can show you a little more of the shoes. I know ,I know, they aren't accurate, but they scream Pre Pro 2 to me and I like them! Lol.
So I used Quest( I can't say enough great things about Quest of Canada, they have quality machined aluminum Boba products at reasonable prices and shipping is fast to the states here, I also love thier armor parts as well, very nice products and nice folks!) spikes for them, I had to cut the front of the sole off a bit, basically shave it down to be flat so I could sit the spike strip back further and then gently bent the strip in a few places to better fit.
I used long (1" 1/2 " ) self tapping sheet metal screws to secure them and then filled the void in between the sole on both sides ( top and bottom) with black flexible automotive sealant. This stuff was great, it dried quick, to the consistency of hard rubber and really locked the spike strip in place and blended it with the boots.

I should also mention that before all this I unscrewed the spikes and used a bit of red loc tight on the screw for the spikes so they would wiggle loose.

After all this I used black acrylic paint to cover the soles and wiped it off. I did this a few times and achieved a darker color with some shading on the soles.
I then scuffed up the boot toes with sandpaper and used some dark red and brom Vallejo color acrylics on the spikes to age and "rust" them. I basically just brushed it on rather haphazardly and wiped it off. I then used Vallejo weathering powder "rust" to again add some color and finished that off with a buffing of sandpaper.

I plan on going in with an airbrush to shade the whole boot a bit more but I like my brown inaccurate "cowboy beebop" Boba boots!
 

Attachments

  • 20210410_102059.jpg
    20210410_102059.jpg
    1.5 MB · Views: 212
  • 20210410_102101.jpg
    20210410_102101.jpg
    1.6 MB · Views: 205
  • 20210410_102105.jpg
    20210410_102105.jpg
    1.8 MB · Views: 198
  • 20210410_102113.jpg
    20210410_102113.jpg
    1.8 MB · Views: 210
  • 20210410_102118.jpg
    20210410_102118.jpg
    1.6 MB · Views: 193
  • 20210410_102118.jpg
    20210410_102118.jpg
    1.6 MB · Views: 203
  • 20210410_102122.jpg
    20210410_102122.jpg
    1.8 MB · Views: 208
  • 20210410_102129.jpg
    20210410_102129.jpg
    2 MB · Views: 202
  • 20210410_102134.jpg
    20210410_102134.jpg
    2 MB · Views: 185
  • 20210410_102138.jpg
    20210410_102138.jpg
    2.2 MB · Views: 210
Further notes about the boots, I will probably hammer the screw heads flat to get rid of the Philips head slots in them, and I'm still working on a way to get rid of the "air" logo on the outside of the soles, being Chinese loosely manufacturered boots I have a feeling these came out of a general knockoff shoe factory where they have some generic "Nike air" soles ( not the basketball logo on the bottom of the sole lol). I may just shave it off and repaint and weather the soles.
Overall I'm happy. As I am shooting for a stylized and artistic interpretation of the Pre Pro 2.

Now when my armor comes in, I will be using Rafelfett's templates so that will be very close but with some weathering and artistic license.

I hope you all can see beyond the blasphemy of "stylized " and appreciate it for just being a fun project to make my childhood memory of Boba Fett real
 
So while we wait for my armor and helmet to come in, I will be doing a run down of stuff to get.

I have purchased a Man of War jetpack, from the man of war himself and am eagerly awaiting it! I will be using this pack for my RoTJ SE and just subbing it in for my Pre Pro 2 since they are so similar, so I will cover the build and paint here in this thread. ( I know there are differences , but I am not going for 501st approval or complete accuracy, I just want it to be a recognizable Pre Pro2 Fett).

I also purchased some ESB gauntlets from Christian as well and will be putting those together shortly for the Pre Pro2 here, and if anyone has seen my review of the Marco Enterprises Boba Costume, I already have a pretty darn good PP2 flamer, I may change some parts to metal but otherwise it's good. I bought a vintage coiled red telephone cord and a metal sheethed USB cord for the 2 cords on the flamer.
I also have some cannon Itt plugs from the trash pile that I will use for the gauntlet hoses and have another girthbelt to be dyed brown soon.
I need to get a flight suit and will probably use the cheaper, tighter fitting one found on ebay and alie express ( I have that already and man, its worth every penny, actually a great flight suit and vest). I'll save my future Arkady purchase for my RoTJ SE, as that's where I want the very best!
I'll have to experiment with dye for the flight suit though.
I plan on getting the Handmade Horror pouches and belt, as his price point is great and I can use it for both SE and the Pre Pro.
The helmet I have coming from second hand from a member on the board as he is selling off old parts that he is not using, it has some small imperfections but its nothing I can't fix and the price was right.

The armor I am still torn about. I will either be doing armor from Wasted Fett, or RKD, as both have thier pros and cons. The RKD armor in thier super trooper kit will allow me to put the dents in where I need them so I am leaning towards that and just doing Wasted Fett armor for my SE.
Anyways, that's where I am at, ill attempt to update this as I go and hopefully you all get some joy or inspiration or fun out of this project
 
Little bit of work on the flamethrower, this is the Marco Enterprises part that comes with his suit. Its mostly plastic and aluminum tubing.

I used a red coiled telephone cord from. Ebay. I have only just begun weathering it and honestly I may change it to all metal but I'm also kind of okay with how it looks.
I hit it with black acrylic paint and used a scotchbright pad to rub some of that off and gold rub and buff on the brass parts.

I have a metal sheethed cord coming for the second hookup cord and have several additional weathering and small.parta to do. Juat wanted to give you an overall look at it.
 

Attachments

  • 20210411_200513.jpg
    20210411_200513.jpg
    1.1 MB · Views: 204
  • 20210411_200516.jpg
    20210411_200516.jpg
    1.2 MB · Views: 195
  • 20210411_200518.jpg
    20210411_200518.jpg
    1.9 MB · Views: 206
  • 20210411_200540.jpg
    20210411_200540.jpg
    1.9 MB · Views: 207
  • 20210411_200549.jpg
    20210411_200549.jpg
    1.1 MB · Views: 210
  • 20210411_200645.jpg
    20210411_200645.jpg
    1.5 MB · Views: 207
  • 20210411_200607.jpg
    20210411_200607.jpg
    1.5 MB · Views: 182
  • 20210411_200551.jpg
    20210411_200551.jpg
    1 MB · Views: 183
  • 20210411_200724.jpg
    20210411_200724.jpg
    1.2 MB · Views: 197
  • 20210411_200651.jpg
    20210411_200651.jpg
    1.2 MB · Views: 185
  • 20210411_200648.jpg
    20210411_200648.jpg
    1.6 MB · Views: 197
Sorry about the blurry pictures, I will post clear pictures shortly and give a little bit more detail. As stated, this will be mounted on Man of War ESB gauntlets.
 
Always cool seeing another Pre Pro 2
Thanks man, your build is in my " saved pages" tab and I constantly look at it for inspiration. I really appreciate you commenting.
I am always open to feedback and constructive criticism. This is a loose interpretation so accuracy will be loose on some areas and tight in orhers.
 
Thanks man, your build is in my " saved pages" tab and I constantly look at it for inspiration. I really appreciate you commenting.
I am always open to feedback and constructive criticism. This is a loose interpretation so accuracy will be loose on some areas and tight in orhers.
No worries on the accuracy pressure man. Theres always room for that later on if you decide to go that way. I've fallen madly in love with the pre pro 2 so I love any form of it really haha

Lastly, that means a lot to me it's on your saved tabs. Keep up the good work
 
I’m loving this build so far! Keep up the work I’ll definitely be keeping up with this thread! Also if you want you can check out my WIP if you want it’s ESB but hey it’s still Fett
 
I’m loving this build so far! Keep up the work I’ll definitely be keeping up with this thread! Also if you want you can check out my WIP if you want it’s ESB but hey it’s still Fett
Absolutely man! I'm loving your build so far, I have looked at it many times, I have a bad habit of just browsing and not liking or commenting but I have definitely been a fan of your work for a while! Thank you so much for watching this build, got some exciting stuff coming, decided to pull the trigger on the dentless RKD armor from Imperial Outpost and will be adding my own dents since the Pp2 is a mix of RoTJ and ESB.

Then of course I have my gauntlets build coming soon!
 
Thanks man! Yeah I'm alright with my "artistic interpretation " of it, ill be making the armor accurate and will be about 85 to 90% there on accuracy, I just want to make the suit that I remember from my childhood, more of a Pre Pro 2 idealized version. I am also a fan of weathering, all the RoTJ SE storage marks and accidentsl paint splatter and marks look so cool that I just can't help but add some shading to the shoulders and some marks.

Side note, I eneded up repainting the shoulders lol. I airbrushed some black shading and my airbrush decided to sputter and shoot a nice blast of black spatter on both.. . . .. ugh oh well. Off we go again!
 
Did some more work on the flamer, added the fuel tube to the front and coiled the red telephone cable around the right way this time (doh!). Added some soot and rust staining using Vallejo pigment powder.

Honestly, I think I'm going to leave it as is. Changing everything to metalnis cool and all but this it light and after some rub and buff gold it looks pretty cool. I have added another section of aluminum tubing on the inside to tighten it up but it still extends and retracts. There are two screws already on the side to attache my mount brackets too. Juat waiting on my metal sheethed USB cord to come in from China ( ugh, should have just gone to Walmart), to replicate the second cable.

I'm honestly shocked at how well this was made from the Marco Enterprises costume. Literally all he had was the old promo photos and he got it shockingly close!
 

Attachments

  • 20210413_111736.jpg
    20210413_111736.jpg
    1.6 MB · Views: 168
  • 20210413_111743.jpg
    20210413_111743.jpg
    1.6 MB · Views: 176
  • 20210413_111748.jpg
    20210413_111748.jpg
    1.7 MB · Views: 173
  • 20210413_111759.jpg
    20210413_111759.jpg
    1.9 MB · Views: 188
  • 20210413_111803.jpg
    20210413_111803.jpg
    1.7 MB · Views: 171
  • 20210413_111809.jpg
    20210413_111809.jpg
    3 MB · Views: 168
  • 20210413_111817.jpg
    20210413_111817.jpg
    3.2 MB · Views: 175
  • 20210413_112307.jpg
    20210413_112307.jpg
    1.8 MB · Views: 185
So I went a little.heavy on my weathering on the shoulders so I repainted them fro. The ground up, here are the shoulders now with a little stylized weathering
 

Attachments

  • 20210413_141606.jpg
    20210413_141606.jpg
    2.1 MB · Views: 182
  • 20210413_141609.jpg
    20210413_141609.jpg
    2.1 MB · Views: 182
  • 20210413_141613.jpg
    20210413_141613.jpg
    2.1 MB · Views: 187
  • 20210413_141624.jpg
    20210413_141624.jpg
    2.3 MB · Views: 177
  • 20210413_141636.jpg
    20210413_141636.jpg
    1.9 MB · Views: 173
  • 20210413_141629.jpg
    20210413_141629.jpg
    1.8 MB · Views: 182
Just for fun. Here is my pile of Pre Pro 2 goodies so far.

I haven't gone over the knees as I wasn't too happy with them. My RKD armor set coming has some great knees in the kit so I will.probay yank out the turned metal darts and install them on the RKD knees.
 

Attachments

  • 20210413_141735.jpg
    20210413_141735.jpg
    2.2 MB · Views: 182
  • 20210413_141839.jpg
    20210413_141839.jpg
    1.8 MB · Views: 199
  • 20210413_141755.jpg
    20210413_141755.jpg
    2 MB · Views: 186
  • 20210413_141812.jpg
    20210413_141812.jpg
    1.9 MB · Views: 181
  • 20210413_141818.jpg
    20210413_141818.jpg
    1.1 MB · Views: 177
  • 20210413_141826.jpg
    20210413_141826.jpg
    1.4 MB · Views: 180
  • 20210413_141835.jpg
    20210413_141835.jpg
    1.5 MB · Views: 182
This thread is more than 1 year old.

Your message may be considered spam for the following reasons:

  1. This thread hasn't been active in some time. A new post in this thread might not contribute constructively to this discussion after so long.
If you wish to reply despite these issues, check the box below before replying.
Be aware that malicious compliance may result in more severe penalties.
Back
Top