Santa's Jango Build - Approved

Just some small updates! Have been traveling for work for the whole month of January, but planning to finishing up the blasters and do the prep for the jetpack this weekend.

Updates from vendors:
Vest is completed and has been shipped, should have it this week or early next.
Armor and gauntlets should be completed and shipped out this week.
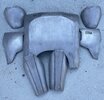
Helmet is very close to completion and should be shipped this week. ChrisThePropGuy sent some pics and it looks awesome!

1643728819337.png

1643728848921.png
 
So. Much. Sanding.

Some more touchup work to do before paint. Weather has been pretty bad so will hold off for now on paint. Super happy with the kit, would absolutely recommend it to anyone.

1644253883499.png
 
Well the weather started to cooperate until it didn't. Paint definitely smudged when reassembling the different parts, but plan to add some weathering around the rougher areas and I realized after I glued the triggers in that they are suppose to be chrome. But I say for a knock around pair of blasters, these will work just fine!

One day I may look for a full metal set for special occasions.

1644279690620.png
 
Got my Arkady Designs flight suit today and it is perfect! The material is some seriously quality stuff and has just enough stretch that is is very easy to move around in. I do plan on getting it taken in just slightly around the legs and hemmed just a bit just so it's a bit more fitted. but could not be happier with a custom piece!

Adding two pictures in different lightning. I know it is to be expected about the blurple, but it really is incredible how it looks like distinctly different colors based on the lighting.

1645130715714.png


1645130745804.png
 
I think I have fallen into the "life" trap that so many builders face. Good news is all my parts have officially arrived or have been purchased!

I have plans to start prepping the jetpack and sanding/polishing the CC armor this weekend. Hoping to have some progress soon.
 
Almost done painting the jetpack, but curious what to do about the blue color. Based on an older thread, it should be a base coat of the Royal Blue and a dusting of the Blue Hyancinth and a dusting of a Purple, which I do not have the Purple on hand.

I used the detachable back piece to show the difference in the Royal Blue and a Royal Blue with a dusting of Blue Hyacinth. Any thoughts on which should be the color I go with? Just Royal or Royal with dusting?

1651254474453.png


1651254527370.png


1651254543640.png
 
Unplanned update, but I was tired of looking at the armor in the box so decided to give myself carpal tunnel and sand and polish up all the cold cast. Lighting is pretty bad in my garage so the shine doesn't really come through, but I am super happy with the results. The cold cast really gives it a "real" weathered look.

Used a 220 grit to knock off most of the top layer and then finished up with a pretty thorough buff with steel wool and then mothers mag and aluminum polish. Word of caution, I would NOT use acetone with cold cast. Maybe that should be obvious, but I am so use to use it as a cleaner on metals. It almost put a pretty good stain on my cod piece.

I do have to get a heat gun to shape the shoulders and boot covers a bit and then next steps are get brave and start punching holes in the vest!

1651517849936.png
 
Two updates in one day, man I must have caught the itch.

Jetpack definitely needs a few touch ups here and there, but honestly this was my most feared part of the whole build. I consider myself a VERY below average painter/taper/whatever you want to call it. Followed the SaxeCoburg thread (huge shoutout!). Started with white, then yellow, then red, the blue. Lots and lot of tape and patience and a bit over a week for that enamel paint to dry, I am beyond happy with this result. Will let it dry all over for a few days after the touchups and then hit it heavy with the weathering. Ordered some decals from Lucky and have the other small bits painted as well and will assemble once its clear coated. BIG step done in my book!

1651532389493.png
 
Did some light weathering, will get back to it once the decals arrive. Going to add magnets to keep the rocket attached to the base and attach the thrusters through pvc.

1651598916984.png
 
Did some weathering today. Also took the heat gun to a couple armor pieces to fit my body a bit better. Still need to get the flight suit altered but will start attaching armor the flak vest starting tomorrow!

Seeker harness was ordered so getting pretty close to trying everything on.
 

Attachments

  • E051DEA7-910D-447E-8DA7-0C0081DFD76B.jpeg
    E051DEA7-910D-447E-8DA7-0C0081DFD76B.jpeg
    3.1 MB · Views: 106
Small update for the weathered helmet, used the same technique as the armor. Watered down black and raw umber acrylics and dabbed into corners then dabbed dry with a paper towel. Used steel wool to knock down any spots that were too dark. I may go heavier with the bucket and armor later on, but for starters gonna keep it a more subtle weathering. Pictures hard to do it justice as well.

1652893182121.png
 
NEVER want to do this step again, but got the majority of the armor attached to the vest via snaps. I think I took a few years off my life during the process. All in all I could have lined it up slightly better, but I am super happy with the outcome and happy the "scariest" step is over with. The pics may look a little off as I am home alone so had to do my best closing up the vest by myself.

Good news always comes with some bad though. As I was dremeling the back of the center piece to get the snaps to sit more flush, I poked a hole straight through the front. Will have to source a new one, but if that's the worst mistake of this build then I will be a happy camper.

And yes, bathroom mirror pics are absolutely the way to go for build threads.

1652986510292.png


1652986561355.png
 
Last edited:
You could fix up that center piece and the repair wouldn’t be noticeable.
Just mix up some 5 min epoxy, tape off the area that needs to be filled and fill from the back. You will probably need to sand a little to get it flat and then hit the center rectangle with rub n buff. No one will ever see the repair but you, and only if you look close.

Yah pretty easy fix, but Dave at DC Props was awesome and is sending me some hoses for the gauntlets and said he would go ahead and include a new center piece as well. I'll definitely hold on to it with the mistake just as a good luck charm!
 
Question for the Jangos out there, do you all just do two snaps or rivets or whatever you use per side on the top of the back plate near the shoulder? Before I punch the holes I was hoping to get some clarification on what's "standard". The armor and shoulders are all secured down in pretty much every corner, but wasn't sure what worked best for the back plate and I assume it needs to come on and off when suiting up and desuiting to get the jetpack situated. Also seems like attaching near the shoulders and letting it hang more or less seemed good enough.

If you all add anything outside where the picture in marked feel free to chime in. Thanks!
1653327272062.png
 
Question for the Jangos out there, do you all just do two snaps or rivets or whatever you use per side on the top of the back plate near the shoulder? Before I punch the holes I was hoping to get some clarification on what's "standard". The armor and shoulders are all secured down in pretty much every corner, but wasn't sure what worked best for the back plate and I assume it needs to come on and off when suiting up and desuiting to get the jetpack situated. Also seems like attaching near the shoulders and letting it hang more or less seemed good enough.

If you all add anything outside where the picture in marked feel free to chime in. Thanks!
View attachment 223838
Cruzer used a hook and eye set like this (https://www.amazon.com/Kenkio-Sewing-Closure-Trousers-Silver/dp/B07CKHTJH8) at each of the 4 locations you marked. Hook on the back plate and eye on the vest. In-between the locations you marked he used another single button snap.
 
This thread is more than 1 year old.

Your message may be considered spam for the following reasons:

  1. This thread hasn't been active in some time. A new post in this thread might not contribute constructively to this discussion after so long.
If you wish to reply despite these issues, check the box below before replying.
Be aware that malicious compliance may result in more severe penalties.
Back
Top