Reworking the old Hasbro Helmet into a Holiday/Droids Boba Fett version

Fettacini

Hunter
Hello everyone, my name is Hoyt. I have been building props and models for the better part of 25 years( that doesn't mean I'm good at it though lol).
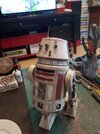
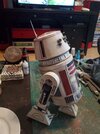
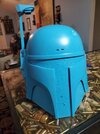
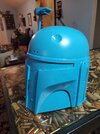
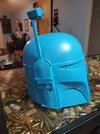
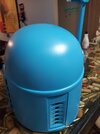
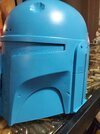
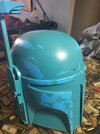
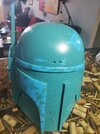
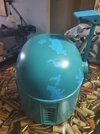
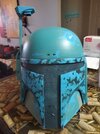
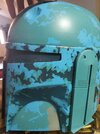
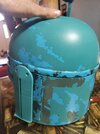
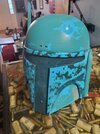
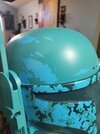
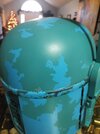
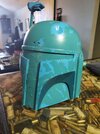
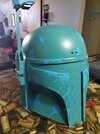
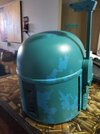
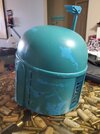
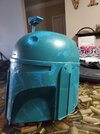
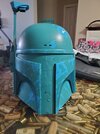
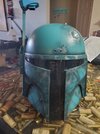
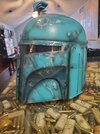
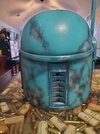
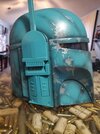
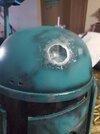
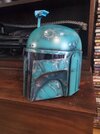
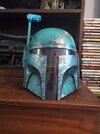
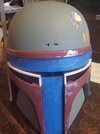
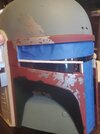
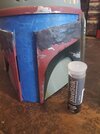
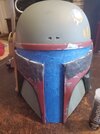
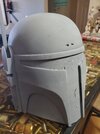
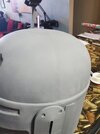
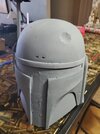
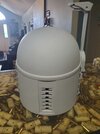
Like everyone here i have always loved Boba Fett. So after lurking for a while I decided to take the plunge and to shake the dust off I decided to take one of my old Hasbro helmets( you all know the one, the huge visor and sound fx version) and mod it to be a Droids / holiday version.

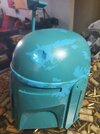
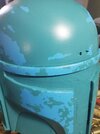
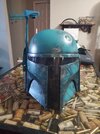
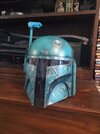
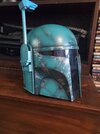
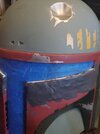
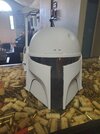
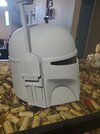
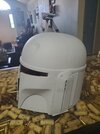
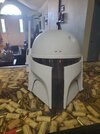
I feel that the slightly cartoony dimensions really lend themselves to doing this and this will be a fun way to start slapping some paint around and familiarize myself with the general shapes and shading of the Boba Bucket.

Now, a little back ground, I like most of yall started collecting as a child, I had wonderful parents who supported my hobby and model building and before I was even 13 I had amassed a large collection of vintage figures, don post helmets and all sorts of cool stuff. When I was 17 I lost my entire collection when our house flooded.

This taught me a valuable lesson. I had everything I ever wanted as a child( I was blessed and lucky, and I didn't know it) and then it was all destroyed, leading me to a much needed life lesson about what it really important. So as an adult I have started rebuilding my collection, using my painting and building skills to fund my hobby.

Anyways, that just gives you an idea of where I am at, im thankful to be doing any of this, and I am grateful for all of you wonderful people who are here supporting and informing us( hobbyist).

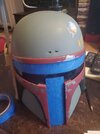
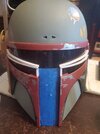
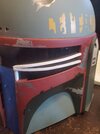
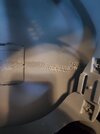
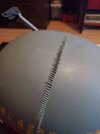
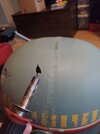
So without further delay, let's start turning this old Hasbro helmet into a neat display helmet.
 

Attachments

  • 20201221_132233.jpg
    20201221_132233.jpg
    1.7 MB · Views: 203
  • 20201221_132239.jpg
    20201221_132239.jpg
    1.7 MB · Views: 193
So I forgot to preface everything ( squirrel! ) ( I will constantly forget what I wanted to say and get distracted, I apologize in advance to anyone who reads this thread) with i am not going for any movie, cartoon, cannon or 501'st accuracy. This is purely a fun project to get to know the shapes of a Boba helmet and bc I recieved a Black series helmet along with a couple of resin kits from the fam for Christmas, the black series now replaces my old hasbro as the "stock toy helmet" in my Boba collection.

So I used some styrene square stock to block out the visor section. Honestly, since in making a life size version of a cartoon( not a super accurate one like the helmets o have seen here) the biggest issue is the horizontal portion of his visor. Its just too large( vertically wide). So in my head, if I just make that a bit smaller then I have a decently serviceable helmet to practice on.

So I used super glue carefully to attach the strips, I then realized I didn't make the angle sharp enough, and I was going to fill in the blocked off portion with epoxy anyway so I added another set of framing strips.
 

Attachments

  • 20201221_135112.jpg
    20201221_135112.jpg
    1.7 MB · Views: 177
  • 20201221_135117.jpg
    20201221_135117.jpg
    1.6 MB · Views: 179
  • 20201222_091654.jpg
    20201222_091654.jpg
    1.6 MB · Views: 166
  • 20201222_091657.jpg
    20201222_091657.jpg
    1.6 MB · Views: 172
Ok, so I didn't start this thread until I had the helmet at a point to where I knew I could paint it, so this will be me replying to myself a few times to show you the process up to that point, I hate threads that just die in the middle. I will paint and finish this, even if no one comments or replies lol. Anything less is just rude on my part

So now that I got the straps in place. I used some JB Kwik steel epoxy to fill in the face plate voids roughly. I know, I know. Its not artist grade fancy Aves epoxy. I still love it. Its an air dry, two part sculptabke epoxy reinforced with steel powder. It sands beautifully and takes paint well.. . . Plus I had like 4 containers of it. . . .soooo.

At this point it looks amazing!!!! . . .. . .just kidding lol. It looks like garbage. Please please please check the next post, I clean it up there!
 

Attachments

  • 20201222_094228.jpg
    20201222_094228.jpg
    1.7 MB · Views: 179
  • 20201222_094230.jpg
    20201222_094230.jpg
    1.5 MB · Views: 178
  • 20201222_094233.jpg
    20201222_094233.jpg
    1.9 MB · Views: 195
Ok! Now I use my handy random orbital palm sander to knock that putty back as much as I can.

Also worth mentioning. The seam on the dome. Ugghhhh its gnarly. Having been building 3d printed props for a while now I like to weld parts. I use a soldering iron to jab into the seam with a shallow series of cuts and then smooth over them, essentially blending the plastic together.
The plastic that this helmet is made of just screams" no glue will stick to me, I dare your to try and epoxy or super glue anything to me"
So with the plastic taunting me. I fired up my soldering iron and welded that little $%#@

I did the inside and outside of the seam.
 

Attachments

  • 20201223_100802.jpg
    20201223_100802.jpg
    987.2 KB · Views: 182
  • 20201223_100759.jpg
    20201223_100759.jpg
    1.1 MB · Views: 192
  • 20201223_110357.jpg
    20201223_110357.jpg
    1.6 MB · Views: 177
  • 20201223_110517.jpg
    20201223_110517.jpg
    1.6 MB · Views: 189
Now, I used Bondo brand body filler ( the red glazing putty that air dries, not the 2 part heavy grade stuff) to smooth out the dome seam and the cheeks. I apply this with an old rubber phone screen squeegee, and then sanded and hit everything with a bonding and surface adhesion primer. Rustoleum brand gray.

I should also mention I masked the light on the RF stalk with some liquid masking ( some old Parma RC racing stuff. Same stuff as Humbrol or Windsor and Newton).
 

Attachments

  • 20201225_114634.jpg
    20201225_114634.jpg
    1.9 MB · Views: 190
  • 20201225_114638.jpg
    20201225_114638.jpg
    1.7 MB · Views: 181
  • 20201225_114630.jpg
    20201225_114630.jpg
    1.9 MB · Views: 196
Ok, so now I can see what carnage i have caused. I just hit the cheeks and dome with another 2 rounds of glazing putty and sanded and in between I coated the whole helmet with Rustoleum sealing and sandable( similar but different than thier filler primer) primer.

Whew! Now we have a good canvas to paint a cartoony Droids/Holiday edition helmet! Yay. Now this is where I leave you all for now, going to get some blue rattlecan color and coat it then fire up the airbrush to shade and start weathering this thing.

Thank you all for looking and I will update soon.
 

Attachments

  • 20201226_110747.jpg
    20201226_110747.jpg
    1.6 MB · Views: 212
  • 20201226_110731.jpg
    20201226_110731.jpg
    1.5 MB · Views: 197
  • 20201226_110726.jpg
    20201226_110726.jpg
    1.4 MB · Views: 200
  • 20201226_110720.jpg
    20201226_110720.jpg
    1.5 MB · Views: 200
  • 20201226_110715.jpg
    20201226_110715.jpg
    1.5 MB · Views: 223
Very nice project. I love the table. A little wine and some belted .308 and away we go. Just for grins, throw in a pic of the whole table top. Did you construct it?
Look forward to the paint up.
 
Thank you for the compliments! Yes my wife and I built the bartop, its sort of a "his and hers " table. Wine corks from the many bottles she has killed lol and all of my favorite rounds, 9mm, 40, 45, 7.62×39, .223, 300blkout, 308 belted(homage tot he minigun), and 50cal. Lots of months collecting the ammo and its built on an old door, that I then framed a lip around and poured about 15 gallons of bartop epoxy in at about 2 gallons at a time. It took forever but its super tough and we love it! It weighs about 200 lbs ish ( maybe a little less, maybe more.).
Thank you again for the kind words, i hope to have some paint updates soon!
 

Attachments

  • 20200328_191314.jpg
    20200328_191314.jpg
    2.7 MB · Views: 197
  • 20200328_191339.jpg
    20200328_191339.jpg
    2.2 MB · Views: 190
  • 20200328_191335.jpg
    20200328_191335.jpg
    2.1 MB · Views: 183
  • 20200328_191319.jpg
    20200328_191319.jpg
    2.4 MB · Views: 196
Also chibobber, love the Rick and Morty reference, literally in my day job and my hobby, when I am about to do something where there is no return once I begin, in my head I hear Rick say " aaaannndddd away we gooo" hahah
 
Hoyt,
Actually the "and away we go" is a my generation(child of the 50's-60's) reference to the late great Jackie Gleason. I thick Rick stole it.;)
Bob
Look up the "Great one". You will be amused.
 
Nice! Yeah I was really worried that the mandible would be a little too large after reworking, but I think they are ok. It adds to the cartoony feel of it. I just slapped the initial chipping coat of a light blue on( the color that will be seen on the edges of the chips) so ill throw some pics up shortly.

I got a few resin kits from the fam, I believe one is from etsy, and the other was some generac kit from ebay.

I asked for these before I did any research on TDH and now I am trying to figure out if they were/are legit or if they may be recast. I dont want to insult or degrade the amazing sellers here so I will do more research to determine thier origins before I post paint threads on them. They are beautiful castings and I want to share the work I will be doing with the world but its not right to the original sculptors/makers if I find they are recast. Of course the etsy makers have no return policies and one I believe came from eBay so im not sure what I will do with them.

Since I have been lurking I have however purchased items from sellers on the forum and verified original products ( some quest design stuff straight from them and some gauntlets from Man of War).

I'm def not trying to kick up dust and controversy as a newbie so this old hasbro reboot is a good start.

My bread and butter has always been weathering, I started into doing commission work by painting 1/6 scale figures and sideshoe 1/4 scale statues for people.

Anyways. Thank you all for the comments and kind support! I cant wait to show you my (humble) paintwork on this.
I am by no means an amazing painter, im intermediately skilled at best, but some may get a kick out of my work.

Just a skill level assessment, her is a converted R5D4 I did for s customer, he had a Sideshow 1/4 R2-D2 that broke, and I printed an R5D4 head and painted it to match and repainted the body panels on R2 to match.

Once again. Im no SuperJedi and I would classify myself as sort of skilled at best, I love Boba and I have learned so much from lurking on the forums thats its time for me to give back and produce some content.
 

Attachments

  • 20200615_105801.jpg
    20200615_105801.jpg
    1.7 MB · Views: 169
  • 20200615_105747.jpg
    20200615_105747.jpg
    1.7 MB · Views: 163
  • 20200615_105814.jpg
    20200615_105814.jpg
    2.1 MB · Views: 165
  • 20200615_105825.jpg
    20200615_105825.jpg
    1.4 MB · Views: 162
  • 20200615_105805.jpg
    20200615_105805.jpg
    1.9 MB · Views: 169
  • 20200615_105809.jpg
    20200615_105809.jpg
    2 MB · Views: 167
Last edited:
First light blue chipping coat is on. This will be the light blue areas around the base silver/gunmetal chips that will show through. Gonna hit it with clearcoat then start masking. I am only doing a few chips and some subtle damage. Im not going all out, more of a freshly painted but somewhat scratched helmet.
 

Attachments

  • 20201226_185618.jpg
    20201226_185618.jpg
    1.9 MB · Views: 184
  • 20201226_185613.jpg
    20201226_185613.jpg
    2 MB · Views: 160
  • 20201226_185622.jpg
    20201226_185622.jpg
    1.9 MB · Views: 169
  • 20201226_185627.jpg
    20201226_185627.jpg
    1.6 MB · Views: 166
  • 20201226_185631.jpg
    20201226_185631.jpg
    1.9 MB · Views: 176
Hoyt,
Actually the "and away we go" is a my generation(child of the 50's-60's) reference to the late great Jackie Gleason. I thick Rick stole it.;)
Bob
Look up the "Great one". You will be amused.
You know that makes sense, so much of Rick and Morty is reference humor. Awsome, ill check that out man, you learn somthing new everyday!
 
So I finally have a day off. I used the liquid masking to start the first layer of damage.

At this point I am really just messing around. I'm getting used to the medium and shape of the helmet. I'm testing how my paints react to the liquid mask and how easily it comes up( surprisingly easy so im digging this Parma liquid mask, also its a huge container, I have enough to do like 200 helmets!).

The damaged areas is roughly, I repeat "roughly" based on ESB damage areas. I, in no way, shape, or form intend to replicate any layering and damage in any real way. Im just free handing some layers and then going back and doing topical applications followed by airbrushed weathering and pigment powders.

I plan on topically painting the silver areas and then some darker chipping as I got so excited to lay color on I forgot to base the helmet in silver. As this is just a fun test to shake loose the cobwebs, I figured I'd see how topical mixes with layering.

Well, thats the plan anyway. We will see!
 

Attachments

  • 20201230_085928.jpg
    20201230_085928.jpg
    2 MB · Views: 162
  • 20201230_085932.jpg
    20201230_085932.jpg
    2 MB · Views: 155
  • 20201230_085937.jpg
    20201230_085937.jpg
    2.1 MB · Views: 164
  • 20201230_085951.jpg
    20201230_085951.jpg
    1.9 MB · Views: 162
  • 20201230_090009.jpg
    20201230_090009.jpg
    1.9 MB · Views: 157
Ok, so just messing around with different layers. I know most people only put the darker blue on the under cheeks, but me being me, I wanted to experiment with some different tones and colors.

So all this will be weathered and I still need to do the hand paint layers ect. So this is all a bit harsh looking now. I know most like to do one panel at a time but im more of a , do the overall look and steps then go back and fine tune each section.

I promise, this will look so much better once I finish hand painting the scratches, metal work, and then airbrush the shading and weathering, hand paint some finer weathering and go in for the final subtle pigment chalk layer.

Oh, also, in my infinite skill (jk) I managed to peel off some layers with the tape!

I'm just going to roll with it and repaint those sections and blend it in with the paint scratches. . . . I knew it was going too well, especially with this type of plastic.
 

Attachments

  • 20210102_150844.jpg
    20210102_150844.jpg
    2 MB · Views: 155
  • 20210102_150838.jpg
    20210102_150838.jpg
    2.1 MB · Views: 156
  • 20210102_150834.jpg
    20210102_150834.jpg
    2.1 MB · Views: 148
  • 20210102_150818.jpg
    20210102_150818.jpg
    1.5 MB · Views: 151
  • 20210102_150825.jpg
    20210102_150825.jpg
    2 MB · Views: 154
  • 20210102_150830.jpg
    20210102_150830.jpg
    1.5 MB · Views: 151
Well, after getting all the layers on, man, I did not like the way it was looking.

Did I mention I am just messing around with this to get used to the liquid masking agent and paint techniques on the shapes. . . . Eh so. . . .

I repainted it. . .the whole thing. I laid my two colors on with masking in between in more or less random but familiar spots.
 

Attachments

  • 20210109_095406.jpg
    20210109_095406.jpg
    2.2 MB · Views: 139
  • 20210109_095411.jpg
    20210109_095411.jpg
    2.1 MB · Views: 150
  • 20210109_095417.jpg
    20210109_095417.jpg
    2 MB · Views: 124
  • 20210109_095420.jpg
    20210109_095420.jpg
    2 MB · Views: 126
  • 20210109_095425.jpg
    20210109_095425.jpg
    1.9 MB · Views: 128
  • 20210109_095430.jpg
    20210109_095430.jpg
    1.5 MB · Views: 128
So, now that I have it back to the more basic paint layers. I then proceeded to use a Molotov pen to do the silver chipping.

I believe my main issue with the original paint work was that I tried to layer a darker color on the mandible areas to mimic the "real" helmet.

I find now that thw Holiday helmet is best done with only the two colors, the main color and the darker "lower mandible" area.

Further, I find that I prefer a cleaner non chipped version or very lightly weathered ( something I find myself incapable of doing apparently, as you will see).

I tend to paint things very dramatically and my life long battle when prop building has been to restrain myself from just weathering and shading everything to death.

After the Molotov pen detail( this was really just an excuse to try them after watching Adam Savage go on about them and finding that the local Hobby Lobby started stocking them) I shaded the helmet with black acrylic through the airbrush.

Having gone pretty hard with that, I then misted some of the original color on to tone it down and hit it with a matt clearcoat.

The next steps will be going back in with a silver and highlight some of the chipping( thus giving the silver areas tonal depth) and selectively chipping and shading with a brush with black and brown tones.

Then I need to paint the ears and RF stalk.
 

Attachments

  • 20210109_134232.jpg
    20210109_134232.jpg
    1.6 MB · Views: 144
  • 20210109_134241.jpg
    20210109_134241.jpg
    1.6 MB · Views: 138
  • 20210109_134250.jpg
    20210109_134250.jpg
    1.6 MB · Views: 155
  • 20210109_134257.jpg
    20210109_134257.jpg
    2 MB · Views: 147
  • 20210109_134317.jpg
    20210109_134317.jpg
    2.1 MB · Views: 135
  • 20210109_134313.jpg
    20210109_134313.jpg
    1.9 MB · Views: 140
Just a few more pics. Like I said, I definitely went overboard on the damage on this one but ehh, its been a fun project. If it were a nice casting like an MC, RS, Animefan, or Fett Pride/Wasted Fett then I would definitely go the cleaner look route.

The whole point of modding the old hasbro was that its basically a trash helmet. So its doing its job of helping me figure out what is easy, what isn't. What I like. What I dont and what I need to keep myself from doing.

So, on to the stage of what I call "enhancements " hand detailing to pull the shapes out and make it a bit sharper.

So this is what it looks like in natural light before the hand detailing.
 

Attachments

  • 20210109_135804.jpg
    20210109_135804.jpg
    2 MB · Views: 146
  • 20210109_135810.jpg
    20210109_135810.jpg
    2 MB · Views: 155
  • 20210109_135817.jpg
    20210109_135817.jpg
    1.9 MB · Views: 143
  • 20210109_135831.jpg
    20210109_135831.jpg
    1.9 MB · Views: 155
* Molotow pen. Not Molotov pens. Molotov pens are very different and have a much more destructive effect on your paint work. . . . .joking. auto correct on my phone is my nightmare
 
This thread is more than 3 years old.

Your message may be considered spam for the following reasons:

  1. This thread hasn't been active in some time. A new post in this thread might not contribute constructively to this discussion after so long.
If you wish to reply despite these issues, check the box below before replying.
Be aware that malicious compliance may result in more severe penalties.
Back
Top