You are using an out of date browser. It may not display this or other websites correctly.
You should upgrade or use an alternative browser.
You should upgrade or use an alternative browser.
Slave1Pirate's Aluminum ROTJ Hero Level 2 Build PIC HEAVY
- Thread starter Slave1Pirate117
- Start date
Slave1Pirate117Hey everyone! So besides a few tree limbs we had no damage from hurricane Ian although it got pretty nasty, we were lucky. We never lost power but it flickered constantly and that meant no internet.
Glad to hear that all is well on the homestead and that family is safe! This is next level work my good sir! I have a co-worker/friend that I talk to daily. I know he is good with metal working as a hobby. And, it's just my ignorance but I legit thought that when you first posted this thread that it was pure blacksmithing type work.
I totally thought you had a forge, an anvil, hammer and a tub of cool water. Again, I know nothing when it comes to working with metal. In talking with my buddy it sounded like there are not too many blacksmiths left as the technology today makes the metal fabrication process easier than beating/shaping a piece of heated metal. And that Blacksmithing today is more viewed as an art. After getting some education on what it takes - still this looks like it is difficult work. I definitely applaud you! Looking forward to seeing more of this come together!
-Iron
Slave1Pirate117
Hunter
Lmao you can't do that with aluminum. Besides....it would be terribly heavy!Slave1Pirate117
Glad to hear that all is well on the homestead and that family is safe! This is next level work my good sir! I have a co-worker/friend that I talk to daily. I know he is good with metal working as a hobby. And, it's just my ignorance but I legit thought that when you first posted this thread that it was pure blacksmithing type work.
View attachment 230155
I totally thought you had a forge, an anvil, hammer and a tub of cool water. Again, I know nothing when it comes to working with metal. In talking with my buddy it sounded like there are not too many blacksmiths left as the technology today makes the metal fabrication process easier than beating/shaping a piece of heated metal. And that Blacksmithing today is more viewed as an art. After getting some education on what it takes - still this looks like it is difficult work. I definitely applaud you! Looking forward to seeing more of this come together!
-Iron
Well, not if you're like Kate from the 2001 movie "A Knights Tale"....Lmao you can't do that with aluminum. Besides....it would be terribly heavy!
Hahaha!
-Iron
Attachments
Slave1Pirate117
Hunter
Thanks Budafett!Woah that is turning out great!
Slave1Pirate117
Hunter
Took the plunge today! The t-visor is here!


I have some clean up around the edges but it looks pretty good!
I have some clean up around the edges but it looks pretty good!
Slave1Pirate117
Hunter
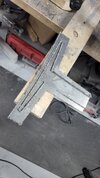
Today I started the process of thickening the metal around the t visor. I cut the shape out on the plasma cutter.
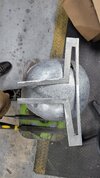
I rolled it in the rollers.
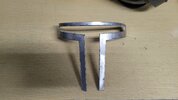
After a dry fit, I realized I didn't need the upper portion of the filler piece. So I cut that off so I had a left and right filler piece.
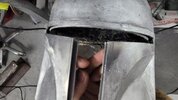
I began welding the left side in place.
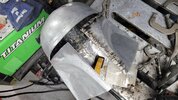
I cleaned it up and welded the other side in place.


I rolled it in the rollers.

After a dry fit, I realized I didn't need the upper portion of the filler piece. So I cut that off so I had a left and right filler piece.

I began welding the left side in place.

I cleaned it up and welded the other side in place.
Slave1Pirate117
Hunter
So today we tackled the backplate that I put aside. I decided that I NEEDED to make cuts in the backplate if I was going to make it fit me right. So I nervously decided where I was going to make my cuts.
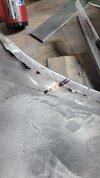
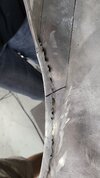
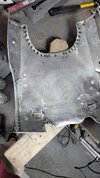
After dome shaping I also realized I was going to need more cuts.
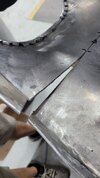
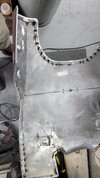
I shaped and welded and contoured it to fit. Wifey helped me get it right. So here are the results. I forgot to get pics of me wearing it.


After dome shaping I also realized I was going to need more cuts.


I shaped and welded and contoured it to fit. Wifey helped me get it right. So here are the results. I forgot to get pics of me wearing it.
Slave1Pirate117
Hunter
Today a nervously cut out the back of the helmet. I fitted the pieces into place and welded the 1st level. The second level "key slot plate" will need to be done tomorrow as well as finishing the 1st level welding.


Slave1Pirate117
Hunter
So I welded in the recess plate a little more. This precise welding without warping the aluminum was difficult.
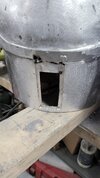
I welded in a key slot plate and it was crooked and warped because it was so thin. I had to remove it and try again with another. I cut out several anticipating this.
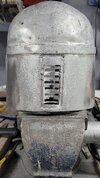
I welded in the second one and it was pretty decent. I intend to use 2 part epoxy to fill in all the pinholes and small gaps for fear of melting the aluminum too much. I also finished up the thickening around the t visor and made sure the opening was proportional.


I welded in a key slot plate and it was crooked and warped because it was so thin. I had to remove it and try again with another. I cut out several anticipating this.

I welded in the second one and it was pretty decent. I intend to use 2 part epoxy to fill in all the pinholes and small gaps for fear of melting the aluminum too much. I also finished up the thickening around the t visor and made sure the opening was proportional.
Slave1Pirate117
Hunter
Thanks Buda!That looks awesome!
Slave1Pirate117
Hunter
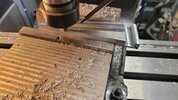
So yesterday I started on my left ear. I found some aluminum bar stock I had lying around and began working it.
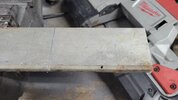
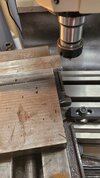
I began by machining the bottom angle
Then I move onto the lip.
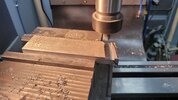
Then I surfaced the area where the bevel section is.
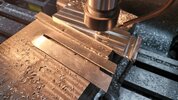
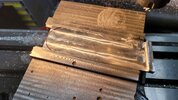
A quick test fit.
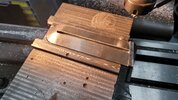
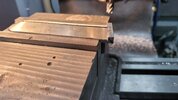
And the angle at the lower lip.
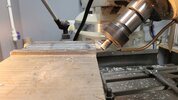
I miss measured though and may need to start over


I began by machining the bottom angle
Then I move onto the lip.

Then I surfaced the area where the bevel section is.


A quick test fit.


And the angle at the lower lip.

I miss measured though and may need to start over
Slave1Pirate117
Hunter
Today was such an exciting day! And nervracking to say the least. Today we endeavored to attach armor plates to Arkady's flight vest!
Alright so I deliberated on the best way to get the armor mounting holes marked out for some time and today I committed to the one I thought best. Drill holes in my armor plates!
I know what you're thinking: What?! Are you crazy! But check it out. My armor is aluminum and weldable. So it's a super easy fix. So what we did was drill holes in all grommet locations through the armor plates. As shown by wifey in this photo.
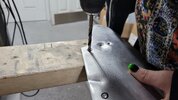
After all the holes were drilled, she was able to align all my armor plates and simply mark the hole locations on the flight vest. From there we went to punching and grommet setting. We use grommets all the time for our pirate costuming business however we misplaced it and had to buy a retail set from home depot. It worked just fine.
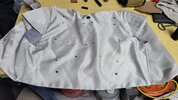
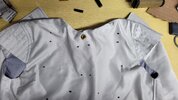
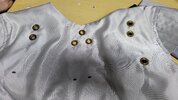
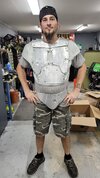
At this point we were able to mock up the panels with through bolts and see if our grommets still aligned with our holes in the armor plates. Bolta Fett at your service! I admit it looks hilariously ridiculous with the bolts hanging out but I'm content with the results. The left peck has some wierd shaping going on near the diamond but I have already started correcting that.
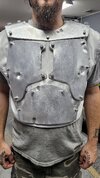
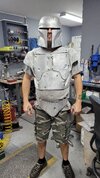
I still feel like the helmet is too tall but maybe once the ears are on and padding installed, things should start to be more fitting.
So let's talk about my bolting configuration. The heads of the bolts are going to be removed and the studs will simply be welded into place in the exact holes that are drilled in every armor plate. The holes will be filled in by those studs and the welds will be ground down and sanded and its like it never happened. The nuts on the back side are fantastic! I decided to use furniture nuts. They are flat and use an Allen key to tighten them. We modified 25 of them for the armor with 2 extra for replacements if necessary. We simply shortened them down to the thickness of the grommet so the armor doesn't flop. They are also completely flat against my chest and collar bone so there was no digging in whatsoever. Check out how it looks from the inside!


We had a blast today! Tomorrow we deal with the pauldrons and stud welding!

Alright so I deliberated on the best way to get the armor mounting holes marked out for some time and today I committed to the one I thought best. Drill holes in my armor plates!
I know what you're thinking: What?! Are you crazy! But check it out. My armor is aluminum and weldable. So it's a super easy fix. So what we did was drill holes in all grommet locations through the armor plates. As shown by wifey in this photo.

After all the holes were drilled, she was able to align all my armor plates and simply mark the hole locations on the flight vest. From there we went to punching and grommet setting. We use grommets all the time for our pirate costuming business however we misplaced it and had to buy a retail set from home depot. It worked just fine.


At this point we were able to mock up the panels with through bolts and see if our grommets still aligned with our holes in the armor plates. Bolta Fett at your service! I admit it looks hilariously ridiculous with the bolts hanging out but I'm content with the results. The left peck has some wierd shaping going on near the diamond but I have already started correcting that.


I still feel like the helmet is too tall but maybe once the ears are on and padding installed, things should start to be more fitting.
So let's talk about my bolting configuration. The heads of the bolts are going to be removed and the studs will simply be welded into place in the exact holes that are drilled in every armor plate. The holes will be filled in by those studs and the welds will be ground down and sanded and its like it never happened. The nuts on the back side are fantastic! I decided to use furniture nuts. They are flat and use an Allen key to tighten them. We modified 25 of them for the armor with 2 extra for replacements if necessary. We simply shortened them down to the thickness of the grommet so the armor doesn't flop. They are also completely flat against my chest and collar bone so there was no digging in whatsoever. Check out how it looks from the inside!
We had a blast today! Tomorrow we deal with the pauldrons and stud welding!
Slave1Pirate117
Hunter
So! Today was a busy day! We did lots of things! First up, the cod piece and kidney plate Boba-Thong. I drilled a hole in the cod piece and counter sunk it for a counter sink bolt. I wish I had thought of this for all the armor plates because it worked so well!
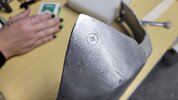
I tightened a nut and washers to the screw to hold it in place in order to weld it.
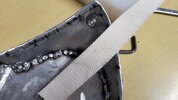
The head got welded over and ground down so it looks like there was never a hole drilled in it. The same was done for the cod piece. The nuts and washers were removed and replaced with a fender washer and lock nut. I ground down any left over protruding bolts. Here is the result.
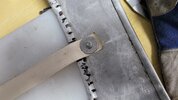
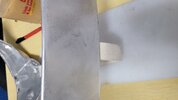
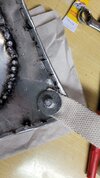
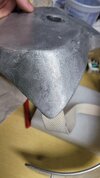
After that the wifey and I continued the process with all the bolts on the armor pieces for the flight vest. No more Bolta Fett! Tell me, what do you all think?


I tightened a nut and washers to the screw to hold it in place in order to weld it.

The head got welded over and ground down so it looks like there was never a hole drilled in it. The same was done for the cod piece. The nuts and washers were removed and replaced with a fender washer and lock nut. I ground down any left over protruding bolts. Here is the result.


After that the wifey and I continued the process with all the bolts on the armor pieces for the flight vest. No more Bolta Fett! Tell me, what do you all think?
Slave1Pirate117
Hunter
Do any of you following this thread know anyone or happen to have extra or half built gauntlets I could borrow in order to get measurements from? I am trying to draw these in my 3d modelling software so that I can make 2d templates in order to make them out of sheet metal. I appreciate any info or advice to this end!
Last edited:
Slave1Pirate117
Hunter
Had these large pieces of rancor hide in our workshop. Which one do you like best for boba's ammo belt? The even toned one is brand new and lighter in color but can be weathered. The darker and more worn couch leather could work too but is already weathered.
Attachments
Slave1Pirate117
Hunter
Thanks Hawk! Your build is looking dope too!This is insane! Looks great! You've been putting in some work man. Love it
Last edited:
Slave1Pirate117
Hunter
I started working on a couple other things in between other OTHER things. Here is a scale template of Batninja's ammo pouch template. Free to use. I am also working on something that will make making these pouches usable and easy to do by anyone.
Attachments
Last edited:
Similar threads
- Replies
- 3
- Views
- 364


