Slave1Pirate's Aluminum ROTJ Hero Level 2 Build PIC HEAVY

Hello everyone! Today I began working on some of the pieces I cut yesterday.

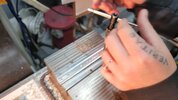
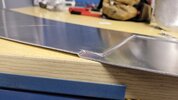
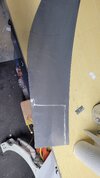
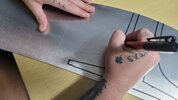
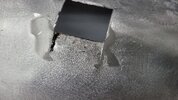
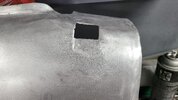
At first I wanted to test the stencil I made and printed on the helmet. I am doing the helmet face different this time so I will make the cut outs AFTER the face is shaped. I cut along the lines with a razor knife to score the aluminum for me to follow after the paper is removed.
20220827_091229.jpg20220827_092026.jpg

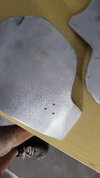
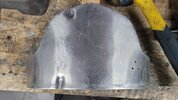
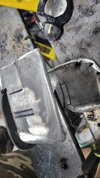
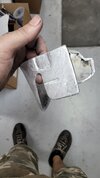
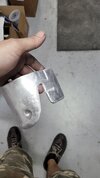
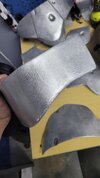
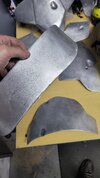
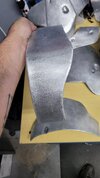
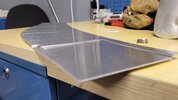
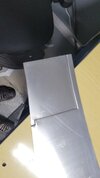
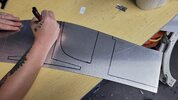
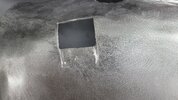
After that, I moved on to some armor parts. The first I did was the kidney plate. I started with the largest bends first.
20220827_093816.jpg20220827_093827.jpg20220827_093837.jpg20220827_093832.jpg
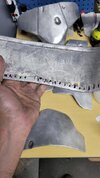
I then began bending the small tabs
20220827_094355.jpg20220827_094358.jpg
Then it was time to shape it to my waste
20220827_095059.jpg20220827_095414.jpg20220827_095814.jpg20220827_095818.jpg20220827_095823.jpg20220827_095829.jpg
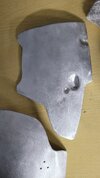
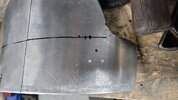
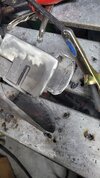
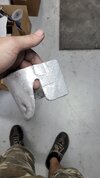
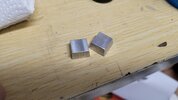
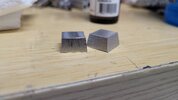
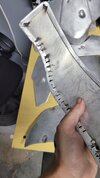
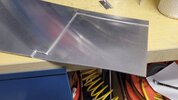
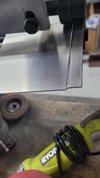
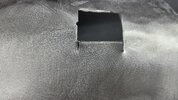
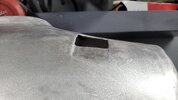
I moved on to the cod piece. The first thing I wanted to do was put the offsets in before bending the hems that way the hems didn't interfere with the bead roller.
20220827_100610.jpg20220827_102013.jpg
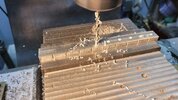
A bead roller is a manual or motorized machine the puts beads or offsets in sheet metal. Changing the rollers on the end makes different shapes. In this case I wanted an offset on either side of the central cod piece as it should be. Doing this allows less material while providing the same shape.
20220827_102016.jpg20220827_102020.jpg
20220827_102728.jpg20220827_102734.jpg
20220827_102738.jpg
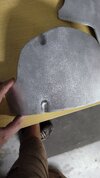
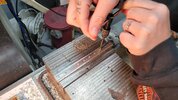
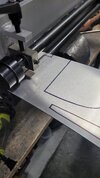
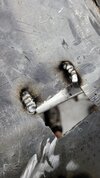
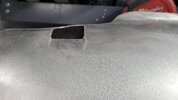
After that I moved on the bending the hems tabs. Btw, the point of the hems is to make the metal look heftier than it is and to provide softer edges that won't cut cloth or skin.
20220827_103918.jpg20220827_103921.jpg20220827_105938.jpg20220827_105943.jpg
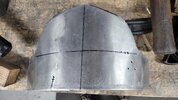
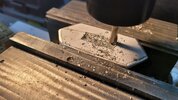
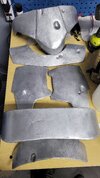
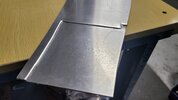
I then started shaping the central cod area to be more bowed out and shaped to my waste.
20220827_110441.jpg20220827_110447.jpg20220827_110541.jpg
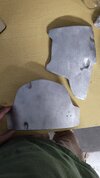
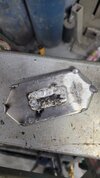
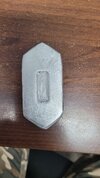
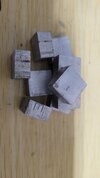
So I was able to complete these two pieces. I will need to weld all the seams so they look as if they are solid and of course the dents that make it Boba's armor.
20220827_110657.jpg20220827_110700.jpg20220827_110704.jpg20220827_110706.jpg
Thanks for following along!
 
So today I wanted to finalize the cod piece. I got pretty dang close! Here is the lower section that needs to be shaped and welded to the cod piece.
20220828_101039.jpg20220828_101046.jpg
While I started on that, the wifey was bending tabs on the other pieces and cleaning the dross of the parts from the plasma cutter.
20220828_101106.jpg20220828_101109.jpg
I began shaping the lower piece and gave up and welded and shaped it along as I welded it.
20220828_111147.jpg20220828_131224.jpg20220828_135408.jpg20220828_135410.jpg20220828_135416.jpg
Now for dents. I used a piece of wood in the vice at an angle and drilled a hole to except the largest dent.
20220828_143437.jpg20220828_143837.jpg20220828_150622.jpg
Wifey kept bending tabs and feeding me parts to shape.
20220828_131233.jpg20220828_131305.jpg
The final pics for the day.
20220828_151427.jpg20220828_164220.jpg20220828_164228.jpg
 
So today I wanted to finalize the cod piece. I got pretty dang close! Here is the lower section that needs to be shaped and welded to the cod piece.
View attachment 228114View attachment 228116
While I started on that, the wifey was bending tabs on the other pieces and cleaning the dross of the parts from the plasma cutter.
View attachment 228117View attachment 228118
I began shaping the lower piece and gave up and welded and shaped it along as I welded it.
View attachment 228119View attachment 228120View attachment 228124View attachment 228125View attachment 228126
Now for dents. I used a piece of wood in the vice at an angle and drilled a hole to except the largest dent.
View attachment 228133View attachment 228134View attachment 228135
Wifey kept bending tabs and feeding me parts to shape.
View attachment 228121View attachment 228122
The final pics for the day.
View attachment 228136View attachment 228137View attachment 228138
Awesome work!
 
I worked on the abdomen panel and left pectoral panel today. Made dents, drilled holes, welded seams and ground them down. I'm getting there!
 

Attachments

  • 20220831_163126.jpg
    20220831_163126.jpg
    1.7 MB · Views: 61
  • 20220831_163124.jpg
    20220831_163124.jpg
    1.7 MB · Views: 61
  • 20220831_163121.jpg
    20220831_163121.jpg
    1.7 MB · Views: 65
  • 20220831_163118.jpg
    20220831_163118.jpg
    1.6 MB · Views: 64
  • 20220831_131511.jpg
    20220831_131511.jpg
    2.7 MB · Views: 61
  • 20220831_130533.jpg
    20220831_130533.jpg
    2.7 MB · Views: 59
  • 20220831_130530.jpg
    20220831_130530.jpg
    2.6 MB · Views: 63
Today I worked on sealing up the hems by welding them and grinding them in to make them all uniform.
 

Attachments

  • 20220901_140216.jpg
    20220901_140216.jpg
    1.3 MB · Views: 64
  • 20220901_140223.jpg
    20220901_140223.jpg
    1.1 MB · Views: 60
  • 20220901_140225.jpg
    20220901_140225.jpg
    1.6 MB · Views: 58
  • 20220901_140227.jpg
    20220901_140227.jpg
    1.2 MB · Views: 59
  • 20220901_145835.jpg
    20220901_145835.jpg
    2.3 MB · Views: 58
  • 20220901_151312.jpg
    20220901_151312.jpg
    1.7 MB · Views: 63
  • 20220901_160916.jpg
    20220901_160916.jpg
    1.3 MB · Views: 59
  • 20220901_160918.jpg
    20220901_160918.jpg
    1.3 MB · Views: 61
  • 20220901_160919.jpg
    20220901_160919.jpg
    1.4 MB · Views: 61
Today wifey and I cut the aluminum blocks, surfaced them in the milling machine, drilled and threaded them and then put on the tapers. I also finished welding and grinding the kidney plate.
 

Attachments

  • 20220902_161827.jpg
    20220902_161827.jpg
    2.6 MB · Views: 58
  • 20220902_160845.jpg
    20220902_160845.jpg
    2.6 MB · Views: 52
  • 20220902_133258.jpg
    20220902_133258.jpg
    987.5 KB · Views: 56
  • 20220902_161829.jpg
    20220902_161829.jpg
    2.1 MB · Views: 58
  • 20220902_161830.jpg
    20220902_161830.jpg
    2.8 MB · Views: 56
  • 20220902_170839.jpg
    20220902_170839.jpg
    2.4 MB · Views: 57
  • 20220902_170844.jpg
    20220902_170844.jpg
    2.3 MB · Views: 55
  • 20220902_170806.jpg
    20220902_170806.jpg
    1.2 MB · Views: 54
  • 20220902_170808.jpg
    20220902_170808.jpg
    1.3 MB · Views: 53
  • 20220902_170811.jpg
    20220902_170811.jpg
    1.4 MB · Views: 52
  • 20220902_170815.jpg
    20220902_170815.jpg
    1.4 MB · Views: 55
  • 20220902_170817.jpg
    20220902_170817.jpg
    1.1 MB · Views: 57
  • 20220902_170825.jpg
    20220902_170825.jpg
    1.7 MB · Views: 57
Looking really great so far! I love how all the dents came out and your fabrication skills are awesome!
Thanks Pink! I've been machining and making star wars toys for myself since I was 12-13 although I've never done this intense of sheet metal work before.

I know! The dents are my favorite parts! I got all giddy when I put the first dent in lol.
 
Yesterday we couldn't work long. We traced the template that I had glued on previously with a razor knife, peeled off the template and traced the cuts with sharpie. Wifey cranked the handle while I guided the helmet wrap through along the lines. By using the step dies, it created the recessed sections on the helmet without forcing me to make layers in turn making the helmet heavier and more work making the layers look as if they were one piece.
 

Attachments

  • 20220903_114038.jpg
    20220903_114038.jpg
    2.3 MB · Views: 71
  • 20220903_114032.jpg
    20220903_114032.jpg
    2.2 MB · Views: 59
  • 20220903_114018.jpg
    20220903_114018.jpg
    2.4 MB · Views: 56
  • 20220903_114004.jpg
    20220903_114004.jpg
    2.2 MB · Views: 54
  • 20220903_114001.jpg
    20220903_114001.jpg
    1.9 MB · Views: 57
  • 20220903_113948.jpg
    20220903_113948.jpg
    844.1 KB · Views: 58
  • 20220903_113946.jpg
    20220903_113946.jpg
    1.2 MB · Views: 55
  • 20220903_110145.jpg
    20220903_110145.jpg
    942.2 KB · Views: 54
  • 20220903_110138.jpg
    20220903_110138.jpg
    1.2 MB · Views: 56
  • 20220903_104715.jpg
    20220903_104715.jpg
    2.4 MB · Views: 58
  • 20220903_104711.jpg
    20220903_104711.jpg
    2.7 MB · Views: 62
So we went in today to work on the last few armor pieces. Wifey began bending tabs on the back plate while I worked on bending tabs on the left knee and shaping it.
20220904_100453.jpg20220904_100459.jpg20220904_101923.jpg20220904_101927.jpg20220904_104131.jpg
As I began shaping the knee, the 2 ears were acting funny. I ran the flat knee through the bead roller to put in the step down which I had NOT done on the other knee until after I had shaped it. This created a weak point and both ears snapped off. I had to weld them back on.
20220904_114543.jpg20220904_114551.jpg20220904_114555.jpg20220904_120438.jpg20220904_120442.jpg20220904_114558.jpg
Wifey was done with the tabs on the backplate so here it is.
20220904_120422.jpg
I toiled over the angles until they looked right. This piece of armor had me very stressed to get it right even though you won't see most of it.
20220904_124655.jpg
The 1st 2 bends were a success.
20220904_124737.jpg
After this, I stressed like crazy trying to get this right. Here are the first adjustments.
20220904_125952.jpg
After awhile on beating and smacking and bending, this is where I ended up and called it quits. I'm not happy with it and it requires more tlc to get it right but it should work out.
20220904_141703.jpg20220904_141707.jpg20220904_141710.jpg20220904_141715.jpg
 
Ok......I have put some serious time into this backplate. I have been shaping this thing for days. My main issues were the stress points. The metal has many bends in opposing directions. When a bend is made and another bend must be done perpendicular to that bend, it doesn't cooperate. The metal tries to correct itself so there must be some relief between bends. I contemplated cutting it a few times to give the metal relief but I was afraid I was misunderstanding the metal and the relief I cut would be a waste so I kept at it. Once I had the majority of the bends close I decided to lock it down by welding all the hem tabs to make it a bit more rigid. Here are the images before welding and grinding.
20220907_112523.jpg20220907_112531.jpg20220907_112533.jpg
Then some more shaping and dialing it in closer. Here is where I am at now. Please be honest. How does it look? I'm actually quite happy with it.
20220908_094210.jpg
20220908_094216.jpg
 
Slave1Pirate117
Every time you post work about what you do to create this metal masterpiece, and you involve your wife. I kinda think of this....
Blacksmithing with the Wife.gif


I picture an anvil, a furnace, and a tub of water.
1662651143936.png


Seriously though, pretty inspiring work. That back armor is legit. Just out of curiosity, is your plan to get those rectangle holes (The raised portion) where you feed the straps through with another piece of metal and shaping it and welding it on?
1662651559454.png


-Iron
 
Lmao it's not that intense! That's funny.

Thanks! I kinda feel like it's right there too. Yes actually I am working on those now. I just made the cuts for the recessed strap trough, bent and welded them. Now I am working on cleanup.
 

Attachments

  • 20220908_112250.jpg
    20220908_112250.jpg
    3.2 MB · Views: 50
  • 20220908_112253.jpg
    20220908_112253.jpg
    2.8 MB · Views: 48
  • 20220908_113535.jpg
    20220908_113535.jpg
    1.5 MB · Views: 47
  • 20220908_113937.jpg
    20220908_113937.jpg
    3.5 MB · Views: 47
  • 20220908_113940.jpg
    20220908_113940.jpg
    2.3 MB · Views: 51
And here are the recessed strap troughs.
 

Attachments

  • 20220908_131328.jpg
    20220908_131328.jpg
    2.9 MB · Views: 52
  • 20220908_131326.jpg
    20220908_131326.jpg
    3.1 MB · Views: 56
  • 20220908_131321.jpg
    20220908_131321.jpg
    3.3 MB · Views: 50
  • 20220908_131319.jpg
    20220908_131319.jpg
    3.1 MB · Views: 50
Here is one of the strap louvers. It's a bit rough but it'll clean up.
20220908_142601.jpg20220908_142604.jpg20220908_142614.jpg20220908_142618.jpg
Welded the 1st louvers.
20220908_143935.jpg20220908_143937.jpg
Blended in the 1st louver and welded the second.
20220908_155456.jpg20220908_155459.jpg
Looking snazzy!
20220908_155502.jpg20220908_155508.jpg
And here is where I left off today. The right one needs a little more tlc but I'm almost there!
20220908_162904.jpg
20220908_162907.jpg
20220908_162911.jpg
20220908_162914.jpg
 
So today I did a little welding and some grinding and some touch ups to a few pieces. I made a few adjustments and drilled holes for mounting the cod piece and kidney plate.
20220912_132001.jpg20220912_132006.jpg
When I got home I donned on the jumpsuit and mocked up the parts I had to double check fitment. Wifey helped me suit up. Please give me your honest opinions! Does anything catch your eye that needs fixing? I am aware that I need to bend the collar down a wee bit.
Resized_20220912_171651.jpeg
Resized_20220912_171740.jpeg
Resized_20220912_171746.jpeg
Resized_20220912_171750.jpeg
Resized_20220912_171843.jpeg
Resized_20220912_171839.jpeg

The kidney plate requires adjustment as it is too loose.
Resized_20220912_171810.jpeg
 
This thread is more than 1 year old.

Your message may be considered spam for the following reasons:

  1. This thread hasn't been active in some time. A new post in this thread might not contribute constructively to this discussion after so long.
If you wish to reply despite these issues, check the box below before replying.
Be aware that malicious compliance may result in more severe penalties.
Back
Top